
Best Above-Ground Pool Liners to Buy in July 2026
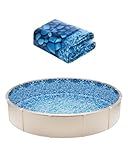
VEVOR 24-ft Round Above Ground Pool Liner, Overlap Pool Liners, Standard Gauge Vinyl, 48-to-54inch Wall Height, Designed for Steel Sided Above-Ground Swimming Pools
- PERFECT FIT FOR 24FT POOLS: TAILORED FOR SEAMLESS INSTALLATION ON 24FT POOLS.
- CUSHIONED COMFORT: SOFT SURFACE PROTECTS SKIN WHILE ENSURING A COMFY SWIM.
- DURABLE & VERSATILE: PREMIUM VINYL WITHSTANDS WEATHER; IDEAL FOR MULTIPLE USES.


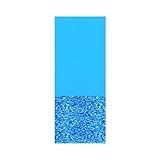
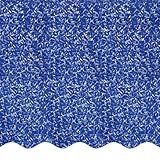
Swimline 18 Foot Round Durable 20 Gauge Vinyl Wall Overlap Pool Liner Cover for 48 and 52 Inch Above Ground Swimming Pools, Blue
- DURABLE DESIGN: ENJOY LONG-LASTING PERFORMANCE WITH DOUBLE-WELDED SEAMS.
- BEAUTIFUL AESTHETICS: ENHANCE YOUR POOL’S CHARM WITH A VIBRANT SWIRL PATTERN.
- HASSLE-FREE SETUP: QUICK INSTALLATION ENSURES MORE TIME FOR FUN IN THE SUN!
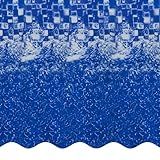
Smartline 24 ft Round Swimming Pool Liner | Tidal Surge | Overlap Style | 48-52 Inch Wall Height | 20 Gauge Heavy Duty Virgin Vinyl | Designed for Steel Sided Above Ground Swimming Pools
- PERFECT FIT GUARANTEED: MEASURE POOL SIZE FOR ULTIMATE COMPATIBILITY.
- VIBRANT OCEAN DESIGN: TIDAL SURGE PATTERN ENHANCES YOUR POOL’S APPEAL.
- EASY INSTALLATION: SIMPLE DRAPE-AND-SECURE METHOD FOR QUICK SETUP.
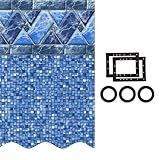
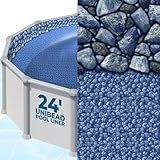
Smartline 24 ft Round Swimming Pool Liner | Stone Harbor | Unibead Style | 52 Inch Wall Height | 25 Gauge Vinyl | for Steel Sided Above Ground Pools | Gasket Kit Included
-
CLASSIC LOOK: TILED DESIGN ADDS ELEGANCE TO ANY POOL SETTING.
-
EASY INSTALLATION: HASSLE-FREE SETUP WITH VERSATILE UNIBEAD STYLE.
-
DURABLE QUALITY: LONG-LASTING MATERIAL AT AN AFFORDABLE PRICE.

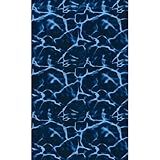
Smartline 18 ft Round Swimming Pool Liner | Boulder Swirl | Overlap Style | 48-52 Inch Wall Height | 25 Gauge Vinyl | for Steel Sided Above Ground Pools | Gasket Kit Included
- DURABLE BOULDER SWIRL DESIGN ENSURES LONG-LASTING, BUDGET-FRIENDLY POOLS.
- EASY INSTALLATION WITH NO BEAD RECEIVERS; PERFECT FOR FLAT-BOTTOM POOLS.
- INCLUDES UNIVERSAL GASKET SET TO PREVENT LEAKS AND CORROSION ISSUES.
SmartLine 24 ft Round Swimming Pool Liner | Sunlight | Overlap Style | 54 Inch Wall Height | 25 Gauge Heavy Duty Virgin Vinyl | Designed for Steel Sided Above Ground Pools
- DURABLE & AFFORDABLE: DURABLE SUNLIGHT PATTERN LINERS THAT SAVE YOU MONEY.
- EASY TO INSTALL: HASSLE-FREE OVERLAP DESIGN FOR A QUICK, SECURE SETUP.
- PREMIUM QUALITY: UV-RESISTANT VINYL ENSURES LONG-LASTING PERFORMANCE.
Shop Square 24 Foot Round Pool Liner for Above Ground Swimming Pools - Unibead Style, 52 Inch Wall Height, Standard Gauge, Durable Vinyl, for Steel Sided Above Ground Pools, Boulder Swirl
- PERFECT FIT FOR 24 FT POOLS: SECURES SNUGLY ON 52 WALLS!
- FLEXIBLE 2-IN-1 INSTALLATION: EASY SETUP FOR ANY POOL LINER NEEDS!
- DURABLE & FADE RESISTANT: BUILT TO LAST WITH VIBRANT COLORS YEAR-ROUND!
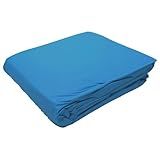
Swimline 24 Feet Solid Round Above Ground Swimming Pool Overlap, Standard Gauge Liner, Vinyl, Easy Installation, Blue
- DURABLE 20 GAUGE VINYL ENHANCES POOL LONGEVITY AND PERFORMANCE.
- FITS 48 AND 52 POOLS, PERFECT FOR A SNUG, SECURE INSTALLATION.
- CHEMICAL AND FADE-RESISTANT DESIGN FOR LASTING VIBRANT APPEARANCE.
Blue Wave Evening Bay Overlap 15 ft Round Pool Liner for Above-Ground Steel Wall Pools – Weather Resistant Standard Gauge Vinyl with Welded Seams - Dark Blue, Fits 48/54-In Depth Walls
- STUNNING DEEP BLUE DESIGN CREATES A SHIMMERING WATER EFFECT.
- DURABLE VINYL CONSTRUCTION RESISTS PUNCTURES FOR LONG-LASTING USE.
- UV PROTECTION ENSURES VIBRANT COLOR RETENTION THROUGH SEASONS.
Installing an above-ground pool liner can be a daunting task if you are unfamiliar with the process. However, by following these steps, you can successfully install a new liner for your above-ground pool:
- Prepare the pool: Start by assembling the pool frame according to the manufacturer's instructions. Ensure that the walls are clean and smooth, free from any debris or sharp objects that could potentially damage the liner.
- Measure and purchase a liner: Accurately measure the dimensions of your pool, including the length, width, and depth. Use these measurements to purchase a liner that fits your pool's specifications. Ensure you select a liner made specifically for above-ground pools.
- Drain the pool: Before installing a new liner, you need to drain the existing water in your pool. Using a submersible pump, remove the water from the pool until it is completely empty.
- Remove the old liner: If you are replacing an old liner, carefully remove it by loosening any clips or fasteners that hold it in place. Start at one end and work your way around the pool, ensuring that you remove the liner completely.
- Inspect the pool walls and bottom: Once the old liner is removed, inspect the walls and bottom of the pool for any damage or rough areas. Repair any cracks or sharp edges and remove any dirt or debris that may have accumulated.
- Install the new liner: Begin by laying the new liner flat near the pool. Carefully unfold it and position it in the center of the pool, ensuring that it covers the walls and bottom evenly.
- Smooth out the wrinkles: Using your hands, gently smooth out any wrinkles or folds in the liner to ensure it fits snugly against the walls and bottom of the pool. Start from the center and work your way outwards, progressively removing wrinkles as you go.
- Secure the liner: Attach the liner to the top of the pool wall using coping strips or other securing mechanisms provided by the manufacturer. These will hold the liner in place, ensuring it does not shift or move during use.
- Fill the pool: Once the liner is secure, begin filling the pool with water. Gradually fill it to the recommended water level, ensuring the liner settles evenly against the walls and bottom as the water rises.
- Adjust and finish: As the pool fills, keep an eye on the liner to ensure it remains smooth and properly aligned. Once full, trim any excess liner material and complete any finishing touches as recommended by the manufacturer.
Remember to consult the manufacturer's instructions specific to your above-ground pool and liner to ensure you follow any additional steps or recommendations.
How to measure the size of an above-ground pool liner?
To measure the size of an above-ground pool liner, you will need a few basic tools and some simple steps. Here's a guide to help you:
- Ensure the pool is empty: Make sure the pool is drained completely and the liner is dry before attempting to measure it.
- Gather the necessary tools: You will need a measuring tape and a pen and paper to record the measurements.
- Start with the pool width: Measure the width of the pool by stretching the measuring tape across the interior of the pool wall from one side to the other. Be sure to measure from the inside, not the outside, of the pool.
- Measure the pool length: Stretch the measuring tape along the length of the pool from one end to the other. Again, make sure to measure from the inside.
- Determine the depth: Measure the depth of the pool by starting from the top edge of the wall and extending the measuring tape down to the base of the pool floor. Take the measurement at multiple points around the pool and note the maximum depth.
- Measure the height: Measure the height of the pool wall by starting from the top edge and measuring down to the bottom of the wall. This measurement will be necessary if you're also replacing the pool wall material.
- Record the measurements: Note down all the measurements you have taken, ensuring they are accurate and clearly labeled.
These steps should provide you with the necessary measurements to determine the size of your above-ground pool liner. Remember to be precise as any inaccuracies may affect the fit of the new liner.
How to trim excess liner material after installation?
Trimming excess liner material after installation can be done by following the steps below:
- Gather the necessary tools: Grab a pair of sharp scissors or a utility knife, measuring tape or ruler, and a marker or pencil.
- Measure the area: Use a measuring tape or ruler to measure the length of the excess liner material that needs to be trimmed. Mark the measurement on the liner material, ensuring accuracy.
- Make a straight cut: Use the marker or pencil to draw a straight line along the marked measurement. This will serve as a guideline for the cutting process.
- Cut the material: Holding the scissors or utility knife at a slight angle, carefully cut along the marked line. Take your time to ensure a clean and precise cut. If using a knife, apply firm and even pressure to avoid tearing or ripping the material.
- Check for accuracy: Once the cut is complete, check that the trimmed area aligns properly with the installed liner. Make any necessary adjustments if needed.
- Clean up: Dispose of the excess liner material and clean up any debris left behind from the trimming process.
Note: It's important to exercise caution when handling sharp tools and always wear protective gloves if necessary. Make sure to read and follow any safety instructions provided with the tools being used.
How to attach a pool skimmer to the liner?
Attaching a pool skimmer to the liner involves a few steps. Here is a general guide to help you with the process:
- Select the appropriate location: Choose a spot on the pool wall that is close to the filter and pump system. Avoid any obstructions or fittings that might interfere with the skimmer installation.
- Cut an opening in the liner: Using a knife or a specialized skimmer hole-cutting tool, carefully cut out a hole in the liner. The hole should match the shape and size of the pool skimmer assembly you are using.
- Prepare the skimmer assembly: Attach the faceplate onto the skimmer body according to the manufacturer's instructions. Make sure all necessary gaskets, o-rings, and screws are in place.
- Position the skimmer: Insert the skimmer assembly into the opening on the pool wall. Ensure that it lines up with the hole in the liner and that the faceplate is properly aligned with the pool opening.
- Secure the skimmer: Using the provided screws or clips, secure the skimmer assembly to the pool wall. Be careful not to overtighten, as it may damage the liner or the skimmer assembly.
- Cut excess liner: Trim off any excess liner material around the skimmer hole, leaving a small overlap for sealing.
- Seal the skimmer: Apply a pool-safe silicone or adhesive sealant around the opening between the liner and the skimmer faceplate. This step is crucial to prevent any leakage between the liner and the skimmer assembly.
- Connect the plumbing: Connect the skimmer basket to the suction line plumbing inside the skimmer. This line is typically connected to the pool pump and filter system.
- Test the skimmer: Fill the pool with water and run the pump to ensure the skimmer is functioning properly. Check for any leaks or issues that may need adjustment or repair.
Always refer to the specific instructions provided with your pool skimmer assembly as each one may have slight variations in the installation process.
What is the role of a pool liner lock in the installation process?
A pool liner lock is used to secure the pool liner in place during installation. It is often installed along the top edge of the pool wall and holds the liner snugly against the wall, preventing it from sagging or shifting. The liner lock typically consists of a track or channel that is attached to the pool wall, and a locking strip that is inserted into the track to hold the liner in place. This helps to ensure a smooth and even installation of the pool liner, providing a neat and professional appearance.