
Best Closet Rod Installation Tools to Buy in July 2026
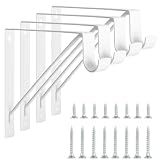
KOVOSCH 4 Pack Heavy Duty Closet Shelf & Rod Brackets, Wall Mounted Closet Shelf Brackets, 11 x 10.2 Inch Closet Shelf Brackets with Rod Support, White
- DURABLE STEEL CONSTRUCTION: LONG-LASTING, HEAVY-DUTY BRACKETS HOLD UP TO 300 LBS.
- SPACE-SAVING DESIGN: CLASSIC L-SHAPE MAXIMIZES STORAGE IN TIGHT AREAS.
- QUICK INSTALLATION: EASY SETUP IN 15 MINUTES WITH INCLUDED MOUNTING HARDWARE.


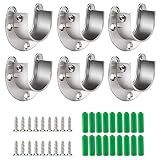
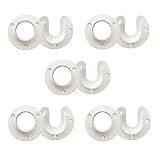
Cosweet 6 Packs Stainless Steel Closet Pole Sockets- Closet Rod End Supports, Flange Set Rod Holder with Screws for Easy Installation&Quick Removal (U Shaped)
-
SECURE FIT: U-SHAPED SOCKETS ENSURE TIGHT, RELIABLE SUPPORT FOR POLES.
-
VERSATILE USE: FITS POLES UP TO 1-1/4 INCHES; PERFECT FOR CLOSETS AND SHOWERS.
-
DURABLE QUALITY: HEAVY-DUTY STAINLESS STEEL FOR LONG-LASTING RUST RESISTANCE.
Gisafai 4 Pcs Closet Rod Center Supports 1-1/2 Inch Heavy Duty Metal Wall Mount Brackets for Shelf Closet Rod Clothes Storage(White)
- EXCEPTIONAL DURABILITY: CRAFTED FROM STEEL FOR LONG-LASTING RELIABILITY.
- HEAVY DUTY CONSTRUCTION: SUPPORTS SUBSTANTIAL LOADS, ENSURING STABILITY.
- EASY INSTALLATION: QUICK SETUP WITH INCLUDED HARDWARE FOR CONVENIENCE.
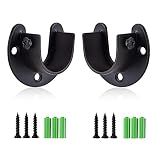
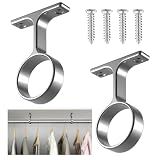
Rise age Stainless Steel Closet Rod Bracket, 1-1/4 Inch Diameter Closet Rod Holder 2 Pcs, Heavy Duty Curtain Rod Holder, Black Closet Rod Support with Screws
-
DURABLE BUILD: SOLID STAINLESS STEEL ENSURES LONGEVITY AND RUST RESISTANCE.
-
VERSATILE USE: IDEAL FOR CLOSETS, BATHROOMS, AND LAUNDRY ROOMS-ENDLESS APPLICATIONS!
-
QUICK INSTALL: USER-FRIENDLY DESIGN FOR FAST SETUP-NO HASSLE, NO FUSS!
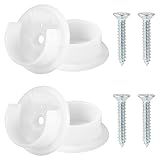
Design House Closet Rod Brackets, Fits Standard Closet Rods, Durable, White, 5-Pack Closet Rod Support Sockets, 2.75 in. Diameter x 0.88 in.W, 182717
- DURABLE PLASTIC SOCKETS SUPPORT LONG-LASTING CLOSET ORGANIZATION.
- FITS STANDARD RODS UP TO 1-5/16 IN FOR VERSATILE INSTALLATIONS.
- INCLUDES 5-PACK FOR COMPLETE SOLUTIONS AND EASY REPLACEMENTS.
LEIFIDE 2 Pcs 1 5/16 Inch Diameter Round Wardrobe Closet Rod Suspended Center Support with Installation Screws Curtain Closet Rod Ceiling Mount Bracket for Home Wardrobe (Polished Chrome)
-
DURABLE ZINC ALLOY: STRONG AND LONG-LASTING SUPPORT FOR HEAVY RODS.
-
EASY INSTALLATION: PUNCH-FREE DESIGN FOR QUICK SETUP AND WALL PROTECTION.
-
VERSATILE USE: IDEAL FOR CLOSETS, CURTAINS, AND DISPLAY RACKS ALIKE.
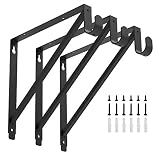
Heavy Duty Closet Rod & Shelf Brackets Clothes Hanger Pole Support Bracket Black 3 Pack
- SUPPORTS RODS UP TO 1.3 INCHES FOR VERSATILE STORAGE SOLUTIONS.
- INCLUDES DUAL SUPPORT FOR RODS AND SHELVES-MAXIMIZING SPACE.
- HEAVY-DUTY METAL CONSTRUCTION ENSURES DURABILITY AND SCRATCH RESISTANCE.
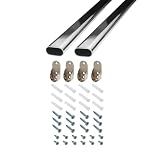
Outwater 36 Inch Steel Oval Closet Rod Kit, 9/16 Inch x 1-3/16 Inch Polished Chrome Heavy Duty Closet Hanging Rod with Metal Brackets, Wall Anchors and Screws, Pack of 2
- HEAVY-DUTY SUPPORT: HOLDS UP TO 75 LBS FOR RELIABLE EVERYDAY USE.
- MODERN DESIGN: POLISHED CHROME FINISH ENHANCES ANY CLOSET AESTHETIC.
- QUICK INSTALLATION: COMPLETE KIT FOR EASY SETUP IN ANY SPACE.
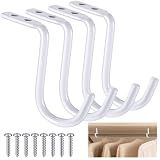
4pcs Closet Rod Holders, Plastic Tension Pole Bar Sockets for 1-3/8" Heavy Duty Wardrobe Tube Rail Support Bracket with Screws Fittings for Home Bathroom Shower Curtain Clothing Store (White)
-
COMPLETE SET INCLUDED: 2 PAIRS OF STURDY SOCKETS WITH SCREWS FOR EASY SETUP.
-
DURABLE & RELIABLE: REINFORCED PLASTIC CONSTRUCTION ENSURES LONG-LASTING SUPPORT.
-
VERSATILE COMPATIBILITY: FITS STANDARD RODS, PERFECT FOR CLOSETS AND SHOWERS.
To install a closet rod securely in a drywall closet, you need to ensure that it can support the weight of the clothes you'll hang. Begin by determining the appropriate height and length for the rod, taking into consideration the space needed for different types of clothing. Next, identify and locate the wall studs in your closet using a stud finder. Studs provide strong anchor points for your closet rod brackets. Mark the positions of these studs along the wall, making sure they are evenly spaced and at the right height for your installation. If it’s not possible to use studs at both ends of the rod, you can use secure drywall anchors designed for a significant weight load. After marking, drill pilot holes into the studs or insert the drywall anchors as needed. Attach the rod brackets using screws, ensuring they are level and firmly anchored. Once the brackets are securely in place, insert the closet rod, adjusting it to fit snugly between the brackets. Finally, test the installation by applying slight pressure on the rod to ensure it doesn't wobble or shift. This setup provides a stable and secure support for your clothing.
How to correctly measure for a corner closet rod?
Measuring for a corner closet rod involves a few specific steps to ensure that it fits properly and functions well in your space. Here's a guide to help you measure and plan for installing a corner closet rod:
- Determine the Type of Corner Rod: Angled Rod: Fits diagonally across a corner. Two Connected Rods: Meet at a right angle in the corner.
- Clear the Space: Remove any existing items or obstructions in the corner to ensure accurate measurements.
- Measure the Corner Width: Use a tape measure to determine the distance from each wall that forms the corner to the desired endpoint of the rod on that wall. Make sure the measurements reflect the usable space, taking into consideration any shelving or molding.
- Determine Rod Length: For Angled Rods: Measure straight across the corner from one wall to the other at about the level where the rod will be installed. This gives you the hypotenuse measure of a right-angle triangle formed by the walls and the rod. For Two Connected Rods: Measure each wall separately from the corner to where you want the rod to end on each side.
- Consider Clearance: Ensure there is adequate space for hangers to move along the rod freely without hitting the wall. Check if the corner or the connecting space allows for enough clearance between hangers when rods are placed at a right angle.
- Check for Leveling: Use a level tool to ensure that the planned rod placement allows for level hanging. This is crucial especially if floors or ceiling aren't even.
- Account for Rod Hardware: Allow extra space for any brackets or hardware that will be necessary to mount the rod. The hardware may require a few additional inches beyond the rod length to fit into the space.
- Physical Obstacles: Check for any obstacles like light switches, plugs, or other features that might interfere with rod placement, and adjust your measurements accordingly.
- Double-Check Measurements: Always double-check your measurements to avoid any mistakes. Consider using a laser measure for more accuracy if available.
- Choose the Correct Rod Size and Hardware: Purchase a rod that matches your measurements and compatible mounting hardware strong enough to support the weight of clothes.
After following these steps, you'll have an accurate plan to install a corner closet rod correctly.
What are the common mistakes in installing closet rods?
Installing closet rods might seem like a straightforward task, but there are several common mistakes that people make. Avoiding these can ensure a functional and secure installation:
- Incorrect Measurements: One of the most common mistakes is not measuring the closet space accurately. It's important to measure the width and height where the rod will be installed to ensure it fits properly.
- Improper Height: Installing the rod at the wrong height can lead to impractical use of space. Standard hanging height for a single rod is typically 68-72 inches from the floor. If you're planning double rods (for shirts or pants), the top should be around 80-84 inches and the lower one about 40-42 inches from the floor.
- Lack of Support: Closet rods need to support a lot of weight. Failing to use a middle support bracket for spans exceeding 4 feet can lead to bending or collapsing rods. It’s crucial to install enough supports especially for long rods.
- Poor Anchoring: Inadequate anchoring into drywall can cause rods to pull out over time. It's best to anchor into wall studs. If that's not possible, use heavy-duty wall anchors suitable for the weight load.
- Choosing the Wrong Type of Rod: Different materials can support different amounts of weight. Using a flimsy or undersized rod for heavy garments can lead to bending or breaking.
- Ignoring Levelness: Installing the rod without a level can result in a slanted rod, which is both visually unappealing and can cause clothes to bunch up on one side.
- Overloading: Even if installed correctly, a rod can only hold so much weight. Overloading can lead to sagging over time. Choose rods designed for heavy-duty use if you have many clothes.
- Inadequate Clearance: Not allowing enough space above or below the rod can make it difficult to hang clothes or remove them without wrinkling. Ensure there’s enough clearance.
- Not Considering Closet Doors: If closet doors slide or fold, installing the rod too close to the doors may interfere with their operation.
- Skipping Instructions: Ignoring or not thoroughly understanding the installation instructions that come with the specific rod you purchased can lead to improper installation.
By taking accurate measurements, choosing the right materials, and ensuring secure installation, many of these common issues can be avoided.
How to select heavy-duty brackets for extra weight?
Selecting heavy-duty brackets for supporting extra weight requires careful consideration of several factors to ensure safety and stability. Here’s a step-by-step guide to help you choose the right brackets:
- Determine the Load Requirements: Calculate the total weight you need the brackets to support, including any dynamic forces if applicable (e.g., if the shelf will be used in an area with frequent movement or vibration).
- Material Selection: Choose a bracket material that can withstand the weight load and environmental conditions. Heavy-duty brackets are commonly made from steel, stainless steel, or reinforced aluminum.
- Check the Weight Rating: Look for brackets that are explicitly rated for the weight you intend to support. This rating should be specified by the manufacturer and verified for your specific use case.
- Consider the Design and Style: Select a design suitable for your application, whether L-brackets, Z-brackets, or adjustable brackets. Ensure they complement the aesthetics of your space if visible.
- Evaluate the Size and Dimensions: Ensure the brackets are the appropriate size for the shelving or object being supported. Consider the depth and height to provide adequate support without causing instability.
- Inspect the Mounting Surface: Assess the surface where the brackets will be mounted to ensure it can support the additional load. Reinforce walls or use anchors if necessary, especially in drywall or plaster surfaces.
- Number of Brackets: Use an adequate number of brackets to evenly distribute the weight. Typically, heavy loads require more than two brackets.
- Spacing Considerations: Properly space the brackets to prevent sagging or uneven weight distribution. The recommended spacing often depends on the length and material of the shelf.
- Installation Hardware: Use appropriate screws and anchors designed for the bracket material and mounting surface. Ensure all hardware is heavy-duty and capable of bearing the anticipated load.
- Manufacturer’s Guidelines: Always follow the manufacturer’s recommendations for installation and load limits. Adhering to these guidelines ensures the brackets function as intended under heavy loads.
- Safety Factor: Incorporate a safety factor into your calculations. This means selecting brackets that can hold more weight than the calculated load as a precaution against unexpected stresses.
- Professional Advice: If in doubt, consult with a structural engineer or professional installer to ensure that your choice meets all safety requirements and standards.
By taking these considerations into account, you can select heavy-duty brackets that provide reliable and secure support for your needs.