
Best Workshop Conversion Tools to Buy in July 2026
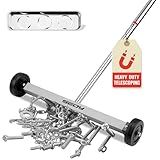
Magnet Sweeper Magnetic Nail Roller: 17-Inch Heavy Duty Magnet Nail Pickup Rolling Tool with Telescoping Adjustable Handle 8.8-Pound Capacity Ideal for Workshop Garage Yard Construction Cleanup
- EFFORTLESSLY CLEARS NAILS AND METAL DEBRIS FOR A SAFER WORKSPACE.
- TELESCOPIC HANDLE PREVENTS STRAIN; PERFECT FOR TIGHT SPOTS AND CLEANING.
- LIGHTWEIGHT, COMPACT DESIGN GLIDES SMOOTHLY ON ALL SURFACES.


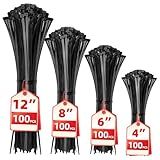
Cable Zip Ties,400 Pack Black Assorted Sizes 12+8+6+4 Inch,Multi-Purpose Self-Locking Nylon Cable Cord Management,Plastic Wire Ties for Home,Office,Garden,Workshop. By HAVE ME TD
- 400 ASSORTED ZIP TIES: PERFECT FOR ANY PROJECT OR TASK!
- STRONG TENSILE STRENGTH: SUITABLE FOR PERSONAL & PROFESSIONAL USE.
- SELF-LOCKING DESIGN: SECURE AND SNAG-FREE HANDLING EVERY TIME!
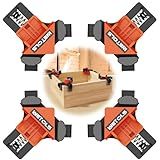
WETOLS Corner Clamp for Woodworking, 90 Degree Right Angle Clamp, Wood Clamps, 4Pcs Adjustable Spring Loaded Woodworking Clamp, Gifts for Dad, Birthday Gifts for Men, Photo Framing, Orange
-
PERFECT GIFT FOR MEN: STYLISH BOX, IDEAL FOR DADS AND GRANDPAS.
-
EFFORTLESS ONE-HANDED USE: LIGHTWEIGHT DESIGN FOR MAXIMUM CONVENIENCE.
-
SUPERIOR DURABILITY: PREMIUM MATERIALS ENSURE LONG-LASTING PERFORMANCE.
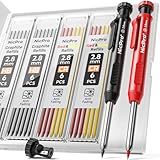
Nicpro Carpenter Pencil with Sharpener, Mechanical Pencils Set with 26 Refills, Deep Hole Marker for Construction, Heavy Duty Woodworking Tools for Architect (Black, Red) - With Case
- COMPLETE SET: 2 CARPENTER PENCILS, 26 REFILLS, AND SHARPENER INCLUDED.
- DEEP HOLE DESIGN: 45MM TIP FOR MARKING IN TIGHT SPACES EASILY.
- STRONGER LEAD: 2.8 MM THICK LEADS RESIST BREAKING DURING TOUGH TASKS.

VEVOR Bench Vise, 6-inch Jaw Width 5.9-inch Jaw Opening, 360-Degree Swivel Locking Base Multipurpose Vise w/Anvil, Heavy Duty Ductile Iron Workbench Vise w/Bolts & Nuts, for Drilling, Pipe Cutting
- DURABLE BUILD: FORGED FROM 60,000 PSI IRON FOR UNMATCHED LONGEVITY.
- VERSATILE FUNCTIONALITY: 360° ROTATION FOR PRECISE, EASY ADJUSTMENTS.
- COMPLETE KIT: INCLUDES ALL NECESSARY ACCESSORIES FOR EFFORTLESS SETUP.
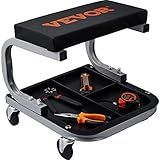
VEVOR Rolling Creeper Garage/Shop Seat, 250 LBS Capacity Padded Rolling Workshop Stool with Tool Tray Storage, Mechanic Stool for Garage, Shop, Auto Repair, Black
- HEAVY-DUTY STEEL FRAME ENSURES DURABILITY AND STABILITY FOR YEARS.
- 360° UNIVERSAL CASTERS PROVIDE SMOOTH MOVEMENT ON ALL SURFACES.
- LARGE TOOL TRAY KEEPS YOUR WORKSPACE ORGANIZED AND EFFICIENT.
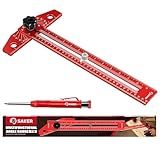
Saker Woodworking Scriber Marking Line Ruler, Adjustable Aluminum Alloy Sliding T-Square Ruler,Precision Line Drawing aid Ruler with Angle Adjustment Scale
- EASY LENGTH & ANGLE MEASUREMENT: SIMPLIFIES DESIGN TASKS EFFORTLESSLY.
- DURABLE ALUMINUM BUILD: LIGHTWEIGHT YET STURDY FOR LONG-TERM USE.
- MULTI-ANGLE FUNCTIONALITY: VERSATILE TOOL FOR PRECISE ANGLE MARKING.
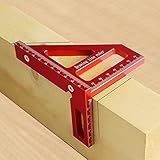
KETIPED 3D Multi-Angle Measuring Ruler,45/90 Degree Aluminum Alloy Woodworking Square Protractor,Drawing Line Ruler, Miter Triangle Ruler High Precision Layout Measuring Tool for Engineer Carpenter,R
-
DURABLE ALUMINUM ALLOY: LIGHTWEIGHT, CORROSION-RESISTANT, AND STURDY.
-
MULTI-FUNCTIONAL DESIGN: MEASURES ANGLES, MARKS, AND SIMPLIFIES PROJECTS.
-
IDEAL FOR ANY DIYER: ESSENTIAL TOOL FOR CARPENTERS, ENGINEERS, AND DECORATORS.
Converting an outdoor storage shed into a workshop can be a great way to utilize the space and create a dedicated area for your DIY projects. Start by clearing out the shed and removing any unnecessary items to make room for your workshop tools and equipment.
Next, assess the condition of the shed and make any necessary repairs or upgrades to ensure it is safe and functional for your workshop needs. Consider adding insulation, lighting, and electrical outlets to make the space more comfortable and practical for working in.
Organize your tools and supplies in a way that makes them easily accessible and functional. You may want to add shelves, pegboards, or storage bins to keep everything tidy and organized. Consider adding a workbench or table for your projects, as well as seating for when you need a break.
Finally, personalize the space with decorations, plants, and other elements that inspire creativity and make the workshop feel like your own. With some planning and creativity, you can transform your outdoor storage shed into a functional and inviting workshop for all your DIY projects.
How to paint the interior of an outdoor storage shed to use as a workshop?
Painting the interior of an outdoor storage shed to use as a workshop can help make it a more welcoming and functional space. Here's a step-by-step guide on how to do it:
- Clean the Shed: Before you begin painting, make sure the interior of the shed is clean and free of any debris, dirt, or dust. Sweep the floor and wipe down the walls with a damp cloth to remove any grime.
- Repair any Damage: Inspect the walls and ceiling for any holes, cracks, or damage. Fill in any holes with spackling compound and sand down any rough spots to create a smooth surface for painting.
- Choose the Right Paint: Select a paint that is suitable for outdoor use and can withstand the elements. A high-quality exterior paint is recommended for sheds as it will be more durable and resistant to moisture.
- Prepare the Paint: Stir the paint thoroughly before using it to ensure it is well mixed. If necessary, thin the paint according to the manufacturer's instructions.
- Tape off Areas: Use painter's tape to mask off any areas you don't want to paint, such as windows or door frames.
- Prime the Surfaces: Apply a coat of primer to the walls and ceiling to help the paint adhere better and create a more uniform finish. Let the primer dry completely before moving on to the next step.
- Paint the Walls and Ceiling: Use a roller or paintbrush to apply the paint to the walls and ceiling in even, smooth strokes. Start at the top and work your way down, making sure to cover the entire surface evenly. Allow the paint to dry between coats as recommended by the manufacturer.
- Add a Second Coat: For full coverage and a more professional finish, apply a second coat of paint once the first coat has dried completely.
- Finish and Clean Up: Once the paint has dried, remove the painter's tape and clean up any drips or spills. Reassemble any shelving or equipment in the shed and let the paint cure fully before using the workshop.
By following these steps, you can transform your outdoor storage shed into a bright and functional workshop that is ready for all of your DIY projects.
What is the best way to store and organize painting supplies in an outdoor storage shed workshop?
- Use clear plastic bins or containers to store smaller items such as brushes, paint tubes, and palette knives. Label the bins for easy identification.
- Hang pegboards on the walls to store larger items like drop cloths, canvases, and easels. Use hooks and baskets to keep everything organized and easily accessible.
- Use shelving units to store paint cans, solvents, and other bulky items. Make sure to label everything clearly so you can quickly find what you need.
- Consider installing a workbench or table in the shed for painting projects. Keep it clutter-free by only storing essential supplies on or near the work surface.
- Use a dedicated area for cleaning and maintaining brushes and other tools. Install a sink or have a bucket of water handy for rinsing.
- Utilize wall space for vertical storage by installing shelves or hooks to hang empty canvases or drying paintings.
- Keep an inventory of your supplies and regularly check for expired or damaged items that need to be replaced.
- Make sure to properly seal and store any flammable materials in a designated area away from sources of heat or sparks to ensure safety.
What is the best way to set up a layout in an outdoor storage shed workshop?
Setting up a layout in an outdoor storage shed workshop will depend on the size of the shed and the types of tools and equipment you plan to use. Here are some general tips on how to set up an efficient and functional layout in an outdoor storage shed workshop:
- Assess your needs: Consider the types of projects you will be working on in your workshop and make a list of the tools and equipment you will need. This will help you determine how much space you will need and how to best organize your layout.
- Prioritize storage: Make sure you have adequate storage for your tools, materials, and supplies. Consider installing shelves, cabinets, pegboards, and other storage solutions to keep your workshop organized and clutter-free.
- Create designated work areas: Divide your workshop into different zones for different tasks, such as a cutting area, assembly area, and finishing area. This will help you work more efficiently and reduce the time spent moving between different tasks.
- Consider your workflow: Arrange your tools and equipment in a way that makes sense for your workflow. Keep frequently used tools within easy reach and make sure you have enough workspace for your projects.
- Maximize natural light: If possible, position your workbench and other work areas near windows or skylights to maximize natural light. This will help reduce eye strain and create a more pleasant working environment.
- Consider ventilation and climate control: Make sure your workshop has proper ventilation to remove fumes and dust. If your shed does not have windows, consider installing a ventilation fan. Additionally, consider installing insulation and a heating or cooling system to maintain a comfortable temperature throughout the year.
- Safety first: Ensure that you have a clear path to walk around your workshop and that emergency exits are easily accessible. Keep fire extinguishers, first aid kits, and other safety equipment handy.
Overall, the best way to set up a layout in an outdoor storage shed workshop is to carefully plan and organize your space to fit your specific needs and preferences. Experiment with different layouts and make adjustments as needed to create a comfortable and efficient workspace.