
Best Mini Fridge Cleaning Tools to Buy in July 2026

4pcs Flexible Cleaning Brush Set for Dryer Vents, Fridge Coils, HVAC Systems & Tight Spaces – Multi-Use Lint and Dust Remover with Crevice Brush and Detailing Tools
-
EFFORTLESSLY CLEAN HARD-TO-REACH AREAS WITH FLEXIBLE STAINLESS STEEL SHAFTS.
-
EXCLUSIVE CREVICE TOOL WITH BUILT-IN TWEEZERS FOR STUBBORN DEBRIS.
-
VERSATILE FOR HOME AND VEHICLE USE, ENSURING TOTAL CLEANLINESS ANYWHERE.


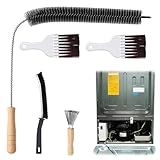
Air Conditioner Cleaner Set Mini Split Cleaning Kit Under Fridge Cleaning Tool Window Unit Kit with 5 Replaceable Brush Clothes for Refrigerator Air Conditioner, No Disassembly Furniture Appliances
- CLEAN AC & FRIDGE COILS EFFORTLESSLY-NO DISASSEMBLY NEEDED!
- INCLUDES 1 BRUSH WITH 5 REPLACEABLE CLOTHS FOR EASY UPKEEP.
- LIGHTWEIGHT DESIGN FOR SIMPLE, EFFECTIVE CLEANING AT HOME.

BZTT 8 PCS Refrigerator Drain Cleaning Tool - Fridge Water Line Cleaner Kit with Long Tube Brush Cleaner, Water Dispenser Cleaning Kit
- VERSATILE TOOL FOR CLEANING FRIDGES, DISPENSERS, AND AQUARIUMS.
- EASY-TO-USE KIT SAVES MONEY AND ELIMINATES COSTLY SERVICE FEES.
- DURABLE STAINLESS STEEL AND NYLON ENSURE EFFECTIVE, GENTLE CLEANING.

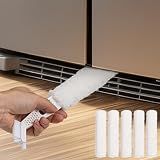
Retractable Gap Dust Cleaner Under Appliance Cleaning Tool, Flat Duster for Under Refrigerator Fridge Stove Couch Bed, Skinny Thin Duster for Tight Spaces (Green)
- ELECTROSTATIC MICROFIBER: ATTRACTS & LOCKS DUST/PET HAIR EFFORTLESSLY.
- VERSATILE CLEANING: USE DRY OR DAMP FOR QUICK & DEEP GRIME REMOVAL.
- SECURE TELESCOPIC POLE: EXTENDS 31 TO 61 FOR STEADY, CONTROLLED CLEANING.

Retractable Gap Dust Cleaner Under Appliance Cleaning Tool, Bafezoze Flat Duster for Under Refrigerator Fridge Stove Couch Bed, Skinny Thin Duster for Tight Spaces
-
ELECTROSTATIC MICROFIBER CAPTURES DUST & PET HAIR EFFORTLESSLY.
-
VERSATILE FOR DRY/WET CLEANING; NO HARSH CHEMICALS NEEDED.
-
STRONG TELESCOPIC POLE ENSURES STABILITY DURING CLEANING TASKS.
XANGNIER Refrigerator Coil Cleaning Brush Kit,5 Pcs
- COMPLETE SET FOR EFFORTLESS REFRIGERATOR COIL CLEANING!
- BOOST EFFICIENCY & SAVE TIME WITH ONE PURCHASE!
- DURABLE TOOLS EXTEND YOUR REFRIGERATOR’S LIFESPAN!

Lumkew Small Cleaning Brush Tight Spaces, 8pcs Crevice Cleaning Brushes Tool for Household Use, Tiny Cleaning Brush Mini Parts Humidifier Toaster
-
ALL-IN-ONE KIT: CLEAN EVERY NOOK WITH 8 VERSATILE BRUSHES FOR ALL NEEDS!
-
REACHES TIGHT SPACES: TACKLE TOUGH GRIME IN CREVICES AND CORNERS EFFORTLESSLY!
-
CONVENIENT STORAGE: SIMPLE STORAGE IN A CUP MAKES CLEANING QUICK AND EASY!

67" Flexible Drain Brush Set, Double Ended Long Hose Pipe Cleaner with 2 Pcs 8.2" Straw Cleaning Brushes, Nylon Tube Cleaner Tool for Refrigerator Defrost, Aquarium Filter, Sink Drain
- INSTANTLY UNCLOGS NARROW TUBES WITH OUR EXTRA-LONG FLEXIBLE BRUSH!
- VERSATILE SMART DESIGN SUITS ALL TUBE SIZES-BUY ONE, GET TWO!
- DURABLE RUST-PROOF BRISTLES CLEAN WITHOUT SCRATCHING VALUABLE HOSES.
To clean the coils on a mini fridge, start by unplugging the appliance and placing it in an area where you have easy access to the back. Use a screwdriver to remove the back panel of the fridge to expose the coils.
Next, use a vacuum cleaner with a brush attachment to gently remove the dust and debris that has collected on the coils. Be sure to thoroughly clean both the coils and the fan located behind them.
Alternatively, you can use a coil cleaning brush or a duster to remove the buildup. Be cautious not to bend the delicate coils while cleaning.
Once all the dust and debris are removed, replace the back panel and plug the mini fridge back in. It is recommended to clean the coils of your mini fridge at least once every 6 months to ensure optimal performance and energy efficiency.
How do I prevent future dust and dirt buildup on the coils of a mini fridge?
To prevent future dust and dirt buildup on the coils of a mini fridge, you can follow these steps:
- Regularly clean the coils: Make it a habit to clean the coils of your mini fridge at least once every 3-6 months. This can be done by unplugging the fridge, and using a vacuum cleaner with a brush attachment to remove any dust and debris from the coils. You can also use a coil cleaning brush or a soft brush to gently sweep away any dirt.
- Keep the area around the fridge clean: Make sure the area around the fridge is free from dust, dirt, and debris that could potentially get sucked into the coils. Regularly sweep or vacuum the floor around the fridge to prevent any buildup.
- Avoid placing the fridge in dusty areas: Try to keep your mini fridge in a clean and well-ventilated area to minimize the amount of dust that can accumulate on the coils.
- Use a fridge coil brush: Consider investing in a fridge coil brush, which is specifically designed to clean the coils of refrigerators and mini fridges. These brushes can help remove dust and dirt more effectively than a regular vacuum cleaner or brush.
By following these tips, you can help prevent future dust and dirt buildup on the coils of your mini fridge, which will in turn help improve its efficiency and prolong its lifespan.
What are the benefits of having a clean cooling system in a mini fridge?
- Improved efficiency: A clean cooling system allows the fridge to operate more efficiently, leading to better cooling performance and lower energy consumption.
- Longer lifespan: Dust and debris in the cooling system can cause it to work harder and potentially overheat, leading to premature wear and tear. Keeping it clean can extend the lifespan of the mini fridge.
- Fresher and safer food storage: A clean cooling system helps maintain a consistent temperature, which is essential for keeping food fresh and safe to eat.
- Reduced risk of mold and bacteria growth: Dust and dirt in the cooling system can provide a breeding ground for mold and bacteria, which can contaminate food and pose health risks. Regular cleaning helps prevent this buildup.
- Quieter operation: A clean cooling system allows the fridge to run more smoothly and quietly, making it less of a distraction in your home or office.
How do I know when it is time to replace the coils on my mini fridge?
There are a few signs that indicate it is time to replace the coils on your mini fridge:
- The fridge is not cooling efficiently or maintaining a consistent temperature.
- There is a build-up of dust and debris on the coils, hindering their ability to release heat.
- The coils are visibly damaged or corroded.
- The fridge is making unusual noises or working harder than usual to maintain temperature.
If you notice any of these signs, it is a good idea to replace the coils on your mini fridge to ensure it continues to function properly.
How do I know if I have successfully cleaned the coils on my mini fridge?
There are a few ways to determine if you have successfully cleaned the coils on your mini fridge:
- Visual inspection: After cleaning the coils, take a look at them to see if they appear clean and free of any dust, dirt, or debris. The coils should look shiny and metallic without any visible buildup.
- Performance: If your mini fridge was struggling to maintain the desired temperature before cleaning the coils, monitor its performance after cleaning to see if it improves. If the fridge starts to cool more effectively and efficiently, it is a sign that the coils have been successfully cleaned.
- Energy consumption: Dirty coils can cause your mini fridge to work harder and consume more energy to maintain the desired temperature. Keep an eye on your energy bills to see if there is any noticeable decrease in energy consumption after cleaning the coils.
If you notice an improvement in these factors, it is likely that you have successfully cleaned the coils on your mini fridge. If you are still experiencing issues with cooling or energy consumption, it may be a good idea to seek professional help to ensure that the coils are properly cleaned and functioning correctly.
How do I access the coils on a mini fridge for cleaning?
To access the coils on a mini fridge for cleaning, follow these steps:
- Unplug the mini fridge from the power outlet to ensure your safety.
- Locate the coils on the back or bottom of the mini fridge. They may be behind a protective panel or grille.
- Remove any panels or grilles covering the coils by unscrewing them or simply pulling them off.
- Use a vacuum cleaner with a brush attachment or a soft brush to remove any dust, dirt, or debris from the coils.
- You can also use a mixture of warm water and mild detergent to clean the coils if they are particularly dirty. Be sure to wipe them dry after cleaning to prevent rusting.
- Once the coils are clean, replace the protective panel or grille and plug the mini fridge back in.
Regularly cleaning the coils of your mini fridge can help improve its efficiency and prolong its lifespan.
What are the signs that indicate it is time to clean the coils on a mini fridge?
- The fridge is not cooling as effectively as before.
- There is a buildup of dust and dirt on the back or bottom of the fridge.
- The fridge is making more noise than usual.
- The exterior of the fridge feels warmer than usual.
- The compressor is running constantly.
- The fridge is using more energy and your electricity bill has increased.