
Best Shed Cleaning Tools to Buy in July 2026
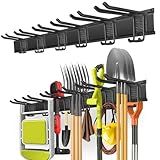
PIYILO Garage Tool Organizer Wall Mount with 48 inches Rails and 6 Double-layer Hooks, Garden Tool Rack Heavy Duty, Garage Hanging Storage Rack For Yard Tools, Shovel, Shed
-
VERSATILE DESIGN: FITS STANDARD STUDS; PERFECT FOR GARAGES AND SHEDS.
-
EASY SETUP: QUICK INSTALLATION WITH ADJUSTABLE HOOKS FOR ALL ITEMS.
-
HEAVY-DUTY STRENGTH: HOLDS UP TO 360 LBS; BUILT TO LAST WITH ROBUST MATERIALS.


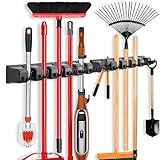
IMILLET 2 Pack Mop and Broom Holder, Wall Mounted Organizer Mop and Broom Storage Tool Rack with 5 Ball Slots and 6 Hooks (Black)
- MAXIMIZE SPACE: ORGANIZE 11 TOOLS WITH 5 BALL SLOTS & 6 HOOKS!
- SECURE GRIP: SPRING-LOADED CLIPS HOLD TOOLS TIGHT AND PREVENT DROPS!
- VERSATILE USE: PERFECT FOR GARAGE, KITCHEN, GARDEN, AND MORE!
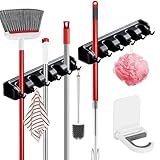
Broom Holder Wall Mount, 2 Packs Heavy Duty Cleaning Supplies Organizer, Garden Tool & Utility Closet with Hook, Mop & Broom Hook Wall Mounted for Bathroom, Garage, Kitchen, Laundry (Black-2pcs)
-
MAXIMIZE SPACE WITH 5 SLOTS & 6 HOOKS FOR 11 TOOLS AT ONCE!
-
STRONG GRIP SUPPORTS UP TO 40 LBS-NO SLIPS, NO MESS!
-
QUICK INSTALLATION-MOUNT SECURELY IN MINUTES, NO EXPERTISE NEEDED!

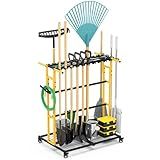
Garden Tool Organizer, Yard Tool Tower Rack for Garage Organization and Storage, Up to 35 Long-Handled Tools/Rakes/Brooms, Heavy Duty Steel Garden Tool Stand for Shed, Outdoor, Black
-
35 SLOTS FOR ALL YOUR TOOLS: MAXIMIZE STORAGE IN MINIMAL SPACE!
-
DURABLE METAL DESIGN: ENJOY RUST-RESISTANT, LONG-LASTING STABILITY.
-
ULTRA-LIGHT & EASY ASSEMBLY: MOVE AND SET UP EFFORTLESSLY IN MINUTES!
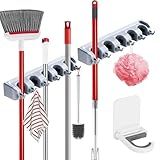
Broom Holder Wall Mount, 2 Packs Heavy Duty Cleaning Supplies Organizer, Garden Tool & Utility Closet with Hook, Mop & Broom Hook Wall Mounted for Bathroom, Garage, Kitchen, Laundry (Gray-2pcs)
- MAXIMIZE SPACE WITH 5 ADJUSTABLE SLOTS; STORE UP TO 11 TOOLS!
- STRONG GRIP: HOLDS WET MOPS & HEAVY TOOLS, SUPPORTS 40 LBS TOTAL.
- QUICK INSTALL: ALL TOOLS INCLUDED, MOUNT SECURELY IN MINUTES!
CCCEI Garage Organization with Wheels, Outdoor Gargen Yard Shed Tools Organizer Cart, Home Storage for Cleaning Supplies Organizer, Broom Holder, for Shovel and Rake, Long Farming and Farming Tools.
- EFFORTLESSLY RELOCATE TOOLS WITH SMOOTH-ROLLING WHEELS.
- STORES 20+ TOOLS, PLUS ACCESSORIES IN HANDY BASKETS.
- HEAVY-DUTY STEEL FRAME ENSURES DURABILITY AND STABILITY.
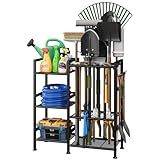
keomaisyto Garden Tool Organizer for Garage Organization, 3 Tier Yard Tool Storage Rack with 35 Long-Handled Tool Slots, Heavy Duty Garden Tool Holder with Large Hooks for Shed, Yard, Garage
- MAXIMIZE STORAGE: HOLDS UP TO 35 TOOLS, PERFECT FOR ANY GARDEN.
- VERSATILE DESIGN: THREE-TIER SHELF FOR SMALL TOOLS AND SUPPLIES.
- BUILT TO LAST: DURABLE, RUST-RESISTANT STEEL FOR LONG-TERM USE.
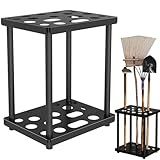
TMQZLN For suncast shed accessories garden tool organizer,16.5“ x 13” x 19.7",Garage Tool Tower Rack,Heavy Duty Garage Tool Storage,for Garden,Yard,Shed,Easy Assembly
-
STURDY, RUST-RESISTANT METAL DESIGN FOR INDOOR AND OUTDOOR USE.
-
EASY TO ASSEMBLE: ORGANIZE YOUR GARDEN TOOLS EFFORTLESSLY!
-
INGENIOUS HOLE DESIGN MAXIMIZES STORAGE FOR DIVERSE TOOL TYPES.

Lovind Garden Tool Organizer for Corner,Metal Yard Tool Organizer for Long-Handled Tools/Rakes/Brooms,Side Garden Pocket,Heavy Duty Steel Yard Tool Storage Rack for Garage,Shed, Outdoor
- MAXIMIZE TIGHT SPACES: CORNER DESIGN SAVES SPACE & KEEPS TOOLS HANDY.
- BUILT TO LAST: STURDY STEEL FRAME RESISTS RUST FOR INDOOR/OUTDOOR USE.
- EFFORTLESS SETUP: LIGHTWEIGHT & EASY ASSEMBLY WITH TOOLS INCLUDED.
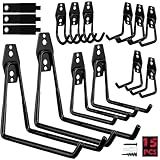
Garage Tool Storage Wall Hook Assortment Set: 15PCS Heavy Duty Large Hanger Garden Tool Organizer Ladder Bike Rack Yard Tool Holder Shed Shovel Metal Screw Organization Bicycle Steel Bracket
- HEAVY-DUTY STRENGTH: SUPPORTS UP TO 80LBS; BUILT FOR DURABILITY.
- HASSLE-FREE INSTALLATION: FITS WOOD, BRICK, AND MORE; QUICK SETUP!
- SECURE ANTI-SLIP DESIGN: PROTECTS ITEMS AND PREVENTS SLIPPING.
Cleaning out a storage shed involves several steps. First, it is important to remove all items stored inside the shed. Take out any large furniture, boxes, or equipment and place them outside. Sort through the items and decide what to keep, donate, sell, or throw away.
Once everything has been removed from the shed, it's time to clean the interior. Start by sweeping or vacuuming the floors to remove dirt, dust, and debris. Use a broom or a brush to remove cobwebs from the corners and ceiling. Wipe down any shelves or storage units that may be inside the shed.
Next, inspect the walls and surfaces for any signs of mold, mildew, or water damage. If you notice any issues, clean them using appropriate cleaning agents or consider fixing them before returning items to the shed. Additionally, check for signs of pests like insects or rodents and take necessary measures to eliminate them.
After the shed's interior has been cleaned, it's important to clean the exterior as well. Use a power washer or a garden hose to remove dirt, grime, and cobwebs from the walls. Scrub any stains or spots using a mild detergent and a brush. Rinse off the soap using clean water and allow the shed to dry completely.
Once the shed is clean and dry, examine the condition of any shelves, hooks, or storage units. Repair or replace any damaged or weak components. Evaluate if the shed needs any repairs such as patching up holes or fixing broken doors or windows.
Finally, it's time to organize and return the items back into the shed. Group similar items together and consider using storage bins or shelves to keep things organized. Label boxes or containers for easy identification. Optimize the space by utilizing vertical storage and leaving pathways for easy access.
Regular maintenance is essential to keep your storage shed clean and organized. Check for any water leaks, debris buildup, or signs of pests periodically. Regularly declutter and reassess the items stored inside to maintain a tidy and functional storage space.
What is the proper way to clean metal surfaces in a storage shed?
To clean metal surfaces in a storage shed, follow these steps:
- Remove any dirt or debris: Start by getting rid of loose dirt, dust, or cobwebs on the metal surfaces using a broom, brush, or a dry cloth. This will prevent any scratching during the cleaning process.
- Mix a cleaning solution: Prepare a mild cleaning solution by combining warm water with a few drops of mild dish soap or a gentle all-purpose cleaner. Avoid using harsh chemicals or abrasive cleaners that could damage the metal.
- Test on a small area: Before applying the cleaning solution to the entire metal surface, it's recommended to test it on a small, inconspicuous area. This will ensure that the solution doesn't cause any discoloration or damage.
- Apply the cleaning solution: Dip a sponge or soft cloth into the cleaning solution, and gently scrub the metal surface. Focus on areas with stains, grease, or grime. Use a toothbrush or small brush to reach crevices or corners that are harder to clean.
- Rinse with water: After scrubbing, rinse the metal surfaces thoroughly with clean water. This will remove any soapy residue and prevent streaks or spots. If possible, use a hose or bucket of water for easy rinsing.
- Dry the surfaces: After rinsing, it's important to dry the metal surfaces to prevent any water spots or potential rusting. Use a clean, dry cloth or towel to wipe away excess moisture.
- Apply a protective coating (optional): Depending on the type of metal surface, you may consider applying a protective coating to prevent future corrosion or rust. This could be a metal polish, wax, or clear sealant suitable for the specific metal you're working with. Follow the manufacturer's instructions for application.
By following these steps, you can effectively clean metal surfaces in your storage shed and maintain their appearance and longevity.
How to safely clean up old paint cans in a storage shed?
Cleaning up old paint cans in a storage shed requires caution and proper disposal methods to ensure safety and environmental responsibility. Here are the steps to safely clean up old paint cans:
- Wear protective gear: Put on gloves, safety goggles, and a dust mask to protect yourself from potential hazards.
- Ventilate the area: Ensure that there is proper ventilation in the storage shed by opening windows or doors to dissipate fumes.
- Sort the cans: Separate the paint cans into three categories - usable paint, dried paint, and empty cans.
- Usable paint: If there is still usable paint, consider donating it to a local community organization, school, or someone in need. Make sure to check if they accept such donations beforehand.
- Dried paint: For cans with dried paint, try to remove the lid, being careful not to damage the can. If the paint inside is completely dry, you can dispose of the can with regular household waste. If the paint is not fully dry, you may need to contact your local waste disposal facility for proper instructions.
- Empty cans: Empty cans can generally be disposed of as regular metals. Rinse them thoroughly to remove any traces of paint. Check your local recycling guidelines to determine if they accept empty paint cans or if they need to be taken to a special recycling center.
- Proper disposal: If you have several paint cans or if the cans still contain wet paint, it is recommended to contact your local waste disposal facility or recycling center to inquire about the proper disposal method. They can provide you with instructions and guidelines based on your location.
- Clean the storage shed: After addressing the paint cans, clean and organize the storage shed. Remove any paint spills, dust, or debris using appropriate cleaning products and tools.
Always remember to abide by local regulations and guidelines for proper disposal methods. It is essential to prioritize safety and environmental responsibility when dealing with potentially hazardous materials like old paint cans.
What is the most efficient way to clean windows in a storage shed?
The most efficient way to clean windows in a storage shed can be done by following these steps:
- Gather your supplies: You'll need a bucket, water, mild dish soap, a squeegee, a soft cloth or sponge, a clean towel, and a ladder if necessary.
- Remove any dirt or debris from the window surface: Use a soft brush or broom to remove any loose dirt or cobwebs from the window frame and surrounding areas.
- Prepare a cleaning solution: Fill a bucket with warm water and mix in a small amount of mild dish soap. Alternatively, you can use a commercial window cleaning solution according to its instructions.
- Wet the windows: Dip your soft cloth or sponge into the cleaning solution and thoroughly wet the window surface. Make sure to cover the entire area.
- Scrub the glass: Gently scrub the glass in circular motions, paying extra attention to any stubborn spots or dirt. Be careful not to apply too much pressure to avoid scratching the glass.
- Use a squeegee: Starting from the top corner of the window, pull the squeegee down in a straight, vertical motion, wiping off the solution as you go. Wipe the squeegee blade with a clean towel after each stroke.
- Repeat the process: Continue working across the window, overlapping each stroke slightly to ensure complete coverage. If necessary, use the squeegee horizontally for wider windows.
- Dry and inspect: Use a clean towel to wipe off any remaining water or streaks on the glass. Inspect the window for any missed spots or streaks, and repeat the cleaning process if necessary.
- Clean the window frame: After cleaning the glass, wipe down the window frame and sill with a damp cloth to remove any dirt or dust.
By following these steps, you can efficiently clean the windows in your storage shed, leaving them sparkling and clear.
How to label and organize storage containers while cleaning out a shed?
Labeling and organizing storage containers while cleaning out a shed is important to ensure easy access and maintenance of items. Here's a step-by-step process on how to do it effectively:
- Empty the shed: Start by emptying the shed completely, taking all items out and sorting them into different categories such as tools, gardening equipment, sports gear, etc. This will make it easier to determine what needs to be stored and how to label the containers.
- Group similar items: As you sort through the items, group similar items together. For example, group all the tools in one area, all the gardening equipment in another, and so on. This will give you a clearer idea of how many storage containers you'll need and how to label them.
- Select appropriate containers: Choose storage containers that are sturdy, stackable, and of adequate size for the items you're storing. Clear plastic containers are ideal as they allow you to see the contents without having to open them.
- Clean and repair containers: If you're reusing old storage containers, clean them thoroughly to remove any dirt or debris. Inspect for any damages and repair them if necessary.
- Labeling containers: Use adhesive labels, a label maker, or permanent markers to label each container. Be specific and concise with your labels, including the category of items inside and a brief description of the contents. If preferred, also number the containers and maintain a corresponding inventory list for easy reference.
- Categorize and arrange: Once the containers are labeled, group them by category and arrange them accordingly. Place the most frequently used items in easily accessible areas, while items used less often can be stored towards the back or on higher shelves.
- Create a map or inventory list: For larger sheds or extensive storage, consider creating a map or inventory list indicating the location of each category of items. This will help you quickly find specific items when needed, saving time and effort.
- Maintain consistency: Ensure that everyone who uses the shed follows the same labeling and organization system. Regularly review and update the system as needed to accommodate any changes or additions.
By following these steps, you can label and organize storage containers in your shed in a way that maximizes efficiency and makes it easier to locate items whenever needed.