
Best Leaf Blower Maintenance Essentials to Buy in July 2026

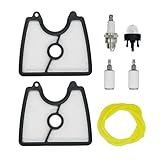
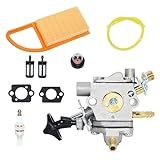
Husqvarna 599332501 Leaf Blower Maintenance Kit for 125B and 125BVX Blowers
- BOOST PERFORMANCE WITH OFFICIAL HUSQVARNA TUNE-UP KIT!
- INCLUDES PREMIUM FUEL FILTER, AIR FILTER, AND SPARK PLUG.
- PERFECT FIT FOR 125B AND 125BVX MODELS FOR OPTIMAL OUTPUT.


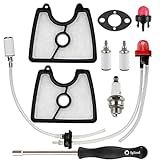
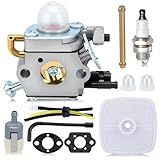
125B Air Filter Spark Plug Tune Up Kit Replacement for Husqvarna 125B 125BX 125BVX Leaf Blower, 545112101 Replacement for Craftsman 358794810 358794811 Blowers with Fuel FilterPrimer Bulb Line
- COMPLETE TUNE-UP KIT FOR OPTIMAL PERFORMANCE OF LEAF BLOWERS.
- VERSATILE REPLACEMENT FOR TOP BRANDS: HUSQVARNA, CRAFTSMAN, JONSERED.
- INCLUDES ESSENTIAL COMPONENTS FOR HASSLE-FREE MAINTENANCE AND USE.
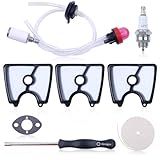
Hyceker 545112101 125B Air Filter Tune Up Kit for Husqvarna 125B 125BX 125BVX Redmax HB280 HB281 Handheld Leaf Blower, 599332501 Maintenance Kit with 581798001 Fuel Line Kit and 597797901 Air Filters
- COMPATIBLE WITH HUSQVARNA 125B AND POPULAR REDMAX MODELS.
- COMPLETE KIT: FILTERS, SPARK PLUG, TOOLS FOR EASY MAINTENANCE.
- HIGH-QUALITY REPLACEMENTS FOR OPTIMAL PERFORMANCE AND LONGEVITY.

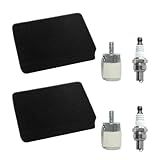
HUSWELL BG50 BG55 Leaf Blower Air Filter for Stihl BG85 BG65 SH85 SH55 BG45 BG46 BR45 BR45C Air Cleaner Tune Up Kit Primer Bulb Spark Plug Fuel Filter Parts
- COMPATIBLE WITH MULTIPLE STIHL MODELS FOR VERSATILE USE.
- CAPTURES 99% OF AIRBORNE PARTICLES FOR OPTIMAL PERFORMANCE.
- COMPLETE PACKAGE INCLUDES ESSENTIAL PARTS FOR HASSLE-FREE MAINTENANCE.
2-Pack 590849001 Leaf Blower Service Kit Compatible with Husqvarna 150BT, 350BT, 560BT, Includes Air Filter, Spark Plug & Fuel Filter, Replacement Parts for Husqvarna Handheld Leaf Blowers
-
COMPATIBLE WITH HUSQVARNA 150BT, 350BT, AND 560BT MODELS.
-
DURABLE COMPONENTS EXTEND EQUIPMENT LIFESPAN FOR RELIABLE USE.
-
QUICK-START SPARK PLUG BOOSTS EFFICIENCY AND REDUCES DOWNTIME.
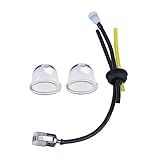
Hettluo 581798001 Fuel Line Kit Air Filter Kit Adjustment Tool for Husqvarna 125B 125BX 125BVX Leaf Blower
- COMPLETE KIT: FUEL LINE, FILTERS, SPARK PLUG, AND TOOLS INCLUDED.
- COMPATIBLE WITH MULTIPLE MODELS FOR EXTENSIVE USABILITY AND VALUE.
- ENHANCE PERFORMANCE & LONGEVITY OF YOUR HUSQVARNA & JONSERED BLOWERS.
BR600 BR550 Carburetor Air Filter Tune Up Kit for Stihl BR500 Carburetor Carb Rebuild Kit Replaces ZAMA C1Q-S183 Backpack Leaf Blower Parts Carb Carburetor Trimmer with Maintenance Kit Weed Eater
-
COMPATIBLE WITH STIHL BR500, BR550, BR600, AND BR700 LEAF BLOWERS!
-
HIGH-QUALITY CARBURETOR KIT TESTED FOR OPTIMAL PERFORMANCE!
-
COMPLETE KIT INCLUDES ESSENTIAL PARTS FOR EASY INSTALLATION!
Hipa PB-2100 Carburetor for Echo PB2100 PB 2100 ES-2100 ES2100 PB-2155 Leaf Blower Zama C1U-K42 C1U-K42A C1U-K42B Maintenance Kit
-
ALL-IN-ONE KIT: SAVE TIME AND MONEY WITH COMPLETE ECHO PARTS INCLUDED.
-
READY TO RUN: FACTORY-TUNED CARBURETOR; NO ADJUSTMENTS NEEDED FOR USE.
-
DEPENDABLE PERFORMANCE: WET FLOW TESTED FOR OPTIMAL ENGINE RELIABILITY.
Hipa 90069 90097 Repower Fuel Line Kit for Echo SRM210 SRM225 GT200 GT225 PAS225 PB200 PB250 PE200 PE2100 PE211 ES210 ES250 HC150 Trimmer Blower Mantis Tiller Carburetor Fuel System Maintenance Kit
-
FITMENT GUARANTEED: COMPATIBLE WITH TOP ECHO MODELS FOR EASY INSTALLATION.
-
COMPLETE KIT: INCLUDES FUEL LINE, FILTER, AND PRIMER BULB FOR FULL SERVICE.
-
HASSLE-FREE PURCHASE: VERIFY MODEL NUMBERS TO ENSURE PERFECT COMPATIBILITY.

Husqvarna Leaf Blower Gutter Attachment Kit, Hose Attachment 125B and 125BVX Leaf Blowers, Black
- SAFELY CLEAN GUTTERS WITHOUT LADDERS, PROTECTING YOU FROM FALLS.
- 12-FOOT REACH ALLOWS EASY ACCESS TO HARD-TO-REACH GUTTERS.
- COMPLETE KIT INCLUDES ALL NECESSARY TUBES FOR EFFICIENT CLEANING.
Cleaning and maintaining a leaf blower's fuel system is essential for its proper functioning and longevity. Here is a step-by-step guide on how to do it:
- Gather the necessary tools: You will need a pair of safety goggles, work gloves, a screwdriver, a clean cloth, a small brush with stiff bristles, and a fuel stabilizer.
- Safety first: Put on your safety goggles and work gloves to protect yourself from any debris or chemicals.
- Empty the fuel tank: Start by emptying the fuel tank completely. Use a funnel to pour the fuel into an approved container or drain it into a gas can if you plan to reuse it later.
- Remove the fuel lines: Locate the fuel lines attached to the carburetor. Use your screwdriver to loosen the clamps securing the lines and carefully detach them.
- Remove and clean the carburetor: Take off the carburetor cover and unscrew it using your screwdriver. Use a clean cloth to wipe away any built-up grime or debris from the carburetor and its components. You can also use a small brush to gently remove any stubborn dirt.
- Clean the fuel lines: Inspect the fuel lines for any clogs, blockages, or damage. If you notice any issues, use the small brush to clean out any debris or blow compressed air into the lines to clear them.
- Add fuel stabilizer: Before reassembling the fuel system, add a recommended amount of fuel stabilizer to the remaining fuel in the gas can. Shake the can gently to mix the stabilizer.
- Reassemble the fuel system: Once all the components are clean and dry, carefully reattach the fuel lines to the carburetor, making sure they are securely clamped in place. Reinstall the carburetor cover and tighten its screws.
- Refill with stabilized fuel: Using the funnel, pour the stabilized fuel from the gas can into the leaf blower's fuel tank. Avoid overfilling and spilling any fuel.
- Test and run the leaf blower: Start the leaf blower and let it run for a few minutes to ensure that the fuel is flowing smoothly through the system. Observe if there are any leaks or irregularities.
Regularly cleaning and maintaining your leaf blower's fuel system will help keep it in optimal condition, prevent clogs, and ensure reliable performance when clearing leaves and debris from your yard.
How to clean or replace the air filter of a leaf blower?
To clean or replace the air filter of a leaf blower, follow these steps:
- Turn off the leaf blower and allow it to cool down completely.
- Locate the air filter on your leaf blower. It is usually found on the side or back of the engine.
- If the air filter is washable, remove it from the leaf blower. If it is disposable, proceed to step 6.
- If the air filter is washable, gently tap it against a hard surface to remove any loose debris.
- Fill a bowl or sink with warm water and a small amount of mild detergent. Place the air filter in the soapy water and gently agitate it to remove any dirt and grime. Let it soak for a few minutes.
- Rinse the air filter thoroughly with clean water to remove all soap residue and dirt particles. Ensure that all debris is completely washed away.
- If the air filter is washable, gently squeeze it to remove excess water. Do not wring or twist the filter as it may damage the fibers.
- Allow the air filter to air dry completely before reinstalling it. Make sure it is completely dry to prevent any moisture from entering the leaf blower’s engine.
- If the air filter is disposable, simply remove it from the leaf blower and discard it. Replace it with a new, compatible air filter.
- Reinstall the clean or new air filter back into the leaf blower, making sure it is securely fitted and in the correct orientation.
- Start the leaf blower and check for proper airflow to ensure that the air filter is installed correctly.
It is important to regularly clean or replace the air filter in a leaf blower as it helps maintain proper air intake and prevents dust and debris from clogging the engine, resulting in optimal performance.
How to remove varnish buildup from a leaf blower's fuel system?
To remove varnish buildup from a leaf blower's fuel system, you can follow these steps:
- Start by emptying the fuel tank of any remaining fuel. This can be done by either running the blower until the fuel is depleted or by using a hand pump or siphoning tube to drain the tank.
- Next, detach the fuel lines from the carburetor. This may involve removing the air filter cover and intake tube to access the carburetor. Remember to carefully disconnect the fuel lines without damaging them.
- Prepare a mixture of fuel system cleaner or carburetor cleaner according to the manufacturer's instructions. These cleaners are specifically formulated to dissolve varnish and debris in fuel systems.
- Dip the fuel lines and carburetor parts into the cleaner, making sure they are completely submerged. Allow them to soak for the recommended time, usually around 15-30 minutes. This will help dissolve the varnish buildup.
- While the parts are soaking, use a small brush or toothbrush to gently scrub the inside of the fuel tank and any other accessible areas where varnish may have accumulated. Be careful not to damage any delicate components.
- After the soaking time has elapsed, remove the parts and fuel lines from the cleaner solution. Use a clean cloth or brush to wipe away any remaining varnish or debris. Rinse the parts with clean water to remove any cleaner residue.
- Reassemble the fuel system by reconnecting the fuel lines to the carburetor, and reattach the carburetor to the engine according to the manufacturer's instructions.
- Finally, refill the fuel tank with fresh, clean fuel. Make sure to use the recommended fuel mixture for your leaf blower.
Following these steps should help remove varnish buildup from your leaf blower's fuel system, improving its performance and reliability. However, if you're unsure about any specific steps or if the varnish buildup is severe, it's always recommended to consult the manufacturer's instructions or professional assistance.
How to clean and maintain the fuel pump of a leaf blower?
Cleaning and maintaining the fuel pump of a leaf blower is an important aspect of its routine maintenance. Here are the steps to clean and maintain the fuel pump of a leaf blower:
- Read the manufacturer's manual: Before starting any maintenance task, it is crucial to read and understand the manufacturer's instructions and guidelines specific to your leaf blower model.
- Safety precautions: Make sure you have safety glasses, gloves, and a well-ventilated area to work in. Also, ensure the leaf blower is turned off and cool before starting any maintenance task.
- Disconnect the spark plug: Unplug the spark plug wire to prevent accidental starting during the maintenance process.
- Locate the fuel pump: The fuel pump is usually found inside the fuel tank, attached to the cap or near the fuel lines. It is responsible for drawing fuel from the tank and delivering it to the carburetor.
- Remove the fuel pump cover: Depending on the model, you may need to remove or unscrew the fuel pump cover to access the pump itself.
- Inspect for debris: Look for any signs of dirt, debris, or blockages that may disrupt the fuel flow. Use a small bristle brush or compressed air to clean the area around the fuel pump.
- Clean the fuel pump: Gently remove the fuel pump from the housing. If it is clogged or dirty, use a soft brush or a toothbrush soaked in carburetor cleaner to clean it thoroughly. Pay attention to the small filters and valves in the pump and make sure they are clean and in good condition.
- Reassemble: Once the fuel pump is clean, reassemble it by following the reverse procedure of disassembly. Make sure all parts fit correctly and are tightly secured.
- Check the fuel lines: Inspect the fuel lines for cracks, leaks, or any signs of damage. Replace any damaged fuel lines to ensure proper fuel flow and avoid future issues.
- Reconnect spark plug: Reconnect the spark plug wire once you have completed the fuel pump maintenance and are satisfied with the reassembly.
- Test run: Before using the leaf blower, start the engine and let it run for a few minutes to make sure the fuel pump is functioning correctly.
Regular cleaning and maintenance of the fuel pump will help to ensure optimal performance and extend the life of your leaf blower. However, if you are unsure or uncomfortable with performing these tasks, it is always recommended to consult a professional or a dealer who specializes in leaf blower repairs.