
Best Hand Mixer Cleaning Tools to Buy in July 2026
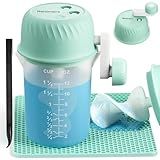
Resiners Resin Mixer, Hand-Crank Epoxy Mixer Paddle Silicone Mat Mixing Cup Kit, 3 Speeds Adjustable, Minimum Bubbles, Easy Clean, Epoxy Resin Stirrer Sticks Tool Supplies for Mold Casting, DIY Crafts
-
ECO-FRIENDLY & NO ELECTRICITY NEEDED: EFFORTLESS HAND-CRANK MIXING!
-
RAPID MIXING: PERFECTLY MIXES RESIN IN JUST 15 SECONDS, ZERO BUBBLES.
-
UNIVERSAL COMPATIBILITY: FITS MULTIPLE CUP SIZES FOR ALL YOUR PROJECTS!


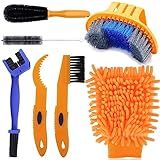
Qihengzhijia 7PCS Bike Cleaning Brush Tool Kit - Bicycle Chain Cleaner Brush Set Suitable for Dirt/Road/Mountain/BMX/Hybrid/Folding Bike
- EFFORTLESS CLEANING: SAVE TIME WITH A DIY BIKE CHAIN CLEANING KIT!
- VERSATILE USE: PERFECT FOR ALL BIKE TYPES-CLEAN, RIDE, REPEAT!
- DURABLE & COMPACT: LIGHTWEIGHT DESIGN ENSURES EASY STORAGE AND CARRY.
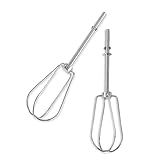
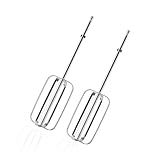
Hand Mixer Beaters for KitchenAid, Turbo Beaters Compatible with W10490648, KHM2B, AP5644233, PS4082859 Parts (2 Pack)
-
PRECISION FIT FOR KITCHENAID MODELS: COMPATIBLE WITH MULTIPLE MODELS & PART NUMBERS.
-
DURABLE STAINLESS STEEL DESIGN: RESISTS RUST AND BENDING FOR LONG-LASTING USE.
-
EASY INSTALLATION & CLEANUP: SNAP-ON DESIGN AND DISHWASHER SAFE FOR CONVENIENCE.
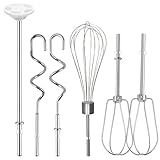
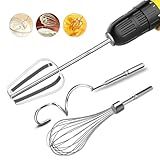
Hand Mixer Beaters Attachments for KitchenAid KHM512 KHM6118 KHM7210 KHM926, Including Turbo Beater, Pro Whisk, Dough Hooks, Blending Rod, Set of 6
- VERSATILE KIT: PERFECT MIX OF TOOLS FOR WHIPPING, BLENDING, AND KNEADING.
- STAINLESS STEEL QUALITY: DURABLE, RUST-RESISTANT, AND FOOD-SAFE MATERIALS.
- EASY SETUP: SNAP-ON DESIGN FOR QUICK INSTALLATION AND HASSLE-FREE CLEANING.
2 Pcs Hand Mixer Attachments Beaters, Hand Mixer Beaters Attachments for Kitchen Stainless Steel Replacement Parts for Hamilton Beach 62682RZ 62692 62695V 64699 Mixer
- COMPATIBLE ATTACHMENTS: FITS SELECT HAMILTON BEACH HAND MIXERS ONLY.
- PREMIUM QUALITY: CRAFTED FROM FOOD-GRADE 304 STAINLESS STEEL FOR SAFETY.
- VERSATILE KITCHEN USE: PERFECT FOR WHIPPING, MIXING, AND BAKING DELIGHTS.
homicozy 3-Piece Stainless Steel Hand Mixer Attachment Set - Whisk, Dough Hook, Egg Beater for Drills - Dishwasher Safe, 7.5 Inch (Drill Not Included)
- TRANSFORM ANY DRILL INTO A POWERFUL MIXER FOR VERSATILE USE!
- COMPACT DESIGN MAKES IT EASY TO STORE AND PORTABLE FOR TRAVEL.
- SAVE TIME WITH EFFICIENT MIXING; HIGH PERFORMANCE AT A LOW COST!
To clean a hand mixer, start by unplugging it from the power source. Remove any detachable parts, such as beaters, blades, and mixing bowls. Wash these parts in warm soapy water, using a sponge or cloth to remove any food residue.
For the main body of the hand mixer, use a damp cloth to wipe away any food splatters or spills. Avoid submerging the entire unit in water, as this can damage the motor and electrical components.
If there are stubborn stains or build-up on the hand mixer, you can use a mixture of baking soda and water to create a paste. Apply the paste to the affected areas and let it sit for a few minutes before wiping it away with a damp cloth.
Once all parts are clean and dry, reassemble the hand mixer and store it in a safe place until its next use. Regular cleaning and proper maintenance will help prolong the life of your hand mixer and ensure it continues to work efficiently.
How to clean a hand mixer without damaging it?
To clean a hand mixer without damaging it, follow these steps:
- Unplug the hand mixer from the power source.
- Remove any attachments or beaters from the mixer.
- Wipe down the mixer body with a damp cloth or sponge to remove any food or residue.
- Fill a bowl with warm soapy water and submerge the beaters in the water. Let them soak for a few minutes to loosen any dried-on food.
- Use a soft brush or sponge to gently scrub the beaters and remove any remaining food particles.
- Rinse the beaters thoroughly with clean water and dry them completely before reattaching them to the mixer.
- Wipe down the mixer body again with a clean, damp cloth to remove any soap residue.
- Store the hand mixer in a clean, dry place when not in use to prevent dust and dirt buildup.
By following these steps, you can effectively clean your hand mixer without causing any damage to it.
How to clean a hand mixer with vinegar?
- Unplug the hand mixer and remove any attachments or accessories.
- Fill a cup or bowl with white vinegar.
- Dip a clean cloth or sponge in the vinegar and wring out any excess liquid.
- Wipe down the exterior of the hand mixer with the vinegar-soaked cloth, paying special attention to any built-up grime or residue.
- If there are any removable parts, such as beaters or whisk attachments, soak them in a bowl of vinegar for about 15-20 minutes to help loosen any stuck-on food particles.
- Use a small brush or toothbrush to scrub any stubborn stains or residue on the attachments.
- Rinse all parts thoroughly with water to remove any vinegar residue.
- Allow all parts to air dry completely before reassembling the hand mixer and storing it away.
- Repeat this cleaning process regularly to ensure your hand mixer stays in top condition and free of bacteria and food residues.
How to clean a hand mixer that has rust?
- Begin by unplugging the hand mixer and removing any detachable parts such as beaters or attachments.
- Fill a small bowl with vinegar or lemon juice. Both are natural acids that can help break down rust.
- Dip a cloth or sponge into the vinegar or lemon juice and scrub the rusted areas of the hand mixer. You may also use a toothbrush for smaller, hard-to-reach areas.
- If the rust does not come off easily, you can make a paste using equal parts baking soda and water. Apply this paste to the rusted areas and let it sit for a few minutes before scrubbing with a cloth or brush.
- Rinse the hand mixer with warm water to remove any remaining rust, vinegar, or baking soda residue.
- Dry the hand mixer thoroughly with a clean towel.
- To prevent future rust from forming, make sure to always dry the hand mixer completely after cleaning and store it in a dry place.
- If the rust is particularly stubborn, you may need to use a commercial rust remover or contact the manufacturer for further advice.