
Best Brick Fire Pit Kits to Buy in July 2026
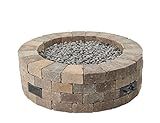
Outdoor GreatRoom Co Propane Fire Pit Kit - 52 Inch Round Bronson DIY Bonfire Gas Fire Pits for Outside Patio - Includes 84 Stone Paver Blocks, 42" Firepit Burner, Tumbled Lava Rock, 105,000 BTU
-
BUILD YOUR OWN FIRE PIT WITH OUR ALL-IN-ONE PREMIUM KIT!
-
STYLISH BLEND OF CLASSIC BRICK DESIGN AND MODERN UTILITY.
-
DURABLE, USA-MADE, AND BACKED BY A 1-YEAR WARRANTY.


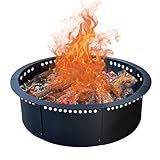
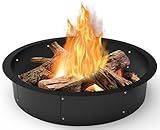
SoulMate Outdoor 40-Inch Outer/36-Inch Inner Fire Pit Ring Smokeless,Duty Solid Metal Steel Round Firepit Rim Insert for DIY Fire Pits, Outdoor Above or In-Ground, Camping Garden Patio Backyard.
-
QUICK ASSEMBLY: EASILY SET UP IN MINUTES FOR IMMEDIATE ENJOYMENT.
-
ENHANCED AIRFLOW: TOP VENTILATION HOLES ENSURE EFFICIENT COMBUSTION.
-
VERSATILE DESIGN: SUITABLE FOR VARIOUS OUTDOOR SCENARIOS AND GATHERINGS.

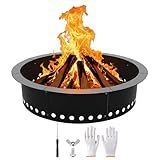
Iron Forge Tools Smokeless Firepit - 36 inch Outer/30 inch Inner Round Fire Ring Insert Liner - Heavy Duty Metal Permanent Outdoor Fire Pit Ring (36x30x10) Utility Patent Pending
-
BUILT TOUGH: PREMIUM 36 STEEL FOR LONG-LASTING DURABILITY!
-
SMOKELESS DESIGN: ENJOY CLEAN, HASSLE-FREE OUTDOOR FIRES!
-
EASY DIY INSTALLATION: TRANSFORM YOUR YARD WITH RUSTIC CHARM!
Fire Ring for Outside Fire Pit 36-Inch Outer/32-Inch Inner Diameter, VivaGarden Heavy Duty Solid Metal Steel Round Fire Pit Ring for Camping, DIY Campfire FirePit Insert Kit for Wood Burning, Black
-
TOOL-FREE SETUP: ENJOY QUICK ASSEMBLY WITH INNOVATIVE WING NUTS!
-
EFFICIENT 360° AIRFLOW: EXPERIENCE SMOKELESS, VIBRANT FIRES EVERY TIME!
-
VERSATILE DESIGN: BUILD YOUR DREAM FIRE PIT EASILY FOR ANY GATHERING!
OutVue 42 inch Square Fire Pit Ring, Heavy Duty Firepit Ring, DIY Campfire Insert Above or In-Ground, for Outdoor, Camping, and Bonfires
-
RUGGED STEEL BUILD: DURABLE, WEATHER-RESISTANT WITH HIGH-TEMP FINISH.
-
SPACIOUS DESIGN: 42” DIAMETER, PERFECT FOR GATHERINGS AND CAMPFIRES.
-
QUICK ASSEMBLY: EASILY SET UP IN MINUTES-IDEAL FOR OUTDOOR FUN!
Koutemie Outdoor Fire Pit Ring Liner 40-Inch Outer/36-Inch Inner Diameter, Heavy Duty Solid Metal Steel Round Firepit Rim Insert for Outside DIY Campfire Ring Above or In-Ground, Black
-
DURABLE DESIGN: HIGH-QUALITY STEEL WITHSTANDS HEAT FOR LASTING USE.
-
DIY FLEXIBILITY: CUSTOMIZE YOUR FIRE PIT EASILY FOR YOUR UNIQUE SPACE.
-
SPACIOUS & VERSATILE: 36-INCH DIAMETER SUITS VARIOUS OUTDOOR GATHERINGS.
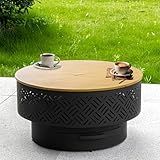
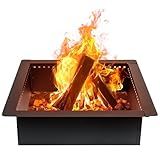
OutVue 26" Wood Burning Fire Pits with Grill & Lid, Fire Pit Table for Outside with Waterproof Cover & Fire Poker, Outdoor Firepit with Functions for BBQ,Table and Bonfire
-
3-IN-1 VERSATILITY: ENJOY A BONFIRE, BARBECUE, OR DINING TABLE ALL YEAR!
-
DURABLE & SAFE DESIGN: HIGH-TEMP COATING & MESH VENTS KEEP SPARKS AT BAY.
-
QUICK ASSEMBLY: SET UP IN JUST 5 MINUTES WITH SIMPLE STEP-BY-STEP INSTRUCTIONS!
Building a DIY fire pit with bricks can be a fun and rewarding project. Here's a step-by-step guide on how to do it:
- Select a suitable location: Choose an area in your backyard or outdoor space that is flat, well-ventilated, and away from any flammable objects such as trees or shrubs. Ensure you comply with any local fire safety regulations.
- Gather the necessary materials: You'll need fire bricks, regular bricks, gravel, sand, a shovel, a rake, a spirit level, a rubber mallet, and a wheelbarrow.
- Clear the area: Remove any vegetation, rocks, or debris from the chosen location. Dig a shallow hole about six inches deep and wider than the diameter of your desired fire pit.
- Level the ground: Compact the soil inside the hole and use the shovel and rake to ensure the area is level and even. This will provide a stable base.
- Place gravel layer: Pour a layer of gravel into the hole, filling it up to about two inches. Evenly spread the gravel and use the back of the rake to compact it down.
- Lay the first layer of bricks: Take the fire bricks and arrange them in a circle around the perimeter of the hole. Ensure they are touching, but leave a small gap between each brick to allow for expansion. Use a spirit level to ensure the first layer is perfectly level.
- Add subsequent brick layers: Build up additional layers of fire bricks, ensuring they are staggered to create a sturdy structure. Use the rubber mallet to gently tap the bricks into place.
- Fill gaps with sand: Once all the fire bricks are in place, fill any gaps between them with sand. This helps stabilize the bricks and provides insulation.
- Lay the final layer: For the top layer, use regular bricks instead of fire bricks for aesthetic purposes. Arrange them on top of the fire bricks, making sure to stagger them. Use the mallet to secure them in place.
- Test for stability: Gently shake the structure to ensure it is sturdy and well-balanced. Make any necessary adjustments by adding or removing sand underneath the bricks.
- Enjoy the fire pit: Once everything is secure and stable, you can start using your DIY fire pit. Remember to follow fire safety guidelines, never leave the fire unattended, and always have a fire extinguisher or a water source handy.
That's it! With some patience and careful construction, you can create a beautiful and functional fire pit using bricks. Enjoy the warmth and ambiance it brings to your outdoor space.
How to lay the first layer of bricks?
To lay the first layer of bricks, follow these steps:
- Prepare the area: Clear the ground and ensure it is level and compacted. Remove any loose dirt, debris, or vegetation.
- Mark the layout: Use a chalk line or string to mark the outline of the brick wall. Measure and mark the corners and ends of the wall to ensure accuracy.
- Lay the foundation: Apply a layer of mortar or cement mix, about 1 inch thick, along the marked outline. Use a trowel to spread the mortar evenly.
- Position the first brick: Place the first brick at one corner of the wall, pressing it firmly into the mortar. Make sure it is level and aligned with the chalk line.
- Add more bricks: Set additional bricks next to the first one, leaving a small gap (about 3/8 inch) between each brick for mortar. Continue laying bricks in a straight line, using a level to check for accuracy.
- Adjust the bricks: Tap each brick gently with a rubber mallet to ensure they are properly seated in the mortar. You can also use a spirit level to make adjustments as needed.
- Apply mortar joints: Once the first layer of bricks is in place, use a trowel to apply mortar to the top surface of each brick. Smooth the mortar, ensuring it fills the gaps between the bricks.
- Clean excess mortar: Use a brush or damp sponge to remove any excess mortar from the bricks before it dries.
- Repeat the process: Continue laying bricks in subsequent rows, making sure to stagger the joints for added strength and stability.
It is important to note that bricklaying requires skill and experience. If you are unsure or unfamiliar with the process, it may be beneficial to seek guidance from a professional or consult detailed instructional resources.
What is required for the maintenance of a brick fire pit?
To maintain a brick fire pit, several steps are recommended:
- Regular cleaning: Remove any debris, ashes, and burnt wood from the fire pit after each use. Use a shovel or brush to clean the inside and around the edges of the pit.
- Inspect and repair: Routinely check for any damage or cracks in the bricks. Replace any loose or broken bricks to ensure the fire pit's structural integrity.
- Sealing: Apply a high-temperature sealer or firebrick mortar to the bricks. This will help protect the bricks from cracking due to heat.
- Prevent moisture: Cover the fire pit with a weather-resistant cover when not in use to prevent moisture buildup. Moisture can cause damage to the bricks over time.
- Proper drainage: Ensure that the fire pit has adequate drainage to prevent water from collecting inside. If water accumulates, it can damage the bricks and shorten the lifespan of the fire pit.
- Regular maintenance: Periodically inspect the fire pit for any signs of wear and tear, such as crumbling mortar or loose bricks. Clean and repair as necessary to maintain its functionality and safety.
Overall, regular cleaning, inspections, repairs, sealing, and moisture prevention are key factors in the maintenance of a brick fire pit.
How to incorporate fireproof insulation in a brick fire pit?
To incorporate fireproof insulation in a brick fire pit, you can follow these steps:
- Choose the right insulation material: Look for fireproof insulation materials such as ceramic fiber blankets or boards, which are commonly used for high-temperature applications.
- Clean the fire pit: Remove any debris, ashes, and loose bricks from the fire pit to create a clean working surface.
- Measure and cut the insulation: Measure the diameter and depth of the inside of the fire pit using a measuring tape. Transfer these measurements onto the insulation material and use a utility knife or a saw to cut the insulation to the appropriate size and shape.
- Test-fit the insulation: Place the insulation inside the fire pit, ensuring it fits snugly against the walls and bottom of the pit. Trim any excess insulation material, if needed.
- Apply a layer of refractory cement: Remove the insulation and apply a thin layer of refractory cement to the interior walls and bottom of the fire pit using a trowel. Refractory cement is a heat-resistant material that helps protect the brickwork from the intense heat generated by the fire.
- Place the insulation: Put the insulation back into the fire pit, pressing it firmly against the walls and bottom. Make sure the insulation is in direct contact with the refractory cement, allowing for a tight seal.
- Install fire bricks: If desired, you can further enhance the fire pit's insulation by using fire bricks. These specialized bricks are designed to withstand high temperatures and provide an extra layer of protection. Create a layer of fire bricks on top of the insulation, using a heat-resistant adhesive or refractory mortar to secure them in place.
- Finish the fire pit: Once the insulation and fire bricks are in place, you can complete the rest of your fire pit construction process. Add additional layers of bricks, ensuring they are securely bonded together using appropriate mortar. Build the fire pit to your desired height and size, following any other design or safety considerations.
It's important to note that this information provides general instructions to incorporate fireproof insulation in a brick fire pit. It is always recommended to consult reliable resources or professionals to ensure your fire pit meets local building codes and safety standards.
How to level and adjust the bricks as you build?
Leveling and adjusting bricks as you build is crucial to ensure a sturdy and professional-looking structure. Here are the steps to follow:
- Start by laying a bed of mortar or a base of crushed stone or sand, depending on your building surface.
- Place the first brick on the bed, ensuring it is in the right position according to your building plan.
- Use a spirit level to check whether the brick is level vertically and horizontally. Adjust if necessary by adding or removing mortar beneath the brick.
- Tap the brick lightly with a rubber mallet to level and set it firmly in place.
- Move on to the next brick, applying mortar on the sides and bottom before placing it adjacent to the first brick.
- Check the level between the first and second bricks and make adjustments as needed.
- Repeat these steps for subsequent bricks, continuously checking and adjusting their level and alignment as you go.
- Use a string line or a straightedge between bricks to ensure your walls are straight as you build.
- If you encounter any high spots or unevenness in the bricks, gently tap them with the rubber mallet to level them out.
- As the mortar start to set, clean off any excess mortar on the surface of the bricks using a trowel or brush.
- Continue the process, periodically rechecking the level and alignment until the desired height is reached.
- Allow sufficient time for the mortar to dry and set before applying any additional layers or load-bearing weight on the structure.
Regularly checking the level and adjusting as you build will help you achieve a well-built and visually appealing brick structure.