
Best Bird Bath Accessories to Buy in July 2026

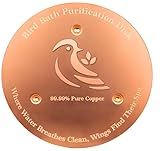
Bessny 2 Pack Bird Bath Copper Discs, 99.9% Pure Copper Cleaner with Triple-Point Support, Reinforced Design for Safe Clean Water, Universal Fit for Outdoor Birdbaths and Bowls, All-Season Use
-
NATURAL PURIFICATION: KEEP BIRDBATH WATER CLEAN WITHOUT CHEMICALS!
-
STABLE DESIGN: ENJOY MAXIMUM EFFICIENCY IN ANY BIRDBATH STYLE!
-
DURABLE & EASY: YEAR-ROUND PERFORMANCE WITH MINIMAL MAINTENANCE NEEDED!


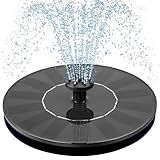
Mademax 1W Solar Bird Bath Fountain Pump, Solar Fountain, Free Standing Floating Solar Powered Water Fountain Pump for Bird Bath, Garden, Pond, Pool, Outdoor
- ATTRACT HUMMINGBIRDS WITH 50-70CM SPRAY IN JUST 3 SECONDS!
- INNOVATIVE PUMP RETAINER PREVENTS SPILLS AND KEEPS WATER IN THE BATH.
- SWITCH NOZZLE FOR FUN, CUSTOMIZABLE WATER PATTERNS IN YOUR GARDEN!
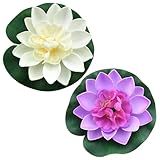
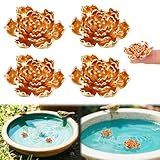
LUORNG 2PCS 10CM/3.94Inch Birdbath Fountain Accessory Lotus Leaf Flower Floating Spray Garden Supply Lotus Decoration Faux Artificial Lotus Flower for Garden Pond and Swimming Pool Decoration
- VIVID COLORS LASTING LONG: DURABLE EVA FOAM & SILK KEEP HUES BRIGHT.
- STUNNING VISUAL APPEAL: MULTI-LAYER DESIGN MIMICS REAL LOTUS BEAUTY.
- EASY DIY FOR FOUNTAINS: TRANSFORM BIRD BATHS WITH SIMPLE INSTALLATION!
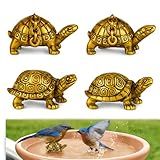
Kahedincy 4 Pcs Copper Bird Bath Disk Accessories Decorations, Mini Turtle Birdbath Purification Plate for Outdoor Outside Birdbaths, Bowl Decor
- ELEVATE YOUR BIRDBATH WITH STYLISH, PURIFYING COPPER DISCS!
- ADORABLE MINI TURTLE DECOR ADDS CHARM AND FUNCTIONALITY!
- DURABLE BRASS TURTLES FOR YEAR-ROUND BEAUTY IN YOUR OUTDOOR SPACE!
Ulycon Bird Bath Copper Disk, Premium 0.6mm Sturdy 99.99% Pure Copper Disk for Bird Baths,Triple-Point Support Ensures Clean Water Year-Round, Compatible with All Outdoor Birdbath Bowls
-
99.99% PURE COPPER KEEPS BIRDBATH WATER CLEAN & SAFE FOR BIRDS
-
INNOVATIVE DESIGN REDUCES CLEANING FREQUENCY, SAVES YOU TIME
-
COST-EFFECTIVE SOLUTION: NO MORE CLEANING TOOLS NEEDED!
Otoolling 4 Pcs Mini Peony Shape Copper Bath Disk Ornaments Brass Bird Bath Purification Disks Birdbath Cleaner Single 0.6 oz Weight Universal Fit for Outdoor Birdbaths, Bowl
- PURIFIES WATER NATURALLY, PROMOTING HEALTH AND SAFETY FOR BIRDS.
- VINTAGE CHARM ENHANCES AESTHETICS; CLEANING MADE STYLISHLY EASY.
- YEAR-ROUND COPPER EFFICIENCY SAVES ON CLEANING COSTS AND EFFORT.
To attract more birds to your bird bath, start by ensuring the bath is in a safe and accessible location, ideally near trees or shrubs that provide cover for birds to feel secure. Maintain clean, fresh water by changing it regularly, as birds are drawn to clean water for drinking and bathing. Choose a bird bath with a gentle slope and a textured surface to allow birds of all sizes to easily approach and grip. Consider adding a fountain or dripper, as the sound and movement of water can attract birds. Position the bird bath in a sunny spot if possible, as birds enjoy sunbathing after bathing. Additionally, plant native plants nearby to create a welcoming habitat, and avoid using chemicals in the area that could deter birds. With these strategies, your bird bath will become a popular spot for a variety of bird species.
How to add moving water to a bird bath?
Adding moving water to a bird bath can be an excellent way to attract more birds, as the movement catches their attention and can help keep the water clean. Here are some options to consider:
- Solar-Powered Fountain Pump: Purchase a solar-powered pump: These small pumps are environmentally friendly and cost-effective since they use solar energy. Installation: Place the solar panel in a sunny spot and submerge the pump in the bird bath. The pump will create a small fountain effect when the sun hits the panel.
- Electric Fountain Pump: Buy a low-voltage electric pump: Ensure it’s safe for outdoor use and has features suitable for bird baths. Setup: Run an outdoor extension cord to your bird bath (make sure it's rated for outdoor use), and submerge the pump. Make sure the cord is secured and doesn't pose a tripping hazard.
- Bubbler: Acquisition: You can find simple water bubbler attachments that attach to small pumps. Placement: Attach the bubbler to your existing pump, either solar or electric, for a gentle bubbling effect.
- Dripper System: Materials: Use a hose or a DIY system made from a gallon jug or water container with a small hole at the bottom to create a drip effect. Adjust flow: Adjust the flow so that it creates a consistent drip, making the water attractive to birds while preventing overflow.
- Agitator: Buy a solar water wiggler: This is a small agitator that creates ripples in the water. Setup: Just place it in the bird bath, and it will start working in sunlight. There are battery-operated ones available as well.
- DIY Options: If you're handy, you can create your own system using a small aquarium pump, tubing, and a creative setup to ensure consistent water movement.
Additional Tips:
- Regular Maintenance: Clean the bird bath and pump regularly to prevent algae buildup and ensure proper function.
- Adequate Water Level: Ensure that the water level is maintained for the pump to operate efficiently without burning out.
- Safety: If using electrical solutions, ensure connections are safe and protected from rain and use ground-fault circuit interrupter (GFCI) outlets.
By incorporating any of these methods, you can enhance your bird bath, making it a more attractive oasis for your neighborhood birds.
How to add lighting around a bird bath for night viewing?
Adding lighting around a bird bath for night viewing can create a beautiful and serene focal point in your garden. Here are some steps and ideas to help you achieve this:
- Choose the Right Lighting Type: Solar Lights: These are eco-friendly and easy to install since they don't require any wiring. Place solar path lights around the bird bath to provide subtle illumination. LED Spotlights: LEDs are energy-efficient and can be used for uplighting. Position these to highlight the bird bath for a more dramatic effect. String Lights: Wrap weather-resistant string lights around nearby trees, bushes, or garden structures for a softer, ambient glow.
- Placement of Lights: Be strategic with placement to avoid glare that could disturb the birds. Aim lights at an angle that highlights the water surface without being too harsh. Consider using lights with adjustable brightness or focus to better control the illumination.
- Installation: For solar lights, ensure that the solar panels receive adequate sunlight during the day for efficient charging. For electrical lights, waterproof outdoor extension cords are necessary unless the lights are battery-operated or solar.
- Safety Precautions: If using electrical lights, make sure all components are rated for outdoor use and weather conditions in your area. Ensure that cords and fixtures do not present a trip hazard or become waterlogged.
- Enhance the Effect: Add reflective or light-colored stones or mulch around the base of the bird bath to amplify the light. Consider placing plants with light-colored blooms nearby to reflect more light and add to the ambiance.
- Maintenance: Regularly check solar panels for dirt and clean them to maintain efficiency. Replace any burnt-out bulbs promptly and check connections for corrosion or damage.
These suggestions should help you create a beautiful nighttime scene around your bird bath, inviting both feathered friends and human admirers to enjoy your garden after dark.
How to repair a cracked bird bath?
Repairing a cracked bird bath can be a straightforward task, depending on the severity of the crack and the material of the bird bath. Here's a general guide to help you repair a cracked bird bath:
Materials Needed:
- Waterproof Epoxy Sealant: Choose a sealant appropriate for the material of your bird bath (e.g., concrete, ceramic, resin).
- Scrub Brush or Wire Brush: For cleaning the area around the crack.
- Sandpaper: Medium to fine grit, for smoothing the surface and preparing it for adhesion.
- Clean Cloths or Rags: For drying the bird bath after cleaning.
- Putty Knife: Optional, for applying the epoxy.
- Gloves and Safety Gear: To protect your hands and eyes during the process.
Steps to Repair:
- Clean the Bird Bath: Empty and thoroughly clean the bird bath, especially around the cracked area, using a scrub brush or wire brush. Remove any debris, algae, or dirt to ensure the epoxy adheres properly. Rinse with clean water and allow it to dry completely.
- Prepare the Surface: Use sandpaper to gently sand the area around the crack to create a rough surface for better adhesion. Wipe away any sanding dust with a clean, dry cloth.
- Mix the Epoxy: Follow the manufacturer's instructions to mix the epoxy sealant. Most epoxies require mixing two parts together until uniformly blended.
- Apply the Epoxy: Wearing gloves, apply the epoxy to the crack, using a putty knife or your fingers. Ensure the epoxy is pressed into the crack and slightly over the edges to create a tight seal. Smooth it out as much as possible to create an even surface.
- Allow to Cure: Let the epoxy dry and cure for the time recommended by the manufacturer, typically 24 hours. Make sure the repair is thoroughly dried before proceeding to the next step.
- Check the Repair: After the epoxy has fully cured, inspect the crack to ensure it is sealed properly. If necessary, apply a second layer of epoxy for additional strength.
- Refinish (Optional): If desired, paint over the repair with a non-toxic, waterproof paint suitable for the bird bath's material. This step is optional, but it can enhance the appearance and longevity of the repair.
- Reassemble and Fill: Once everything is completely dry and cured, reassemble (if applicable) and fill the bird bath with water to check for any leaks.
Additional Tips:
- Material Considerations: For ceramic bird baths, you might also consider using a ceramic repair kit, which can offer a more precise color match.
- Regular Inspection: Inspect the bird bath regularly to catch and repair any new cracks early, minimizing damage.
- Winter Storage: Consider storing your bird bath indoors during the winter to prevent freeze-thaw cycles, which can cause cracking.
By following these steps, you can extend the life of your bird bath and continue to provide a refreshing space for local birds.
How to install a heater in a bird bath?
Installing a heater in a bird bath can help provide birds with access to water during freezing conditions. Here’s a step-by-step guide on how to install a heater in a bird bath:
- Choose the Right Heater: Purchase a heater that is specifically designed for bird baths. These are typically submersible heaters or heated bases. Make sure it is appropriate for the size of your bird bath and for outdoor use. Check that the power rating is compatible with your electrical supply (usually 120 volts in North America).
- Read the Instructions: Before you begin the installation, read all the instructions and safety warnings provided by the manufacturer.
- Location and Safety: Place your bird bath in a location where it's easily accessible and visible for enjoyment. Ensure the area is safe from predators and away from heavy foot traffic. Make sure the electrical source is weatherproof and ideally connected to a GFCI (Ground Fault Circuit Interrupter) outlet to prevent electrical hazards.
- Prepare the Electrical Connection: If your bird bath is not close to an electrical outlet, you will need a heavy-duty outdoor extension cord. Make sure it is rated for outdoor use and can handle the wattage of the heater. Keep cords tidy and out of the way to prevent tripping hazards.
- Install the Heater: For a submersible heater: Place the heater at the bottom of the bird bath. Ensure it is fully submerged in water before turning it on. These heaters typically have a thermostat that automatically turns them on and off. For a heated base: Place the bird bath on top of the heated base. Ensure it's stable and the base is flat. Some designs might require a bird bath with a flat bottom for stability.
- Secure the Cord: To prevent accidental disconnection, secure the cord along the ground using garden staples or tuck it away along the edge of a path.
- Fill the Bird Bath with Water: Make sure the water level is above the minimum requirement for the heater to function properly. Check the manual for specific details regarding the water level.
- Monitor and Maintain: Regularly check the water level to ensure the heater is submerged and not running dry. Clean the bird bath periodically to prevent algae growth and to ensure clean water for the birds. Inspect the heater and cord for any signs of damage, and make sure all connections are secure and dry.
- Precautions: Never use a bird bath heater in a metal bird bath unless the heater is specifically rated safe for such use. Disconnect the heater before doing any cleaning or maintenance.
By following these steps, you provide a valuable source of unfrozen water for birds during the winter months, promoting the health and enjoyment of avian visitors.