
Best Backpack Leaf Blowers to Buy in July 2026
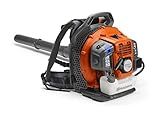
Husqvarna 150BT Gas Leaf Blower, 51-cc 2.16-HP 2-Cycle Backpack Leaf Blower, 765-CFM, 270-MPH, 22-N Powerful Clearing Performance and Ergonomic Harness System, 970466901
- POWERFUL 2-CYCLE ENGINE: 765 CFM & 270 MPH FOR HEAVY-DUTY TASKS.
- ERGONOMIC DESIGN: PADDED HARNESS ENSURES COMFORT DURING USE.
- EASY STARTING: AIR PURGE SYSTEM & VARIABLE SPEED THROTTLE SIMPLIFY OPERATION.


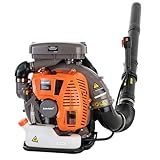
Schröder Backpack Leaf Blower - Backpack Blower - Gas Leaf Blower - SR-6400L - 3.7 HP Engine
-
UNMATCHED POWER: 63.3 CC ENGINE DELIVERS 230 MPH AIRSPEED FOR EFFORTLESS CLEANING.
-
ULTIMATE COMFORT: LIGHTWEIGHT DESIGN AND ERGONOMIC STRAPS MINIMIZE FATIGUE DURING USE.
-
BUILT TO LAST: COMMERCIAL-GRADE DURABILITY ENSURES RELIABLE PERFORMANCE IN ANY ENVIRONMENT.
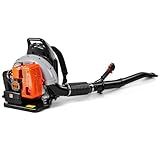
HTK Backpack Blower, 63CC Gas Powered Leaf Blower with 665 CFM & 205 MPH for Commercial Lawn Care, Yard Debris & Snow Removal
-
POWERFUL 63CC ENGINE: TACKLE TOUGH JOBS WITH COMMERCIAL-GRADE STRENGTH.
-
RAPID CLEARING: 665 CFM AIR VOLUME CLEARS AREAS QUICKLY AND EFFICIENTLY.
-
COMFORT & CONTROL: ERGONOMIC DESIGN AND EASY STARTS REDUCE FATIGUE AND HASSLE.
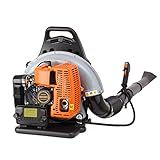
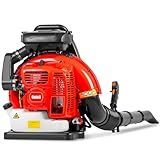
Backpack Gas Powered Leaf Blower, Commercial 2.7kW 850CFM 63CC 4.3HP 2-Stroke Powerful Lightweight Gasoline Grass Lawn Blower w/Harness Air-Cooled & 1.8L Fuel Tank for Yard Lawn Care, Snow Removal
- POWERFUL 63CC ENGINE DELIVERS HIGH SPEED, BOOSTING WORK EFFICIENCY.
- ADJUSTABLE DESIGN ALLOWS EASY DIRECTION CHANGES FOR WIDESPREAD BLOWING.
- LIGHTWEIGHT & ERGONOMIC BUILD MAKES FOR EFFORTLESS LONG-TERM USE.
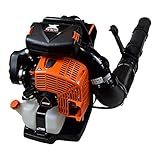
ECHO 220 MPH 1110 CFM 79.9 cc Gas 2-Stroke X Series Backpack Blower with Tube-Mounted Throttle PB-9010T
- HIGH-QUALITY TOOLS THAT DELIVER PROFESSIONAL RESULTS.
- AFFORDABLE PRICING WITHOUT COMPROMISING ON PERFORMANCE.
- VERSATILE OPTIONS SUITABLE FOR VARIOUS PROJECTS AND SKILLS.
Getell Professional Gas Powered Backpack Leaf Blower – 2-Stroke High-Performance 63CC/665 CFM Blower System with Comfort Design for Complete Property Maintenance (GB655 PRO)
-
HIGH-POWERED PERFORMANCE: 63 CC ENGINE WITH 665 CFM AIRFLOW FOR ULTIMATE CLEANING.
-
SMART TECHNOLOGY: SPEED CONTROL ADAPTS FOR DETAILED CARE AND HEAVY-DUTY TASKS.
-
ALL-DAY COMFORT: ERGONOMIC DESIGN AND COOLING VENTILATION REDUCE OPERATOR FATIGUE.
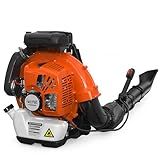
75.6cc Gas Leaf Blower Backpack 847CFM 2-Cycle Ergonomic Harness System 236 MPH Low Vibration and Cruise Control Powerful Gas Blowers for Lawn Yard Care Gifts for Dad
-
POWERFUL 75.6CC ENGINE: TACKLES TOUGH TASKS YEAR-ROUND EFFORTLESSLY.
-
HIGH AIRFLOW & SPEED: 847 CFM AND 236 MPH FOR UNBEATABLE EFFICIENCY.
-
ERGONOMIC COMFORT DESIGN: PADDED STRAPS AND CRUISE CONTROL FOR FATIGUE-FREE USE.
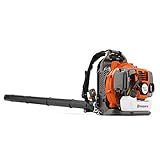
Husqvarna 350BT Gas Leaf Blower, 50.2-cc 2.1-HP 2-Cycle Backpack Leaf Blower with 692-CFM, 180-MPH, 21-N Powerful Clearing Performance and Ergonomic Harness System, Gifts for dad
-
POWERFUL 50.2-CC ENGINE: 180 MPH & 692 CFM FOR ULTIMATE CLEARANCE.
-
ERGONOMIC DESIGN: ADJUSTABLE HARNESS FOR COMFORTABLE, CONTROLLED USE.
-
EASY START SYSTEM: AIR PURGE AND LOWVIB TECHNOLOGY FOR SMOOTH OPERATION.
Assembling a backpack leaf blower might vary slightly depending on the specific model you have, but the general process is fairly similar. Here's a step-by-step guide on how to assemble a backpack leaf blower:
- Start by unpacking and laying out all the components that come with the leaf blower. Ensure that you have all the necessary parts including the blower unit, the backpack straps, a nozzle or tube, and the necessary screws or fasteners.
- Begin by attaching the backpack straps to the blower unit. Typically, there will be designated attachment points on the blower unit. Securely fasten the straps to these points using the provided screws or fasteners. Make sure the straps are adjusted to a comfortable fit for your body.
- Next, attach the blower tube or nozzle to the blower unit. Look for a connection point near the air outlet. Align the tube with the connection point and slide it in until it fits securely. Some models may require you to use screws or fasteners to secure the tube in place.
- Once the tube is attached, check if there are any additional accessories like a handle or secondary tube. If you have any extras, follow the manufacturer's instructions to attach them accordingly.
- After all the components are securely attached, double-check all the connections to ensure they are tight and properly aligned.
- Finally, make sure you have fuel (if required) and check the oil level (if applicable). Follow the instructions in the user manual to fuel up the backpack leaf blower correctly.
Remember, it's important to always consult the specific assembly instructions provided by the manufacturer for your model as the process may vary. Additionally, follow the safety guidelines mentioned in the user manual while operating the backpack leaf blower to ensure safe and effective use.
How to replace the recoil starter cord on a backpack leaf blower?
Replacing the recoil starter cord on a backpack leaf blower can typically be done following these steps:
- Gather the necessary tools: You will need a screwdriver, pliers, and a new recoil starter cord.
- Remove the starter assembly: Locate the starter assembly on the side of the engine. It is usually held in place with screws. Use the screwdriver to remove the screws and take off the starter assembly cover.
- Release the tension on the spring: Once you have removed the cover, you will see a spring coil inside. Using your pliers, grip the cord handle and unwind the existing cord from the coil, allowing the tension to release slowly. Be cautious, as the spring may snap back suddenly if not controlled properly.
- Remove the old cord: Once the tension has been released, carefully remove the old cord from the coil. Take note of how the old cord was attached to the mechanism, as you will need to reattach the new cord in the same way.
- Attach the new cord: Take the new cord and thread it through the hole on the outside of the starter reel. Pull the cord through until you have an equal length of cord on both sides.
- Wind the new cord: Begin winding the cord around the starter reel, making sure it wraps tightly and evenly. Wind it in the same direction as the original cord, usually in the clockwise direction.
- Secure the cord: After the cord has been wound around the starter reel, find the notch on the reel where the cord can be secured. This is typically a small groove where the end of the cord can be inserted and held in place.
- Wind the spring: Use the pliers once again to slowly wind the starter spring back into its original position. Continue winding until you feel resistance and the spring is fully tensioned, but be careful not to overwind it.
- Test the recoil starter: Give the cord a gentle pull to test the recoil starter mechanism. It should retract smoothly and fully when released.
- Reassemble the starter assembly: Once you are satisfied with the recoil starter function, reattach the starter assembly cover using the screws you removed earlier.
By following these steps, you should be able to successfully replace the recoil starter cord on your backpack leaf blower. However, it's always advisable to consult the specific user manual for your leaf blower model, as the details and steps may vary.
How to start a backpack leaf blower?
Starting a backpack leaf blower typically involves a set of steps that can vary slightly depending on the specific model and brand. However, the following are general instructions on how to start a backpack leaf blower:
- Prepare the blower: Put on any necessary safety gear, such as goggles, ear protection, and gloves. Make sure the backpack leaf blower is fueled up with a proper fuel mixture (if two-stroke engine) or filled with gasoline (if four-stroke engine).
- Prime the blower (if applicable): If your leaf blower has a primer bulb, press it several times to get fuel into the carburetor. This may not be required for all models.
- Set the controls: Adjust the throttle to the "start" or "choke" setting. Set the blower tube in a suitable position, either pointing away from you or upwards.
- On/Off switch: Locate the on/off switch, usually located near the throttle. Switch it to the "on" position.
- Starting procedure: Place the machine on a flat and stable surface. Secure it by holding it firmly against your leg or with a strap around your waist. Keep your hand free from the throttle trigger.
- Pull the starter cord: Grasp the starter handle firmly, keeping the cord taut. While standing over the blower, pull the cord smoothly and firmly, but not excessively, until you feel resistance. Then, forcefully pull the cord to start the engine. Repeat this step if the engine doesn't start on the first attempt. Be mindful of any recoil from the cord.
- Warm-up: Once the engine starts, let it idle for a minute or two to warm up. During this time, gently disengage the choke or move it to the "run" position, depending on your model.
- Engage throttle: After the warm-up period, engage the throttle to the desired speed for leaf blowing and begin your cleanup.
It's essential to consult the specific manufacturer's instructions for your backpack leaf blower as starting procedures might differ slightly.
What is the recommended fuel mixture for a backpack leaf blower?
The recommended fuel mixture for a backpack leaf blower typically consists of a 2-stroke engine oil mixed with regular unleaded gasoline. The most common ratio for the fuel mixture is 50 parts gasoline to 1 part oil (50:1), but it is always advisable to consult the specific recommendations of the manufacturer mentioned in the leaf blower's user manual.
How to connect the blower tube to a backpack leaf blower?
Connecting the blower tube to a backpack leaf blower typically involves a few simple steps. Here is a general guide:
- Locate the blower tube: The blower tube is usually a long, narrow attachment that directs the airflow from the blower. It may be stored separately or already attached to the blower handle.
- Position the blower: Place the backpack leaf blower on a flat and stable surface, ensuring that it is securely positioned.
- Identify the connection point: Look for the corresponding connection point on the blower's handle or nozzle. This is where the blower tube will be attached.
- Align and insert: Line up the end of the blower tube with the connection point on the blower. Insert the blower tube firmly into the opening, ensuring that it is fully engaged and securely connected. It may require a slight twist or push to lock it in place, depending on the specific model.
- Confirm the connection: Gently pull on the blower tube to confirm that it is securely attached to the blower. It should not easily detach or move.
- Check for any air leaks: Before operating the blower, it's important to check for any air leaks around the connection point. Ensure the seal is tight, without any gaps or air escaping from the joint. If there are any leaks, reposition the blower tube and reattach it to create a proper seal.
Please note that the specific instructions may vary depending on the make and model of the backpack leaf blower, so it's always recommended to refer to the owner's manual for detailed instructions specific to your equipment.
What is the lifespan of a backpack leaf blower?
The lifespan of a backpack leaf blower can vary depending on several factors, including brand, quality, maintenance, and frequency of use. On average, a well-maintained backpack leaf blower can last between 5 to 10 years. However, some high-quality models can last even longer with proper care. Regular maintenance, such as cleaning the air filter, checking spark plugs, and using clean fuel, can help extend the lifespan of the leaf blower.