
Best Shed Anchors to Buy in July 2026
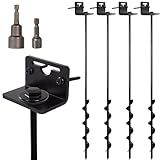
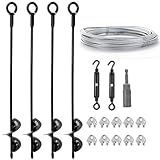
VASGOR 24” Mobile Home Anchors - Ground Anchor Screw in with Brackets and Adapter for Drill - Earth Anchors - Storage Shed and Swing Anchor Kits
- UNMATCHED STABILITY: HOLDS STRONG IN WINDS UP TO 1000 LBS-NO BUDGING!
- DRILL-READY CONVENIENCE: INCLUDES ACCESSORIES FOR QUICK AND EASY SETUP.
- VERSATILE USE: PERFECT FOR SWINGS, TENTS, SHEDS, AND MORE OUTDOOR NEEDS!


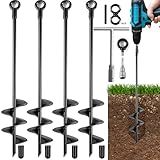
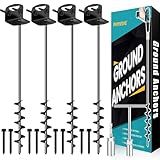
Fabulas Ground Anchors Heavy Duty, Swing Set Anchor Kit 18 Inch 4 Pack Screw in Earth Anchors Trampoline Stakes High Wind Metal Auger Anchor for Shed Tent Carports Securing Animals Camping Mobile Home
- DURABLE METAL CONSTRUCTION: HEAVY-DUTY, RUST-RESISTANT DESIGN FOR LONGEVITY.
- QUICK INSTALLATION: EFFORTLESS SETUP WITH DRILL OR WRENCH, SAVES TIME.
- VERSATILE USE: PERFECT FOR SHEDS, TENTS, TRAMPOLINES, AND MORE!
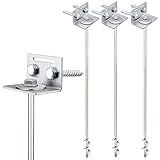
Ground Anchors Screw in - 24" Set of 4 with Brackets and Drill Bit - Earth Anchors - Mobile Home Anchors - Storage Shed Anchor Kit - Swing Set Anchors for Metal Swing Set - Playset Anchor - Tie Down
-
EFFORTLESS SETUP: QUICK INSTALLATION WITH INCLUDED HEX DRILL BIT!
-
UNMATCHED STRENGTH: HOLDS UP TO 4.7 TONS WITHOUT LOSING SHAPE!
-
SECURE YOUR VALUABLES: DESIGNED FOR HARD SOIL-NO WIND WORRIES!
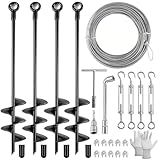
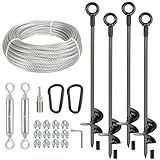
Fabulas 4 Pack 18" Ground Anchors Shed Anchor Kit with 50ft Galvanized Cable & 4 Pack Turnbuckles, Heavy Duty Ground Anchor Screw in Spiral Auger Earth Stakes for Shed Trampoline Swing Set Mobile Home
-
COMPLETE KIT: EVERYTHING YOU NEED FOR SECURE OUTDOOR ANCHORING.
-
SUPERIOR GRIP: 18 ANCHORS WITH SPIRAL BLADES ENSURE MAXIMUM STABILITY.
-
EASY USE: QUICK INSTALLATION WITH TOOLS; GLOVES FOR SAFE HANDLING.
hannger 4 Pack 18" Ground Anchors Shed Anchor Kit with 1/8" Galvanized Cable & Turnbuckles, Heavy Duty Earth Anchors for Sheds Canopy Gazebo Dog Runs Carport Tent
- COMPLETE KIT: 4 HEAVY-DUTY ANCHORS + ACCESSORIES FOR EASY SETUP.
- DURABLE BLACK COATING ENSURES RUST-RESISTANCE IN HARSH CONDITIONS.
- SUPERIOR HOLDING POWER AGAINST HIGH WINDS FOR SECURE ANCHORING.
25" Ground Anchors Screw in, Mobile Home Anchors with Upgraded Wider Spiral Blades, Earth Anchors Swing Set Anchors High Wind Heavy Duty for Shed, Trampoline, Carports(Set of 4)
- WIDER BLADES FOR SUPERIOR GRIP: ENHANCED STABILITY IN CHALLENGING SOILS.
- QUICK & EASY INSTALLATION: USE AN ELECTRIC DRILL FOR FAST SETUP ANYWHERE.
- VERSATILE ANCHORING SOLUTIONS: PERFECT FOR SECURING VARIOUS OUTDOOR ITEMS.
hannger 4 Pcs 30" Long Ground Anchors Shed Anchors Kit with 3/16" Galvanized Cable & Turnbuckles & Carabiners, Heavy Duty Earth Anchors for Sheds Trees Trampoline Greenhouse Swing Set Tent
-
SUPERIOR STABILITY: 30 ANCHORS RESIST TIPPING IN HIGH WINDS.
-
HEAVY-DUTY DURABILITY: QUALITY STEEL CONSTRUCTION ENSURES LONG-LASTING USE.
-
VERSATILE USE: PERFECT FOR SECURING FURNITURE, PLAYGROUNDS, AND MORE!
An outdoor storage shed is a great addition to any property as it provides extra storage space for tools, equipment, and other items. To ensure its stability and prevent it from being damaged or blown away by strong winds, it's important to anchor the shed firmly to the ground. Here's how you can accomplish this:
- Choose the right location: Select a suitable spot for your shed where the ground is level and well-drained. Avoid areas prone to flooding or standing water.
- Gather the necessary materials: You'll need anchor kits, which typically include metal stakes or rods, cables or straps, and any necessary hardware. These kits can be purchased from local hardware stores or online.
- Prepare the shed site: Clear away any obstacles or debris from the area where the shed will be installed.
- Mark the spots for anchor placement: Determine where the corners of your shed will rest and mark these spots on the ground with stakes or paint. This will help you accurately position the anchors.
- Install the ground anchors: Using a mallet or hammer, drive the metal stakes or rods provided in the anchor kit into the ground at the designated spots. Make sure they are buried deep enough so they won't be easily pulled out.
- Secure the shed to the anchors: Attach the cables or straps to the shed's base or floor, and connect them to the ground anchors using the hardware provided. Follow the manufacturer's instructions for proper attachment.
- Tighten the cables/straps: Ensure the cables or straps are securely tightened to provide adequate tension and keep the shed in place. Avoid over-tightening, as this can put unnecessary strain on the shed's structure.
- Test for stability: Give the shed a gentle tug or push to check if it feels secure. If it moves or wobbles, adjust the anchor cables or straps until it is firmly anchored.
- Regularly check and maintain the anchors: Periodically inspect and tighten the cables or straps, especially after severe weather conditions or ground shifts. Replace any damaged or worn-out components as needed.
By following these steps, you can effectively anchor your outdoor storage shed to the ground, protecting it against potential damage and ensuring it remains stable and secure.
Can I use cinder blocks as shed anchors?
Cinder blocks can potentially be used as shed anchors, but they may not provide sufficient stability or security on their own. It is recommended to use purpose-built shed anchors, such as ground anchors or concrete footings, for a stronger and more secure foundation. These anchors are specifically designed to provide stability and prevent the shed from shifting or being lifted by strong winds. However, if cinder blocks are used as an additional measure along with proper shed anchors, they can offer some added stability. It is important to consult with a professional or follow the manufacturer's instructions for proper anchoring methods specific to your shed's size and location.
How do I install a helical anchor?
Installing a helical anchor involves several steps, and it is important to follow safety guidelines and manufacturer instructions for your specific anchor. The following is a general guide on how to install a helical anchor:
- Gather the necessary tools and equipment: You will need a helical anchor, a drive tool or installation machine, a torque indicator, a level, and any other tools recommended by the manufacturer.
- Determine the installation location: Identify the spot where you want to install the helical anchor. Ensure it meets the required depth, alignment, and angle for the specific project.
- Prepare the installation equipment: Attach the appropriate drive tool or installation machine to the helical anchor. Make sure it is securely connected and ready for installation.
- Clear the area: Remove any obstructions or debris that could hinder the installation process. This ensures a smooth installation and proper placement.
- Start the installation: Hold the drive tool or installation machine and begin rotating it clockwise to drive the helical anchor into the ground. Apply downward force while maintaining a vertical alignment to ensure proper penetration.
- Monitor torque and depth: Use a torque indicator and depth gauge to monitor the torque applied and the depth reached during installation. Follow the manufacturer's recommendations for torque values and required installation depth.
- Confirm proper installation: Use a level to check if the helical anchor is properly aligned and plumb after installation. Adjust if necessary to ensure accuracy.
- Install additional anchors if required: If the project requires multiple helical anchors, repeat the installation process for each one following the appropriate spacing and alignment guidelines.
- Secure any attachments: If the helical anchor is designed to support structures or hold objects, secure them according to the manufacturer's instructions, such as attaching brackets, plates, or other components.
It is essential to consult the manufacturer's installation guidelines and specifications for your specific helical anchor to ensure proper installation and maximize its performance.
What is the recommended distance between anchor points?
The recommended distance between anchor points can vary depending on the specific application and the type of anchor being used. However, as a general guideline, it is typically recommended to have anchor points spaced no more than 6 feet apart horizontally and no more than 4 feet apart vertically. This spacing helps ensure proper support and stability for the intended load or force. It is important to refer to the manufacturer's instructions and applicable safety standards for specific anchor products and intended use.
How do I prevent damage to the shed during anchor installation?
To prevent damage to the shed during anchor installation, follow these steps:
- Choose the appropriate type of anchor: Select an anchor that is suitable for the type of shed and the ground condition. Examples include ground anchors, concrete anchors, or mobile home anchors.
- Clear the area: Before starting the installation process, remove any debris, rocks, or other obstacles from the ground near the shed. This will prevent any damage during the installation.
- Mark the anchor locations: Determine the ideal spots for the anchors and mark them with chalk or tape. Make sure the anchors will be placed in stable ground and will provide sufficient support.
- Dig pilot holes: Use a hand auger or a spade to dig pilot holes at each marked location. The depth of the holes should be as specified by the anchor manufacturer.
- Insert the anchors: Carefully insert the anchors into the pilot holes, ensuring they are positioned straight and level. If using ground anchors, make sure they are twisted firmly into the ground until only the eyelet or attachment point is showing. If using concrete anchors, follow the manufacturer's instructions for installation.
- Tighten the anchors: Use the provided tools or equipment to tighten the anchors securely into place. Be cautious not to overtighten, especially if using concrete anchors, as it may cause damage to the shed.
- Test the stability: Once the anchors are securely installed, test the stability by gently pulling or pushing on the shed from different directions. If the shed feels steady and firm, the installation was successful.
By following these steps carefully, you can minimize the risk of damage to the shed during anchor installation. Always consult the anchor manufacturer's instructions for specific guidelines and recommendations.