
Best Ventilation Solutions for Sheds to Buy in July 2026
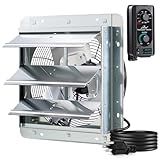
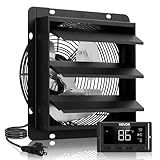
iLIVING 12" Wall Mounted Shutter Exhaust Fan, Automatic Shutter, with Thermostat and Variable Speed controller, 0.6A, 960 CFM, 1400 SQF Coverage Area Silver (ILG8SF12V-ST)
- POWERFUL AIRFLOW: 960 CFM COVERS UP TO 1400 SQ FT, ENSURING OPTIMAL VENTILATION.
- SPEED CONTROL: VARIABLE SPEEDS & THERMAL REGULATION FOR TAILORED COMFORT.
- DURABLE DESIGN: BUILT WITH GALVANIZED STEEL AND ALUMINUM FOR LONG-LASTING USE.


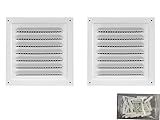
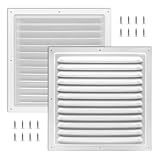
2pcs Attic Vent Soffit Vent Aluminum Wall Vent Metal Shed Vent Square Vent Louver Vent Grille with Built-in Insect Screen for Exterior Door House Attic Garage Ceiling (White 6" x 6"-2 Pack)
-
DURABLE METALLIC VENTS FOR RELIABLE EXHAUST AND INTAKE SOLUTIONS.
-
VERSATILE FOR HOMES, SHEDS, GARAGES, AND MORE-PERFECT FOR ANY NEED.
-
ENHANCE HOME VALUE WITH STYLISH, EFFICIENT VENTILATION SOLUTIONS.
![2 Pcs 16" X 16" Gable Vents, Hon&Guan Aluminum Alloy Attic Vent for Houses Door Vents for Exterior Doors [Vent Opening: 13.9” x 13.9”], Black](https://cdn.blogweb.me/1/41idb7b_Q_Wr_L_SL_160_8028e601e1.jpg)
2 Pcs 16" X 16" Gable Vents, Hon&Guan Aluminum Alloy Attic Vent for Houses Door Vents for Exterior Doors [Vent Opening: 13.9” x 13.9”], Black
-
DURABLE ALUMINUM DESIGN: RUST-PROOF, HURRICANE-RESISTANT, LONG-LASTING.
-
OPTIMAL AIRFLOW & PROTECTION: FREELY CIRCULATING AIR WHILE BLOCKING DEBRIS.
-
WHISPER-QUIET OPERATION: ENJOY PEACE WITH NOISELESS, SMOOTH FUNCTIONING.
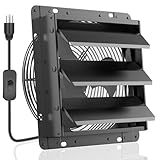
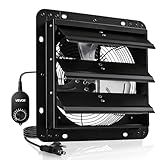
HG Power Upgraded 10 Inch Shutter Exhaust Fan, 647CFM Quiet Garage Exhaust Fan with 8 Foot Long ON/OFF Switch Cable for Chicken Coop, Shed, Basement, Gable, Kitchen, Attic Ventilation Use, Black
- VERSATILE 647CFM FAN: IDEAL FOR ANY SPACE NEEDING VENTILATION.
- DURABLE DESIGN: SEALED LOUVER BLOCKS RAIN AND DUST EFFECTIVELY.
- HASSLE-FREE INSTALLATION: SET UP EASILY INDOORS, NO OUTDOOR WORK NEEDED!
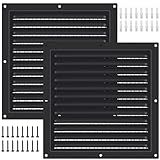
2 Pcs Attic Vent 10" X 10" Shed Vents Metal Gable Vents for Houses Wall Vent with Screen Vent Covers for Home Garage Attic Ceiling, Boost Ventilation and Guard Against Moisture
-
DURABLE METAL DESIGN: HIGH-QUALITY, CORROSION-RESISTANT FOR LASTING USE.
-
IDEAL SIZE FOR AIRFLOW: PERFECT 10X10 FIT ENSURES EFFECTIVE VENTILATION.
-
VERSATILE APPLICATIONS: PERFECT FOR SHEDS, GARAGES, BATHROOMS, AND MORE!
VEVOR 12 inch Shutter Exhaust Fan, Wall Mounted Attic Vent Fan with Smart Programming Variable Speed Temperature Control, 1500 CFM,EC Motor,Timer, for Shed,Garage,Greenhouse Ventilation Cooling,Black
-
RAPID VENTING: EXPELS 1500 CFM FOR FRESH, CLEAN INDOOR AIR FAST.
-
SMART PROGRAMMING: INTELLIGENT CONTROLLER ADJUSTS SETTINGS FOR OPTIMAL AIRFLOW.
-
TOUGH BUILD: DURABLE ALL-METAL DESIGN WITHSTANDS HARSH WEATHER CONDITIONS.
VEVOR 10 inch Shutter Exhaust Fan, Wall Mounted Attic Vent Fan with Variable Speed Controller, 900 CFM, AC Motor, Heavy-duty Steel, Low Noise for Shed, Garage, Greenhouse Ventilation Cooling, Black
- RAPID VENTING: EXPELS STALE AIR AND ODORS QUICKLY WITH 900 CFM.
- SMOOTH VARIABLE SPEED: TAILOR AIRFLOW FROM GENTLE BREEZE TO POWERFUL BLAST.
- TOUGH BUILD: ALL-METAL CONSTRUCTION WITHSTANDS HARSH WEATHER CONDITIONS.
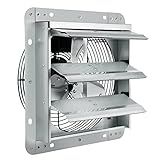
VEVOR 10'' Exhaust Fan, Wall Mounted Attic Fan with Variable Speed, 820 CFM, Automatic Shutter, Ventilation and Cooling, Silver, Fan Only
- POWERFUL 820 CFM AIRFLOW ELIMINATES HEAT, ODORS, AND DUST.
- RUST-PROOF ALL-METAL DESIGN ENSURES DURABILITY IN ANY ENVIRONMENT.
- EASY INSTALLATION IN WINDOWS AND WALLS FOR OPTIMAL COOLING.
2Pcs Aluminum Gable Vents with Screen Mesh, 10x10 Inch Metal Wall Vents for Attic, Garage, Shed, and Exterior Doors, Square Louver Vent Grilles for Improved Ventilation
-
DURABLE ALUMINUM BUILD: LONG-LASTING STRENGTH FOR RELIABLE VENTILATION.
-
EASY 10X10 INSTALLATION: HASSLE-FREE SETUP WITH INCLUDED SCREWS.
-
VERSATILE DESIGN: PERFECT FOR ATTICS, SHEDS, WALLS-MANY AIRFLOW NEEDS!
Adding ventilation to an outdoor storage shed is important to prevent condensation, mold, and mildew buildup. There are several ways to achieve proper ventilation in a shed. One common method is to install vents on the walls or roof of the shed to allow air to circulate. You can also add a small window or skylight to provide additional airflow. Another option is to install a solar-powered vent fan that automatically turns on when the temperature rises, helping to keep the shed cool and dry. Proper ventilation is key to maintaining the integrity of your shed and protecting your belongings stored inside.
How to add a window to a shed for ventilation?
Adding a window to a shed for ventilation is a relatively simple process that can be completed with a few basic tools and materials. Here's how to do it:
- Choose the location: Decide where you want to add the window to the shed. Consider the layout of the shed and where the window will provide the best airflow.
- Measure and mark: Measure the size of the window you want to add and mark the dimensions on the shed wall using a pencil and a level.
- Cut the hole: Using a saw, carefully cut out the marked area of the shed wall. Be sure to follow safety precautions while using the saw.
- Install the window frame: Place the window frame in the hole you cut, making sure it fits snugly. Use screws to attach the frame to the shed wall.
- Add the window: Slide the window into the frame and secure it in place according to the manufacturer's instructions.
- Seal the edges: Use caulk or weather-stripping to seal the edges of the window frame, preventing drafts and moisture from entering the shed.
- Test the ventilation: Open the window to ensure it functions properly and provides adequate ventilation.
By following these steps, you can easily add a window to your shed for added ventilation and natural light.
How to install a humidity sensor in a shed for ventilation control?
To install a humidity sensor in a shed for ventilation control, follow these steps:
- Choose a suitable location: Select a spot in the shed where the humidity sensor can easily detect the moisture levels in the air. Make sure the sensor is not blocked by any obstructions and is placed in an area where it is not exposed to direct sunlight or drafts.
- Install the sensor: Mount the humidity sensor on a wall or ceiling using screws or adhesive tape, depending on the sensor's design. Make sure to follow the manufacturer's instructions for proper installation.
- Connect the sensor to a ventilation system: If you have a ventilation system installed in your shed, connect the humidity sensor to the system's control unit using the appropriate wiring. Make sure to follow the wiring diagram provided by the manufacturer for correct connections.
- Program the sensor: Set the desired humidity level on the sensor's control panel or through a connected app (if the sensor is smart-enabled). This will determine when the ventilation system should turn on to maintain the optimal humidity level in the shed.
- Test the sensor: After installing and programming the humidity sensor, test it to ensure it is functioning correctly. Monitor the sensor's readings and check if the ventilation system responds appropriately to changes in humidity levels.
By following these steps, you can successfully install a humidity sensor in your shed for ventilation control to maintain optimal air quality and prevent moisture-related issues.
How to install a vent cover on a shed?
- Measure the dimensions of the vent opening on your shed to ensure you purchase the correct size vent cover.
- Purchase a vent cover that is suitable for outdoor use and matches the size of your vent opening.
- Position the vent cover over the vent opening on your shed to ensure it fits properly.
- Use a pencil to mark the screw holes on the vent cover and the shed where you will be attaching it.
- Drill pilot holes into the shed at the marked screw hole locations using a power drill and the appropriate drill bit.
- Line up the vent cover over the pilot holes and fasten it in place using screws. Make sure the vent cover is securely attached to the shed.
- Check that the vent cover is properly installed and covers the vent opening completely.
- Test the vent cover by turning on any fans or vents in your shed to ensure that air can still flow freely through the vent opening.
- Make any necessary adjustments to the vent cover to ensure proper airflow and ventilation in your shed.
- Enjoy the improved airflow and protection provided by the vent cover on your shed.
What is the recommended placement for ventilation in a shed?
For optimal ventilation in a shed, it is recommended to have vents located near the top of the shed to allow hot air to escape, and vents near the bottom to allow cool air to enter. This creates a natural flow of air and helps to prevent condensation and moisture buildup inside the shed. Additionally, having vents on opposite sides of the shed will help to create cross ventilation, further improving air circulation. It is also important to ensure that the vents are not obstructed by any objects or debris.