
Best Outdoor Cooler Accessories to Buy in July 2026
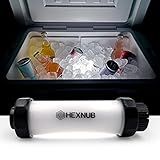
HEXNUB Cooler Box Light, Waterproof, Rechargeable LED Light Compatible with YETI, RTIC, ORCA, Ninja, Igloo, Coleman Ice Chest, Magnetic Base, Great for Outdoor Events, Camping Fishing Hunting Boating
- ILLUMINATE ADVENTURES: ENJOY 55 HOURS OF BRIGHT LIGHT FOR EASY ACCESS!
- UNIVERSAL FIT: ATTACHES TO ANY COOLER BRAND WITH HASSLE-FREE, MAGNETIC BASE.
- RECHARGEABLE CONVENIENCE: QUICKLY RECHARGE IN 4 HOURS, STAY POWERED OUTDOORS!


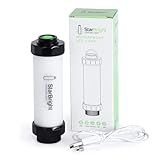
StarBright Rechargeable Cooler Light with USB Charging - Cooler Light for YETI, RTIC, Igloo, Coleman - Waterproof LED - No Installation Required - 5.35x1.61x5.35 Inches - Durable for Outdoor Use
-
60 HOURS OF ILLUMINATION: PERFECT FOR CAMPING, FISHING, AND OUTDOOR EVENTS.
-
WATERPROOF & DURABLE: SUBMERSIBLE DESIGN ENSURES RELIABLE LIGHTING ANYWHERE.
-
USB RECHARGEABLE: EASY CHARGING FOR LONG-LASTING, DEPENDABLE USE ON ADVENTURES.
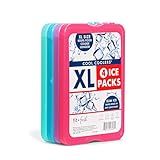
Cool Coolers by Fit & Fresh 4 Pack XL Slim Ice Packs, Quick Freeze Space Saving Reusable Ice Packs for Lunch Boxes or Coolers, Multi
- STAY COLD FOR HOURS-PERFECT FOR PACKED BAGS ON HOT DAYS!
- DURABLE, LEAKPROOF DESIGN IDEAL FOR ALL OUTDOOR ADVENTURES.
- NON-TOXIC, BPA-FREE ICE PACKS-SAFE FOR FOOD AND EASY TO CLEAN!
Skywin Waterproof Multicolor LED Cooler Lights – 2.76 x 1 x 1 Inches, 3 x AA Battery-Operated, Reusable Cooler Accessories for Camping, Outdoor Events, and Parties
- WATERPROOF DESIGN FOR ALL OUTDOOR ADVENTURES
- BRIGHT LED LIGHTS FOR EASY SNACK ACCESS
- BATTERY-POWERED & EASY TO INSTALL ANYTIME
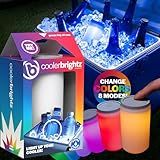
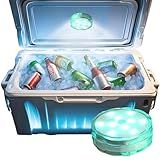
Brightz CoolerBightz LED Cooler Light - 8 Color Modes - Battery Powered Ice Chest Light - Camping Cooler Accessories - Cool Camping, Fishing, Boating, or Tailgating Gadgets
- ILLUMINATE YOUR COOLER: NIGHTTIME VISIBILITY FOR FUN OUTDOOR ADVENTURES!
- EASY SETUP: PORTABLE, WATERPROOF DESIGN FITS POPULAR COOLER BRANDS.
- PARTY MODES: COLOR MORPHING OPTIONS KEEP YOUR GATHERINGS LIVELY!
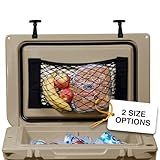
Cooler Net for Dry Storage and Organization - Compatible with YETI, RTIC, Ninja, Igloo, Coleman, Lifetime, Pelican Ice Chests - Works with Cooler Lights, Wheel Kits, RTIC Cooler Accessories, and More
- KEEP FOOD FRESH: ULTRA-STRONG DESIGN PREVENTS SOGGY SNACKS OUTDOORS.
- STAY ORGANIZED: EFFORTLESSLY ACCESS UTENSILS AND DRY GOODS IN COOLER.
- UNIVERSAL FIT: COMPATIBLE WITH MAJOR COOLER BRANDS AND SIZES.
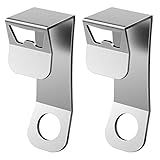
2 Packs Cooler Lock Bracket with Bottle Opener, Heavy Duty Metal Cooler Tie Down Compatible with Yeti/RTIC Coolers, Security Lock Bracket Cooler Accessories
- DURABLE ZINC ALLOY DESIGN: WATERPROOF, RUST-RESISTANT, AND LONG-LASTING.
- BUILT-IN BOTTLE OPENER: CONVENIENTLY OPENS CAPS WITHOUT EXTRA TOOLS.
- UNIVERSAL FIT: FITS MOST MID TO LARGE YETI/RTIC COOLERS SECURELY.
RTIC Cooler Divider for Hard Coolers, Cooler Accessories Perfect for Outdoors, Camping and Travel, Insert to Keep Contents Divided for Organization, 32 QT
- MAXIMIZE STORAGE EFFICIENCY WITH PERFECT FIT FOR 32 QT ULTRA-LIGHT COOLER.
- KEEP FOOD AND DRINKS ORGANIZED FOR EASY ACCESS DURING OUTDOOR ADVENTURES.
- HASSLE-FREE CLEANING ENSURES A FRESH AND READY-TO-USE COOLER EVERY TIME.
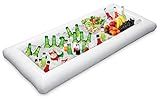
Jasonwell Inflatable Serving Bars Ice Buffet Salad Serving Trays Food Drink Holder Cooler Containers Indoor Outdoor BBQ Picnic Pool Party Supplies Beach Luau Hawaiian Tropical Cooler
-
EXTRA LARGE & VERSATILE: HOLDS PLENTY FOR ANY EVENT, INDOOR OR OUTDOOR!
-
ULTIMATE ICE COOLER: KEEPS DRINKS AND FOOD COLD FOR HOURS-PERFECT FOR PARTIES!
-
EASY TO CLEAN & STORE: CONVENIENT DRAIN PLUG FOR QUICK EMPTYING AND REFILLING!
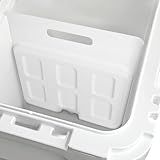
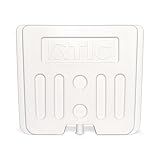
Ice Pack Divider Compatible for YETI Tundra Haul Cooler - Outdoor Accessories for Camping and Travel
- PERFECT FIT: ULTRA-LIGHT DIVIDER DESIGNED FOR YETI TUNDRA HAUL COOLERS.
- ORGANIZE EFFICIENTLY: SEPARATE FOOD AND DRINKS EASILY FOR STRESS-FREE TRIPS.
- CHILL IT: FILL WITH WATER FOR EXTRA COOLING BOOST-FREEZE FOR BEST RESULTS!
Adding extra features like cup holders to an outdoor cooler is relatively simple and can greatly enhance its functionality. Here's a step-by-step guide on how you can do it:
- Assess the cooler: First, examine your outdoor cooler to determine where and how you can add cup holders. Look for flat surfaces or areas where you can attach additional accessories without hindering the cooler's insulation or functionality.
- Choose the cup holders: There are various types of cup holders available in the market, including clip-on cup holders, adhesive cup holders, or holders that need to be screwed onto surfaces. Select a cup holder type that suits your needs and is compatible with your cooler's design.
- Clean and prepare: Clean the surface of the cooler where the cup holders will be attached. Make sure it is dry and free of any dust or debris to ensure a secure attachment.
- Position the holders: Determine the ideal location for your cup holders. Consider accessibility and convenience when deciding where to install them. Most users prefer placing them on the sides or top of the cooler, where they are easily reachable.
- Attach the holders: Follow the instructions provided with the cup holders to attach them properly to the cooler. Depending on the type of cup holder you've chosen, this could involve clipping, adhering, or screwing the holders onto the cooler's surface. Follow the manufacturer's guidelines for the best results.
- Test for stability: Once attached, give the cup holders a gentle tug or shake to ensure they are securely in place. You don't want them to become loose and potentially cause spills or accidents while using the cooler.
- Consider additional features: If you want to go the extra mile, you can explore other features to enhance your outdoor cooler's functionality. These may include adding a bottle opener, Bluetooth speakers, or even LED lights. Again, identify suitable places on the cooler where these features can be attached without interfering with its primary purpose.
Remember, it is important to consider the cooler's insulation and structural integrity throughout this process. Cup holders or other added features should not compromise the cooler's ability to maintain temperature or endure rough outdoor conditions and usage.
What is the best type of cup holder for an outdoor cooler?
The best type of cup holder for an outdoor cooler would be one that is durable, insulated, and easily removable or adjustable. Here are a few options to consider:
- Clip-on Cup Holders: These cup holders can be easily attached to the sides of the cooler using clips or clamps. They are usually made of sturdy plastic or metal and can hold various sizes of cups or bottles. They are convenient as they can be easily moved or adjusted as needed.
- Adjustable Cup Holders: Some outdoor coolers come with built-in cup holders that are adjustable. These holders can accommodate different cup sizes and can be adjusted to various positions. They are especially useful when you have different types of cups or bottles that need to be held securely.
- Insulated Cup Holders: These cup holders have insulation properties that help keep your drinks cold for longer periods. They are usually made of materials like neoprene or foam and provide extra insulation to prevent condensation or heat transfer from affecting your drink. These holders are particularly useful if you plan to spend a long time outdoors.
- Removable Cup Holders: If you prefer versatility, consider purchasing a separate, removable cup holder that can be attached to the cooler when needed. This type often comes with straps or Velcro attachments, allowing you to position it wherever you like on the cooler or even use it separately when not attached.
Ultimately, the best type of cup holder for an outdoor cooler depends on your personal preferences and needs. Consider factors like durability, insulation, adjustability, and convenience when making your choice.
How to secure cup holders to an outdoor cooler?
Securing cup holders to an outdoor cooler can be done easily with the right tools and materials. Here's a simple step-by-step guide to help you secure cup holders to an outdoor cooler:
Materials needed:
- Outdoor cooler
- Cup holders
- Measuring tape
- Marker or pencil
- Drill
- Screws or bolts
- Screwdriver or wrench (as per the fastener type)
Step 1: Measure and mark the placement: Decide where you want the cup holders to be attached on the outdoor cooler. Measure and mark their positions using a measuring tape and a marker or pencil.
Step 2: Pre-drill holes: Drill pilot holes for the screws or bolts at the marked positions on the cooler. Ensure the drill bit diameter matches the screws or bolts.
Step 3: Attach cup holders: Place the cup holders at their designated spots on the cooler. Line up the pre-drilled holes on the cup holders with the holes on the cooler.
Step 4: Secure the cup holders: Insert screws or bolts into the pre-drilled holes on the cup holders and tighten them using a screwdriver or wrench. Make sure they are firmly attached to the cooler.
Step 5: Test the stability: Check the stability of the cup holders by gently tugging or shaking them. If they feel loose, tighten the screws or bolts further, ensuring they are firmly secured in place.
Step 6: Repeat the process if needed: If you want to attach multiple cup holders, repeat steps 1 to 5 for each cup holder, ensuring proper spacing and alignment.
After following these steps, you should have successfully secured the cup holders to your outdoor cooler. Now, you can conveniently place your cups or beverages in the holders while enjoying your outdoor activities.
What materials are needed to add cup holders to an outdoor cooler?
To add cup holders to an outdoor cooler, you will need the following materials:
- Cup holder inserts or clips: These can be purchased online or from a local hardware store. Look for ones that are specifically suitable for outdoor use and can be easily attached to the cooler.
- Drill: A power drill with a drill bit slightly smaller than the cup holder inserts is necessary to create holes in the cooler.
- Marker or pen: Use a marker or pen to mark the desired location for cup holders on the cooler surface.
- Measuring tape or ruler: To ensure accurate placement of cup holders, you can use a measuring tape or ruler to measure and mark the distances.
- Screwdriver: A screwdriver may be required, depending on the type of cup holders you choose. Some cup holders may need to be screwed into place.
- Cleaning supplies: Before installing cup holders, thoroughly clean the cooler surface to remove any dirt, dust, or debris.
- Optional: If the cooler material is thin or flimsy, adding support plates, washers, or reinforcement materials may be necessary to prevent cup holders from detaching or causing damage to the cooler.
Remember to always follow the manufacturer's instructions and suggestions for attaching cup holders to your cooler, as every model may have specific requirements.
How to create adjustable cup holders for an outdoor cooler?
Creating adjustable cup holders for an outdoor cooler can be a fun and practical DIY project. Here's a step-by-step guide on how to do it:
Materials you'll need:
- Outdoor cooler
- PVC pipe (1.5 - 2 inches in diameter)
- PVC pipe cap
- PVC pipe coupler
- PVC pipe elbow joint
- PVC pipe glue
- Drill
- Hole saw attachment (matching the size of your cup holders)
- Sandpaper or file
- Measuring tape
- Marker or pencil
Steps:
- Measure and mark the desired location for your cup holders on the side of your outdoor cooler. Ensure you leave enough space in between each cup holder to fit regular-sized cups or bottles.
- Using a drill and a hole saw attachment, carefully drill holes at the marked locations to create the cup holder openings. Make sure the size of the hole saw matches the size of the PVC pipe you'll be using for the cup holders.
- Once the holes are drilled, smooth out the edges of the holes using sandpaper or a file. This will prevent any sharp or rough edges that could potentially harm cups or bottles.
- Measure and cut the PVC pipe into desired lengths for the cup holders. Each cup holder should be long enough to extend from the cooler's side and accommodate the height of your desired cup or bottle.
- Use PVC pipe glue to attach the PVC pipe caps on one end of each cut PVC pipe. This will create a closed end for the cup holders, preventing cups or bottles from sliding out.
- Apply PVC pipe glue to the other end of each PVC pipe and insert them into the holes you drilled in step 2. Make sure the PVC pipe is securely and tightly attached to the cooler, as it will need to withstand the weight of cups or bottles.
- To add adjustability, insert a PVC pipe coupler into each cup holder. This will allow you to adjust the height of the cup holders by adding or removing pipe sections later.
- Attach a PVC pipe elbow joint to the top of each PVC pipe coupler. This will provide a horizontal platform for the cups or bottles.
- Your adjustable cup holders are now complete! You can arrange the height of the cup holders by adding or removing pipe sections in the couplers, enabling you to accommodate different cup or bottle sizes.
Remember to test the stability and adjustability of your cup holders before using them with cups or bottles. Enjoy your next outdoor adventure with convenient and adjustable cup holders on your cooler!