
Best Under Cabinet LED Lights Installation Guide to Buy in July 2026
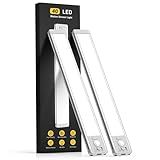
MCGOR 10inch Under Cabinet Lighting, 2 Pack Rechargeable Motion Sensor Light Indoor, 5 Levels Dimmable Magnetic Closet Lights, Wireless Under Counter Lights for Kitchen, Stairs
- AUTO-ACTIVATION WITH MOTION SENSOR FOR HANDS-FREE CONVENIENCE.
- VERSATILE ALWAYS-ON MODE FOR TASKS, READING, OR CAMPING USE.
- CUSTOMIZABLE BRIGHTNESS LEVELS FOR OPTIMAL EYE COMFORT AND USE.


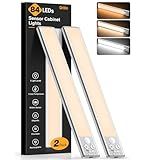
Gritin 10.2inch Under Cabinet Lighting Rechargeable -84 LED Super Bright,3-Color& 5 Level Brightness,4 Modes,Motion Sensor,Long Lasting- Easy Installation Magnetic Under Cabinet Closet Lights -2 Pack
-
DYNAMIC LIGHTING MODES: 4 MODES FOR VERSATILE USE-PERFECT FOR ANY SPACE.
-
MOTION-SENSOR EFFICIENCY: AUTO-OFF FEATURE CONSERVES ENERGY; NO MORE FUMBLING!
-
EASY INSTALLATION: STRONG MAGNETS AND ADHESIVE PLATES FOR HASSLE-FREE SETUP.

Under Cabinet Lighting, 14.7" Rechargeable Motion Sensor Light Indoor, 2 Pack Magnetic Dimmable Closet Lights, Wireless Under Counter Lights for Kitchen, Stairs,Hallway
-
AUTO-ON MOTION SENSOR: LIGHTS ACTIVATE AT 10FT, PERFECT FOR DARK SPACES.
-
DIMMABLE BRIGHTNESS LEVELS: CUSTOMIZE LIGHTING FOR TASKS OR AMBIANCE.
-
EASY USB-C RECHARGE: LONG-LASTING BATTERY; NO WIRING HASSLE NEEDED.
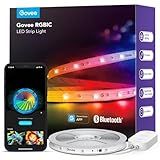
Govee RGBIC LED Strip Lights, Smart LED Lights for Bedroom, Bluetooth LED Lights APP Control, DIY Multiple Colors on One Line, Color Changing LED Strip Lighting Music Sync, Home Decor, 16.4ft
-
VIBRANT RGBIC EFFECTS: DISPLAY MULTIPLE COLORS SIMULTANEOUSLY FOR STUNNING VISUALS.
-
SMART APP CONTROL: PERSONALIZE BRIGHTNESS AND COLORS EASILY VIA THE GOVEE APP.
-
ENGAGING MUSIC SYNC: 11 MODES SYNC LIGHTS TO MUSIC FOR IMMERSIVE EXPERIENCES.

EZVALO 6-Pack Under Cabinet Lighting with Charging Station, 2000mAh Rechargeable Wireless Motion Sensor Lights, 3 Color Temps, Dimmable, Timer, Magnetic, with Remote Control for Kitchen, Closet, Stair
-
THREE VERSATILE MODES: PERFECT LIGHTING FOR EVERY SITUATION AND NEED.
-
STEPLESS DIMMING: TAILOR BRIGHTNESS FOR COMFORT, CLARITY, AND FOCUS.
-
EASY INSTALLATION: TOOL-FREE SETUP WITH PEEL-AND-STICK CONVENIENCE.
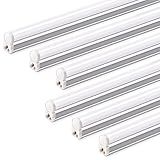
Barrina T5 4FT LED Shop Light, 2200lm,5000K Daylight White, 20W Utility Light Fixture, Ceiling and Under Cabinet Lights for Workshop Garage, Corded Electric with ON/Off Switch, 6 Pack
-
BRIGHT & EFFICIENT: 5000K DAYLIGHT WHITE, 2200 LUMENS, ONLY 20W.
-
FLEXIBLE DESIGN: LINK UP TO 8 LIGHTS SEAMLESSLY; EASY CONNECTIONS.
-
HASSLE-FREE SETUP: PLUG-AND-PLAY INSTALLATION WITH INCLUDED ACCESSORIES.

EZVALO 5 Pack Under Cabinet Lighting, 2400mAh Rechargeable Motion Sensor Light, 10inch Magnetic Closet Lights with Dimmable & 3 Color Temps, Wireless Motion Activated Lights with Remote for Kitchen
-
MOTION-ACTIVATED CONVENIENCE: INSTANT LIGHT IN 0.1 SECONDS-NO MORE TRIPPING!
-
LONG-LASTING RECHARGEABLE: UP TO 45 DAYS OF USE ON A SINGLE CHARGE-HASSLE-FREE!
-
CUSTOMIZABLE LIGHTING: ADJUST COLOR TEMPS & BRIGHTNESS FOR ANY MOOD OR NEED.

DAYBETTER Under Cabinet Lights, 6 PCS Under Cabinet Lighting with Remote, Dimmable LED Strip Lights for Bedroom, LED Lights for Kitchen Cabinet, Counter Shelf 2700K-6500K Warm to Daylight White, 9.8ft
- VERSATILE COLORS: WARM & DAYLIGHT WHITE OPTIONS FOR ANY AMBIANCE.
- SUPER BRIGHT & DIMMABLE: ADJUST BRIGHTNESS FOR PERFECT KITCHEN LIGHTING.
- DUAL CONTROL OPTIONS: EASILY MANAGE WITH REMOTE OR TOUCH CONTROLS.

MCGOR 10inch Under Cabinet Lighting, 2 Pack Rechargeable Motion Sensor Light Indoor, 5 Levels Dimmable Magnetic Closet Lights, Wireless Under Counter Lights for Kitchen, Stairs
- AUTO-ON MOTION SENSOR: LIGHTS ACTIVATE WITHIN 10FT, ENSURING SAFETY.
- DIMMABLE & EYE-PROTECTING: 5 BRIGHTNESS LEVELS FOR ANY OCCASION.
- USB-C RECHARGEABLE: LONG-LASTING BATTERY WITH EASY RECHARGING.

Maylit Under Cabinet Lights Plug in, 3 Pcs 12 Inch Ultra Thin Under Cabinet Lighting, Super Bright Daylight White Under Counter Lights for Kitchen, Dimmable Light for Cabinet, Counter, Workbench, Desk
-
SUPER BRIGHT 1200 LUMENS: ILLUMINATE ANY SPACE WITH DAYLIGHT BRILLIANCE!
-
SMART TOUCH DIMMER: EFFORTLESSLY ADJUST BRIGHTNESS FOR PERFECT AMBIANCE.
-
ULTRA THIN DESIGN: SLEEK INTEGRATION INTO ANY DECOR FOR A CLEAN LOOK.
Installing under cabinet LED lights involves several steps. First, you need to select the right type of LED lights, such as light bars or strip lights, that suit the space under your cabinets. Begin by planning the layout, ensuring you have enough length to cover the desired area and access to a nearby power source. Clean the underside of your cabinets to ensure the LED lights adhere properly. For adhesive-backed strips, peel and stick the lights in position. If you're using screw-mounted light bars, you'll need a screwdriver to secure them in place. Connect the lights to the power source, which might involve hardwiring, plugging into an outlet, or connecting through a low-voltage transformer, depending on the type of lights you've chosen. Ensure all connections are secure and tidy up any excess wires with clips or cable ties to keep them out of sight. Finally, test the lights to make sure they work correctly, making any adjustments necessary to achieve the best illumination effect.
How to integrate under cabinet LED lights with your kitchen design?
Integrating under-cabinet LED lights into your kitchen design can dramatically enhance both functionality and aesthetics. Here are some steps to effectively incorporate these lights:
- Plan the Design: Purpose and Functionality: Decide whether the lighting is for ambient, task, or accent purposes. This will determine the brightness and color temperature. Layout: Sketch your kitchen layout, marking where you propose to install the lights for optimal effect.
- Select the Right Type of LED Lights: Strip Lights: Ideal for even lighting across a larger area. Puck Lights: Good for focused light in specific areas. Light Bars: Offer a more streamlined look with brighter outputs.
- Choose the Correct Color Temperature: Warm White (2700K–3000K): Creates a cozy atmosphere. Neutral White (3500K–4000K): Balances tasks and ambiance, suitable for most kitchens. Cool White (5000K–6500K): Best for task lighting but can make the space feel clinical.
- Consider Dimmable Options: Being able to adjust the light intensity adds versatility, allowing for brighter light during tasks and softer light for ambiance.
- Hide the LEDs: Position lights towards the back and underside of cabinets to hide fixtures from view. Use trims or shields if necessary to prevent glare.
- Ensure Proper Installation: Wiring: If wiring through cabinets, consider professional installation to ensure safety and a clean look. Plug and Play Options: These are easier to install and do not require professional help, ideal for renters or those with fewer DIY skills.
- Integrate with Smart Controls: Consider integrating with smart home systems for convenience. This could include remote controls, smartphone apps, or voice commands.
- Layer with Other Lighting: Combine with overhead or pendant lighting to create layers that can be adjusted for different needs and times of day.
- Test Different Configurations: Before final installation, test various configurations to see how different placements affect lighting and shadow.
- Complement with Kitchen Design: Choose finishes and styles for your lighting that complement your overall kitchen design, such as matching the fixture colors to your cabinet handles or other accents.
By taking these steps, under-cabinet LED lights can serve as a practical and stylish part of your kitchen design.
How to install wireless under cabinet LED lights?
Installing wireless under-cabinet LED lights is a straightforward process. Here’s a step-by-step guide to help you:
- Choose Your Lights: Decide on the type and style of wireless LED lights you want. Battery-operated puck lights, light strips, or bars are common choices for under-cabinet lighting.
- Gather Materials: You will need the LED lights (with batteries if required), mounting tape or screws (as provided in the package), a measuring tape, a pencil, a level, and potentially a screwdriver if you're opting for screws.
- Plan the Layout: Determine where you want to place the lights. It’s generally best to space lights evenly to achieve uniform lighting. Consider areas that need more light, like over the sink or workspaces.
- Prepare the Surface: Clean the surface where the lights will be mounted to ensure the adhesive sticks well; a clean, dry surface ensures better adhesion.
- Install the Lights: Adhesive Method: If your lights have adhesive backing, simply peel off the backing and firmly press the light onto the cabinet. Hold it in place for several seconds to ensure it sticks. Screw Method: If you're using screws, first mark the spots where you’ll drill holes. Use the drill to make starter holes, then fix the lights in place with screws. Ensure lights are aligned correctly by using a level or aligning them visually with the cabinet edge.
- Insert Batteries: If the lights are battery-operated, insert the necessary batteries as per the manufacturer's instructions. Make sure the batteries are installed correctly to power the lights.
- Test the Lights: Turn on the lights to make sure they are functioning properly. Adjust the positioning if needed.
- Adjust Settings: If your LEDs have adjustable brightness, color temperature settings, or timers, configure them according to your preference.
- Maintenance: Keep an eye on battery life. Depending on usage, you may need to replace them periodically. Clean the lights occasionally to maintain brightness.
These steps provide a general guideline, but always refer to the specific instructions provided by the manufacturer of your lights for particular installation details.
How to ensure even lighting with under cabinet LED lights?
Ensuring even lighting with under-cabinet LED lights involves several considerations and steps during installation and configuration. Here’s how you can achieve it:
- Choose the Right Lights: Type of LED Strips or Bars: Opt for LED strip lights or bar lights specifically designed for under-cabinet use. These typically come in different brightness levels and lengths to suit various needs. Brightness and Color Temperature: Select lights that offer adjustable brightness levels and color temperatures that match your kitchen's ambiance and functionality.
- Consistent Placement: Distance from the Wall: Install the lights a uniform distance from the wall or the cabinet's edge to ensure even distribution across the countertop. Spacing Between Light Strips: If using multiple strips or bars, maintain consistent spacing between them to prevent shadow gaps or overly illuminated areas.
- Installation: Surface Preparation: Ensure the underside of the cabinet is clean and smooth for optimal adhesion of the lights. Mounting Technique: Use the provided clips, adhesive backing, or magnet mounts for a stable installation, and ensure the LED strips lay flat against the cabinet’s edge. Measure and Cut: For strip lights, measure your cabinet properly and cut the strip to the needed length according to the manufacturer’s guidelines to prevent unlit sections.
- Diffusion: Use Light Diffusers: Install diffusers to soften and spread the light evenly. Diffusers help eliminate harsh shadows and stark light spots. Positioning: Align diffusion covers right over the LEDs to maximize their effectiveness.
- Power Supply and Wiring: Even Voltage: Make sure the LED strips are connected to an adequate power supply to ensure even brightness across all lights. Avoid Long Runs: Limit the length of the LED strips or bars connected in series to reduce voltage drop and brightness inconsistency.
- Testing and Adjustments: Test Brightness: Once installed, test the lights at different brightness levels to check for even distribution. Fine-tuning: Make any necessary adjustments in positioning or spacing to correct uneven lighting.
- Maintenance: Regular Cleaning: Keep the lights and diffusers clean from dust and grease build-up to maintain brightness consistency.
By following these steps, you can achieve a well-lit and functional under-cabinet lighting setup that enhances your kitchen's design while providing practical illumination.
What is the best location for under cabinet LED lights?
The best location for under cabinet LED lights is critical for both functionality and aesthetics in a kitchen or workspace. Here are some key considerations:
- Front or Back Placement: Front Placement: Positioning lights near the front edge of the cabinets ensures that the light spreads evenly over the countertop, minimizing shadows created by the cabinet. Back Placement: Placing lights toward the back is less common but can be used to provide a more subtle glow or to highlight a backsplash.
- Even Spacing: Ensure that the lights are evenly spaced to avoid dark spots. This typically means placing lights 8-12 inches apart, depending on the output and design of the LED strips or fixtures.
- Avoid Glare: Install fixtures or strips in such a way that they are not directly visible when standing or moving around in the kitchen, to minimize glare and ensure a clean look.
- Task Lighting: Focus on areas where tasks are performed. For instance, installation above food preparation areas or near the sink is particularly beneficial.
- Underneath the Cabinet Lip: Installing lights under the lip or recessed part of the cabinet can help hide the fixture itself, giving a seamless look while still providing ample light.
- Use of Dimmers: Incorporating dimmers allows you to adjust the brightness for various tasks and moods, enhancing the versatility of the space.
- Consideration of Backsplash: If you have a reflective backsplash, consider how the light interacts with it, as reflectivity can amplify the brightness, potentially affecting placement choices.
By considering these factors, you can effectively place under cabinet LED lights that complement the functionality and aesthetic of your space.
How to determine the wiring path for under cabinet LED lights?
Determining the wiring path for under cabinet LED lights involves a few key steps to ensure a seamless installation. Here's a guide to help you plan this process:
- Plan the Layout: Measure your cabinets and the area where you intend to install the LED lights. Decide where the lights will be positioned under the cabinets for optimal illumination.
- Identify Power Source: Locate the nearest electrical source, such as an outlet or switch, and determine if it can support the additional load. Consider if you'll need to install a new outlet or if you can run wiring from an existing source.
- Select the Type of Wiring: Choose between hardwired or plug-in systems. Hardwired systems are more permanent and require electrical work, while plug-in systems tend to be simpler to install but require accessible outlets.
- Plan the Wiring Path: Start from your power source and chart a path to the LED fixtures. Consider routing wire along the back of cabinets and through walls. For concealed installations, fish wires through cabinets and walls. Make use of wire conduits for a cleaner look where wires are exposed.
- Determine Switch Location: Decide if you'll use a wall switch, in-line switch, or remote control to operate the lights. Plan the wiring path to include the switch in a convenient and accessible location.
- Check for Obstacles: Identify potential obstacles such as plumbing, ductwork, or existing electrical work that might interfere with your wiring path. Ensure you won't drill into structural elements or other important components.
- Use the Right Tools and Materials: You'll need materials such as cable, wire nuts, staples or clips to hold wires in place, and light fixtures. Basic tools would include a drill, screwdriver, wire stripper, and voltage tester for safety.
- Install Wiring: Follow your mapped-out path to install the wiring. If hardwiring, ensure power is off before connecting any wires.
- Test the System: Once installed, test the LED lights to confirm that everything is working as intended.
- Safety Precautions: If you're not confident working with electrical systems, consider hiring a professional electrician. Ensure that all electrical components are rated for the location (e.g., dry, indoor use) and comply with local electrical codes.
By carefully planning and mapping out the wiring path, you can achieve a neat and effective lighting setup under your cabinets.
What is the average cost of installing under cabinet LED lights?
The cost of installing under cabinet LED lights can vary widely based on factors like the type of lights chosen, brand, the complexity of the installation, and the geographic location. However, as of recent data, the average cost for both materials and professional installation typically ranges between $200 to $500. Here’s a breakdown:
- Materials: LED Light Strips or Bars: These can range from $20 to $100 per set, depending mainly on length, brightness, and additional features such as dimming capabilities or color options. Power Supplies/Transformers: These are essential for converting household voltage to the lower voltage required by LEDs and might cost between $20 to $50. Optional components like smart home integration can add to the costs.
- Installation: Professional Labor Costs: Electricians may charge anywhere from $50 to $100 per hour. For a simple installation, labor might take 2 to 4 hours, leading to costs of $100 to $400. Complex installations, particularly those involving hardwiring or dealing with difficult cabinetry, could increase labor time and cost.
DIY installations can save significantly on labor costs, but it is important to understand wiring and electrical safety. Always consider consulting with or hiring a professional electrician for installations that involve hardwiring to ensure safety and adherence to local codes. Prices can fluctuate, so it’s advisable to get quotes from local professionals for a more specific estimate.