
Best Ceiling Fans with LED Lights to Buy in July 2026

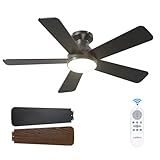
Amico Ceiling Fans with Lights, 42 inch Low Profile Ceiling fan with Light and Remote Control, Flush Mount, Reversible, 3CCT, Dimmable, Noiseless, Black Ceiling Fan for Bedroom, Indoor/Outdoor Use
-
ENERGY-EFFICIENT DESIGN CUTS ELECTRICITY LOSS BY 80% VS. TRADITIONAL FANS.
-
REMOTE CONTROL OFFERS 6 FAN SPEEDS, DIMMABLE LIGHT, AND SLEEP TIMER.
-
SUPER QUIET OPERATION AT 35DB; PERFECT FOR LIGHT SLEEPERS AND FAMILIES.


addlon Ceiling Fans with Lights, 42 Inch Low Profile Ceiling Fan with Light and Remote Control, Flush Mount, Reversible, 3CCT, Dimmable, Quiet, Black Small Ceiling Fan for Bedroom Indoor/Outdoor Use
-
ENERGY EFFICIENT DESIGN: SAVE 80% ELECTRICITY WITH OUR A-RATED FAN!
-
CUSTOMIZABLE COMFORT: DIMMABLE LIGHT & 6-SPEED SETTINGS FOR EVERY NEED!
-
QUIET OPERATION: ENJOY WHISPER-QUIET AIRFLOW AT JUST 35DB FOR RESTFUL NIGHTS!
ZMISHIBO Ceiling Fans with Lights and Remote, 19.7'' Low Profile Ceiling Fan, 3000-6000K Dimmable Modern Flush Mount LED Fan Light, 6 Wind Speeds, Black Fandelier Ceiling Fans for Bedroom
- CONTROL BRIGHTNESS AND COLOR TEMPERATURE WITH SMART APP AND REMOTE.
- SILENT OPERATION WITH 6 SPEEDS AND REVERSIBLE AIRFLOW FOR ALL SEASONS.
- QUICK INSTALLATION WITH VIDEO GUIDE AND 2-YEAR SUPPORT FOR PEACE OF MIND.
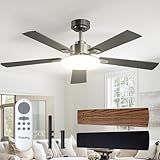
Passky Ceiling Fans with Lights, 52 inch Sleek Ceiling Fan with Light and Remote Control, 3CCT, Dimmable, Reversible, Noiseless, Black Ceiling Fan for Bedroom, Living Room
-
SAVE 80% ENERGY WITH OUR EFFICIENT CEILING FAN AND LIGHT COMBO!
-
ENJOY FULL CONTROL WITH A REMOTE: SPEED, LIGHT, AND TIMER SETTINGS!
-
EASY INSTALLATION FOR RENTERS-NO DRILLING, JUST GREAT STYLE AND COMFORT!
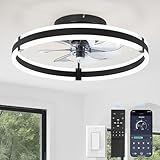
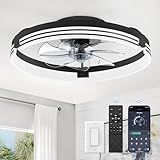
ZMISHIBO 52 Inch Ceiling Fan with Light, App&Remote Control, Flush Mount Low Profile, Dimmable 20W LED Light, Quiet Reversible Motor for Bedroom, Living Room, Apartment, Black
-
VERSATILE 52-INCH SIZE: PERFECT FOR LIVING ROOMS, BEDROOMS & KITCHENS.
-
SMART CONTROLS: APP & REMOTE FOR EASY DIMMING AND COLOR ADJUSTMENT.
-
WHISPER-QUIET OPERATION: ENJOY STRONG AIRFLOW WITHOUT THE NOISE.
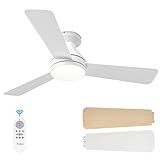
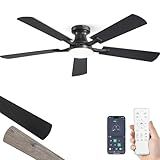
Amico Ceiling Fans with Lights, 42 inch Low Profile Ceiling Fan with Light and Remote Control, Flush Mount, Reversible, 3CCT, Dimmable, Noiseless, White Ceiling Fan for Bedroom, Indoor/Outdoor Use
-
ENERGY EFFICIENT DESIGN: SAVE 80% ON ENERGY COSTS WITH A-RATED EFFICIENCY!
-
REMOTE CONTROL CONVENIENCE: ADJUST SPEEDS, LIGHT, AND TIMER EFFORTLESSLY!
-
WHISPER-QUIET OPERATION: ENJOY PEACEFUL COMFORT, IDEAL FOR LIGHT SLEEPERS!
ZMISHIBO Low Profile Ceiling Fans with Lights and Remote, 20 Inch Flush Mount Ceiling Fan with Light, 3000K-6000K Dimmable Fandelier LED Fan Light, 6 Wind Speeds Black Ceiling Fans for Bedroom
- EFFORTLESSLY ADJUST BRIGHTNESS AND TEMPERATURE WITH REMOTE CONTROL.
- ENJOY YEAR-ROUND COMFORT WITH REVERSIBLE MOTOR AND QUIET OPERATION.
- CUSTOMIZE AIRFLOW WITH 6 SPEEDS AND SAVE ENERGY WITH SMART DESIGN.
Installing a ceiling fan with LED lights involves several steps. First, ensure that the power to the existing light fixture or fan is turned off at the circuit breaker to ensure safety. Remove the old fixture, carefully disconnecting the wiring if necessary. Assemble the new ceiling fan according to the manufacturer’s instructions, which typically involves attaching the blades and light kit, if not pre-installed. Next, mount the ceiling fan bracket to the ceiling box, ensuring it is securely fastened. Connect the wires from the ceiling to the fan, typically matching black to black, white to white, and green or copper to the ground wire. The wires for the LED light may have separate instructions, often connecting to specific colored wires for integrated controls. Attach the fan to the mounting bracket, secure it with screws, and ensure it is stable. Install the LED lights or globes, and the remote control receiver, if applicable. Finally, turn the power back on at the circuit breaker and test the fan and lights to ensure they function correctly. Adjust any settings or fan speeds as needed to complete the installation.
How do you install a ceiling fan on a sloped ceiling?
Installing a ceiling fan on a sloped ceiling involves a few additional considerations compared to installing it on a flat ceiling. Here’s a step-by-step guide to help you through the process:
Materials Needed:
- Ceiling fan with a sloped ceiling mounting kit
- Downrod (appropriate length)
- Screwdriver
- Adjustable wrench
- Ladder
- Circuit tester
- Wire connectors
- Electrical tape
Steps:
- Turn Off Power: Before starting, make sure to turn off the power to the existing fixture from the circuit breaker.
- Check the Ceiling Angle: Measure the slope of your ceiling with an angle finder or use a protractor. This will determine the type of mount and downrod length you need.
- Choose the Right Mounting Kit: Not all ceiling fans are designed for sloped ceilings. Purchase a sloped ceiling mounting kit if your fan doesn’t already include one. These kits allow the fan to hang straight despite the angle.
- Select the Correct Downrod: Depending on the angle and height of your ceiling, you may need a longer downrod. This helps position the fan blades at the correct distance from the ceiling.
- Remove the Existing Fixture: If there’s an existing light fixture, carefully remove it and disconnect the wiring. Ensure the electrical box is rated to support the weight of a ceiling fan.
- Install the Ceiling Fan Mounting Bracket: Use the mounting bracket included in the sloped ceiling kit, which accommodates the angle. Secure it to the ceiling box with screws, ensuring it’s tightly fixed.
- Assemble the Fan: Attach the downrod to the motor housing of the fan. Ensure all screws and bolts are tightened properly. Pass the wires from the fan through the downrod.
- Attach the Fan to the Ceiling Bracket: Lift the fan assembly and hook it to the mounting bracket. This usually involves engaging a ball-and-socket joint which allows the fan to hang properly despite the ceiling’s angle.
- Secure Wiring Connections: Connect the wires from the ceiling to the fan according to color codes: typically black to black (hot), white to white (neutral), and green/bare to the grounding wire. Use wire connectors and secure with electrical tape for added safety.
- Finalize Installation: Attach the fan canopy to the mounting bracket, covering the wiring.
- Attach the Fan Blades and Lights (if applicable): Once the motor is secured, attach the fan blades following the manufacturer’s instructions. Add any additional light kit components if needed.
- Test the Fan: Turn the power back on at the circuit breaker. Test the fan to ensure it operates correctly on all settings and is stable.
Additional Tips:
- Consult the Instructions: Always refer to the specific instructions provided with the ceiling fan for details particular to that model.
- Consider Hiring a Professional: If you’re unfamiliar with electrical work or ceiling fan installation, hiring a professional can ensure safety and accuracy.
By following these steps and considering the angles and height factors of the sloped ceiling, you can successfully install a ceiling fan in a way that maximizes performance and safety.
How do you install a ceiling fan with a light kit?
Installing a ceiling fan with a light kit can be a manageable DIY project if you have basic electrical knowledge and tools. Here's a step-by-step guide to help you through the process. Make sure to follow safety precautions and consult a professional if you're unsure about working with electricity.
Materials and Tools Needed:
- Ceiling fan with a light kit
- Ladder
- Screwdrivers (Phillips and flathead)
- Wire strippers
- Electrical tape
- Voltage tester
- Wire nuts
- Pliers
- Safety goggles
- A circuit tester or multimeter
Steps:
- Turn Off Power: Turn off the circuit breaker to the room where you will install the fan. Use the voltage tester to ensure the power is off at the switch and at the ceiling.
- Remove Old Fixture: If replacing an old fixture, remove it. Unscrew the retaining screws and use the voltage tester on the wires to confirm that no power is present.
- Install the Ceiling Fan Mounting Bracket: Install the mounting bracket that comes with your ceiling fan. Ensure it is attached securely to the ceiling box. The box itself must be rated for fan support and securely mounted to a ceiling joist.
- Assemble the Fan and Light Kit: Assemble the fan according to the manufacturer's instructions. Typically, this includes attaching the blades and light kit. Some fans require partial assembly before mounting, while others allow you to mount the motor housing first.
- Attach Downrod (if applicable): If your fan uses a downrod, attach it following the manufacturer's guidance. Ensure all screws and pins are secure. For flush mounts, follow the guide for conversion.
- Mount the Ceiling Fan: Lift the fan motor assembly to the mounting bracket. Some models have a hook or an extra hand-supported feature for easy wiring. Secure the fan to the bracket using the provided screws.
- Make Electrical Connections: Connect the wires from the fan to the ceiling wires. Typically, this involves: Black/blue wires (fan and light) to black (ceiling live) White wires (neutral) to white (ceiling neutral) Green or bare wire (ground) to green or bare ceiling wire. Use wire nuts to secure the connections and wrap them with electrical tape for added security.
- Attach the Light Kit: Connect the light kit wires, usually by matching the colors: blue or black from the fan to black (light kit), and white to white. Secure with wire nuts.
- Secure Fan and Attach Blades: Finish assembling by attaching the fan blades to the motor. Ensure all screws and connections are tight and blades are balanced.
- Install Light Bulbs and Shades: Install light bulbs that meet the fixture’s specifications and attach any glass shades, securing them as per the instructions.
- Test the Fan: Turn the power back on at the breaker. Use the wall switch to test the fan and light to ensure both functions correctly. Make sure the fan rotates without wobble.
Tips for Success:
- Always check local building codes to ensure compliance with safety standards.
- If you're installing the fan in a new location, consult with or hire a professional to run wiring to that location.
- Ensure the ceiling box is rated for use with ceiling fans, as they require additional support due to their weight and movement.
If at any step you're unsure, it is safer to consult or hire a professional electrician.
How do you replace an LED light bulb in a ceiling fan?
Replacing an LED light bulb in a ceiling fan is a straightforward process, but you should take certain precautions to ensure safety and avoid damaging the fixture. Here are the steps to replace the bulb:
- Turn Off Power: Before you begin, turn off the power to the ceiling fan and light by using the corresponding switch. For extra safety, you can turn off the circuit breaker that controls the fan.
- Allow Bulb to Cool: If the light was recently on, give it a few minutes to cool down. LED bulbs don't get as hot as incandescent bulbs, but they can still retain some heat.
- Access the Light Bulb: Remove the Light Cover: Depending on your ceiling fan model, you might need to remove a glass or plastic cover. This is usually done by unscrewing screws or nuts, or sometimes by twisting the cover counterclockwise.
- Remove the Old Bulb: Gently grasp the bulb and unscrew it by turning it counterclockwise. If it’s a pin-type bulb, gently pull it out of the socket.
- Select the Correct Replacement Bulb: Check the wattage and base type of the existing bulb to ensure you purchase the correct LED replacement. It's crucial to match the base type (e.g., E26, GU24) and ensure the new bulb wattage doesn't exceed the fixture's rating.
- Install the New Bulb: Insert the new LED bulb into the socket and turn it clockwise until secure. If it’s a pin-type, gently push it into place.
- Reattach the Light Cover: Once the new bulb is in place, reattach the light cover by reversing the removal steps. Make sure it’s secure to avoid it falling when the fan is on.
- Turn the Power Back On: Restore power by turning the switch back on and activating the circuit breaker, if you turned it off. Test the new bulb to ensure it’s working properly.
- Dispose of the Old Bulb: Dispose of the old LED bulb according to local regulations for electronic waste, if applicable.
If the new bulb does not light up, double-check the bulb's connection and ensure the power supply is active. If problems persist, there may be an issue with the fixture itself that requires further investigation.
How do you connect wiring for a ceiling fan with LED lights?
Connecting wiring for a ceiling fan with LED lights involves several steps, and it's important to approach the task with caution as improper handling of electrical components can be dangerous. Below are the general steps you can follow. However, specific instructions can vary depending on your fan model, so always refer to the manufacturer's manual.
- Turn Off Power: Go to your circuit breaker and turn off power to the circuit you'll be working on. Use a voltage tester to ensure the power is truly off at the ceiling.
- Prepare the Ceiling Box: Make sure the ceiling box is rated for a ceiling fan and can support the weight. If not, replace it with one that is fan-rated.
- Assemble the Fan: Before wiring, partially assemble the fan, attaching blades if needed or per manufacturer instructions. This often involves assembling the downrod and motor housing.
- Identify Your Wires: In the ceiling, you typically find three or four wires: Black or Red: Live wire for the fan. Blue: Often used for the light kit (if separate from the fan). White: Neutral wire. Green or Bare: Ground wire.
- Connect Ground Wires: Attach the green or bare ground wire from the fan to the ground wire in the ceiling box using a wire connector.
- Connect Neutral Wires: Connect the white wire from the fan to the white wire in the ceiling box. These are your neutral wires.
- Connect Power Wires: If your fan and light are controlled by separate switches: Connect the black wire from the fan to the black or red wire in the ceiling box for fan power. Connect the blue wire from the fan to the red wire in the ceiling for light (if separate). If the ceiling only has a black and white wire, connect both black and blue wires to the black ceiling wire. If they are controlled by the same switch: Connect both the black and blue wires from the fan to the black wire in the ceiling.
- Secure Connections: Use wire connectors to secure all connections and wrap them with electrical tape for extra safety.
- Attach Fan to Ceiling Box: Secure the fan bracket to the ceiling box following the manufacturer's instructions, then hang the fan motor on the bracket.
- Install Light Kit and Blades: Attach the fan blades and the light kit, making sure all screws are tightened properly.
- Restore Power and Test: Turn the power back on at the circuit breaker, then use the wall switch or remote (if applicable) to test the fan and light.
Always ensure your hands are dry, and you're working in a safe environment when handling electrical wiring. If you're unsure at any step, it's recommended to consult with or hire a licensed electrician.
What is the difference between flush mount and downrod installation?
Flush mount and downrod installation refer to different methods of mounting ceiling fans, and each is appropriate for specific ceiling heights and aesthetic preferences.
- Flush Mount: Installation: In flush mount or "hugger" installations, the ceiling fan is mounted directly against the ceiling without any added downrod or extension. Ideal for: This type of installation is often used in rooms with low ceilings (typically 8 feet or less) as it maximizes the available headroom. Aesthetics: Flush mount fans are generally more compact and can offer a more streamlined appearance, making them less intrusive in smaller spaces. Airflow: While flush mount fans are great for low ceilings, they may not circulate air as effectively as fans installed with a downrod because they are closer to the ceiling.
- Downrod Installation: Installation: Downrod installations use a metal rod to lower the fan from the ceiling. The length of the downrod can be adjusted depending on the ceiling height. Ideal for: This method is best for rooms with higher ceilings (over 8 feet) as it allows the fan to hang at an optimal height for air circulation-typically between 8 to 9 feet from the floor. Aesthetics: The use of a downrod can create a more dramatic and noticeable presence of the ceiling fan, especially in larger rooms or spaces with very high ceilings. Airflow: With the fan positioned lower, it can circulate air more effectively throughout the room, which enhances the cooling effect.
In summary, the choice between flush mount and downrod installation depends on your ceiling height, the desired aesthetic, and the need for effective air circulation in the space.