
Best Glass and Acrylic Suncatchers to Buy in July 2026
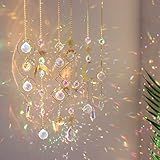
6Pieces Colorful Crystals Suncatcher Hanging Sun Catcher with Chain Pendant Ornament Crystal Balls for Window Home Garden Christmas Day Party Wedding Decoration
- TRANSFORM YOUR SPACE WITH 6 VIBRANT SUNCATCHER CHAINS-ENDLESS STYLES!
- PREMIUM CRYSTALS CREATE STUNNING REFLECTIONS AND DAZZLING RAINBOWS!
- PERFECT FOR ANY OCCASION-INDOORS, OUTDOORS, AND ALL CELEBRATIONS!


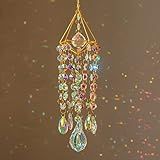
HDCRYSTALGIFTS Crystal Suncatchers for Window Hanging Wind Chime Style Garden Sun Catchers with Crystals Rainbow Maker Indoor Outdoor Decor Handmade Gold Plated
- HANDCRAFTED ELEGANCE: BEAUTIFUL HANDMADE GOLD-PLATED K9 CRYSTAL PRISMS.
- VERSATILE DECOR: IDEAL FOR SUNCATCHERS, WIND CHIMES, AND FESTIVE DECORATIONS.
- GIFT-READY PACKAGING: COMES IN A STYLISH PINK BOX, PERFECT FOR ANY OCCASION!

Made By Me Create Your Own Window Art, Paint Your Own Suncatchers, DIY Arts & Crafts Idea, Craft Kits for Kids, Crafts for Kids & Toddlers, Toddler Arts and Crafts
-
CREATE 20 WHIMSICAL WINDOW DESIGNS FOR ENDLESS FUN!
-
EASY-TO-USE PAINT PENS PERFECT FOR LITTLE HANDS!
-
INCLUDES EVERYTHING NEEDED FOR EASY DISPLAY!
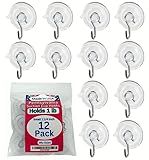
12 Pak Small 1 ¼ -inch (Made in Pennsylvania) Heavy Duty Suction Cup Hooks for Glass Windows. Signs Holiday Ornaments Suncatchers-(Holds 1 Pound)
-
CONVENIENT 4X4 ZIP-LOCK BAG FOR EASY STORAGE AND ACCESS.
-
PROUDLY MADE IN THE USA, SUPPORTING LOCAL MANUFACTURING!
-
HASSLE-FREE INSTALLATION WITH SECURE HOLD FOR VARIOUS SMOOTH SURFACES.
LUMITI 6pcs Crystal Sunflower Suncatchers Hanging Ornaments, Rainbow Maker Sun Catchers Indoor Window Outdoor Patio Garden Decor Gifts (Multicolor)
-
TRANSFORM ANY SPACE WITH VIBRANT, RAINBOW-FILLED SUNSHINE MAGIC!
-
HANDCRAFTED CRYSTALS LET YOU MIX AND MATCH FOR UNIQUE DECOR STYLES.
-
PERFECT GIFT FOR LOVED ONES, ADDING CHARM TO ANY OCCASION!

HYBEADS 16 pcs Crystal Suncatcher, Colorful Suncatchers Sun Catchers Indoor Window Hanging Ornaments for Home Garden Ceiling Christmas Party Wedding Indoor Outdoor Decoration Prism Rainbow Maker
-
VIBRANT PRISMS: 16 COLORFUL SUNCATCHERS CREATE MAGICAL RAINBOWS INDOORS.
-
VERSATILE DECOR: PERFECT FOR HOMES, CARS, PARTIES, AND SPECIAL OCCASIONS.
-
IDEAL GIFTS: THOUGHTFUL PRESENTS FOR MOTHERS, SISTERS, AND FRIENDS.
Glass and acrylic suncatchers serve a similar aesthetic purpose but have distinct differences in terms of material properties, appearance, and durability. Glass suncatchers are often prized for their clarity and the way they refract light, creating vibrant displays of color when sunlight passes through them. They are typically considered more traditional and are often handmade, which can make them unique and artistically valuable. However, glass is brittle and can be easily broken, which is a consideration for placement and maintenance.
On the other hand, acrylic suncatchers are made from a type of plastic that is more durable and less prone to breaking than glass. While they may not have exactly the same clarity and refractive qualities as glass, advancements in manufacturing have allowed acrylic suncatchers to closely mimic the colorful effects of glass. Acrylic is also lighter in weight, easier to produce in various shapes and sizes, and often more affordable, making it a popular choice for mass-produced suncatchers. Additionally, acrylic can be more versatile in design options, including colored or clear variations, embedded patterns, or even printed images.
In terms of care, acrylic suncatchers are less susceptible to damage but may scratch more easily than glass. Overall, the choice between glass and acrylic suncatchers often comes down to personal preference, aesthetic desires, budget considerations, and specific needs regarding durability and safety, particularly in households with children or pets.
What is the price difference between glass and acrylic suncatchers?
The price difference between glass and acrylic suncatchers can vary depending on several factors, such as size, design complexity, brand, and place of purchase. Generally, glass suncatchers tend to be more expensive than acrylic ones. This is because glass is often perceived as a more premium material due to its durability, weight, and traditional appeal.
As a rough guideline:
- Glass suncatchers: These can range from around $10 to over $100, depending on the factors mentioned above. Intricate designs, larger sizes, or those made by well-known artists can command higher prices.
- Acrylic suncatchers: These are typically more affordable, often ranging from about $5 to $50. Their lighter weight and lower production costs contribute to the lower price point.
Ultimately, the choice between the two may depend on your budget, desired aesthetic, and the specific qualities you're looking for in a suncatcher.
How to safely handle glass suncatchers?
Handling glass suncatchers safely involves a few careful steps to ensure both your safety and the preservation of the suncatcher. Here are some tips:
- Wear Protective Gloves: Consider wearing gloves to protect your hands from sharp edges, especially if the suncatcher is large or has intricate designs.
- Choose a Safe Workspace: Work over a soft surface, such as a towel or a padded table, to prevent damage if the suncatcher is accidentally dropped. Ensure the area is well-lit so you can see what you're doing.
- Handle with Care: Hold the suncatcher by its edges or substantial parts of its frame to distribute the weight evenly. Avoid applying pressure on glass panes, as they might crack under stress.
- Inspect Before Handling: Check for any cracks, loose solder, or unsecured parts before handling or hanging the suncatcher. Repair or tighten any loose components to prevent accidents.
- Secure Hanging Method: Use strong, appropriate hanging hardware, such as hooks or wire, to secure the suncatcher. Ensure hooks are firmly attached to the window frame or ceiling.
- Clean Gently: Apply mild soapy water with a soft cloth or sponge to clean the suncatcher. Avoid harsh chemicals that may damage the finish or paint. Dry thoroughly with a soft, lint-free cloth.
- Regular Checks: Periodically check the suncatcher for signs of wear, damage, or loosening of solder joints.
By following these guidelines, you can enjoy the beauty of your glass suncatchers safely and maintain their condition over time.
What is the best location for hanging a suncatcher indoors?
The best location for hanging a suncatcher indoors is typically in a window that receives ample sunlight. Here are some tips for choosing the right spot:
- South-Facing Windows: These windows generally receive the most sunlight throughout the day, making them ideal for catching and reflecting light.
- East or West Windows: An east-facing window will capture morning light, while a west-facing one will catch the afternoon sun. Either can work well, depending on when you want the suncatcher to be most active.
- Avoid Obstacles: Ensure there's nothing outside the window, like trees or buildings, that might block sunlight.
- Adjustable Height: Consider hanging the suncatcher at a height where it will catch the most light without causing a glare or being in the way.
- Room Ambiance: Think about how the colors and reflections from the suncatcher will affect the room's mood and positioning it in a room where this effect will be appreciated.
By placing your suncatcher thoughtfully, you can enhance both its visual effect and the ambiance of your space.
How to repair a broken suncatcher?
Repairing a broken suncatcher can vary depending on the materials it is made from and the extent of the damage. Here are some general steps to guide you through the repair process:
- Assess the Damage: Carefully examine the suncatcher to determine the nature and extent of the damage. Identify any broken glass pieces, detached elements, or damaged frames.
- Gather Materials: Depending on the repairs needed, you might require the following: Replacement glass pieces or colored glass shards Strong adhesive suitable for glass (like E6000 or clear epoxy) Glass cutting tool (if you need to cut replacement pieces) Safety goggles and gloves for protection Frame repair tools, if necessary Small brush for glue application Soft cloth for cleaning
- Safety First: Wear safety goggles and gloves to protect yourself from sharp glass pieces.
- Clean the Area: Clean both the broken edges of the suncatcher and any replacement pieces with a soft cloth to ensure a strong bond.
- Replace or Reattach Pieces: For Detached Pieces: Apply a small amount of clear adhesive to the edges and press the pieces back into place. Hold them securely until the adhesive sets. For Missing Pieces: If glass shards are missing, you may need to cut replacement pieces. Use a glass cutting tool to cut to the correct shape. Apply adhesive and secure the new pieces in place.
- Frame Repair: If the frame is damaged, you may need to solder or glue it back together, depending on its material and construction. Ensure the frame holds the glass pieces securely.
- Let It Cure: Allow the adhesive to cure fully. Check the adhesive packaging for specific curing times, which can vary.
- Clean and Polish: Once everything is securely in place and fully cured, clean the suncatcher with a glass cleaner and a soft cloth to restore its shine.
- Testing: Hang the suncatcher in its location and inspect it in natural light to ensure the repair is both secure and aesthetically pleasing.
If the damage is extensive, or if you're not comfortable doing the repair yourself, consider consulting a professional stained glass artist or craftsman, especially for cherished pieces.
What is a suncatcher?
A suncatcher is a decorative object designed to capture and reflect sunlight, creating colorful patterns of light and shadow. Traditionally, suncatchers are made from pieces of stained glass or other translucent materials. When hung in a window or another spot where sunlight can pass through them, they cast vibrant reflections and often produce a dazzling effect reminiscent of stained glass windows in churches. Suncatchers are popular as decorative pieces in homes and gardens, appreciated for their ability to bring a play of light and color into a space. They come in a variety of shapes, sizes, and designs, from simple geometric patterns to intricate artistic creations.