
Best Suncatchers for Cloudy Days to Buy in July 2026
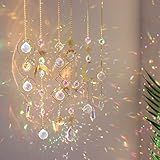
6Pieces Colorful Crystals Suncatcher Hanging Sun Catcher with Chain Pendant Ornament Crystal Balls for Window Home Garden Christmas Day Party Wedding Decoration
- TRANSFORM SPACES: ADD VIBRANT COLORS AND ELEGANCE TO ANY DÉCOR.
- DURABLE QUALITY: PREMIUM CRYSTALS ENSURE LASTING BEAUTY AND CHARM.
- VERSATILE USE: PERFECT FOR HOMES, GARDENS, EVENTS, AND FESTIVE DECOR!


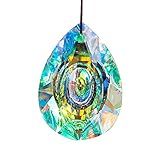
H&D HYALINE & DORA 89mm/3.5in Hanging Chandelier Crystals Prisms for Window Suncatchers Chandelier Parts Rainbow Maker Pendants
-
SAFE PACKAGING ENSURES PRISTINE DELIVERY; NO CHIPPING OR SCRATCHES!
-
VERSATILE DESIGN: PERFECT FOR HOME, OFFICE, GARDEN, OR CAR DECOR.
-
IDEAL GIFT CHOICE FOR ANYONE WHO LOVES BEAUTIFUL, SHINY DECOR!

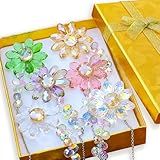
Birthday Gifts for Women,Unique Gifts for Her Mom Sister Friends Girls,2 Pieces Crystals Suncacther (Round)
- STUNNING CRYSTAL DESIGN CREATES VIBRANT RAINBOWS IN ANY SPACE.
- PERFECT GIFT FOR BIRTHDAYS, HOLIDAYS, AND SPECIAL OCCASIONS!
- DURABLE AND LONG-LASTING, IDEAL FOR MEANINGFUL NEW BEGINNINGS.
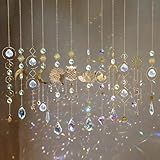
HYBEADS 16 pcs Crystal Suncatcher, Colorful Suncatchers Sun Catchers Indoor Window Hanging Ornaments for Home Garden Ceiling Christmas Party Wedding Indoor Outdoor Decoration Prism Rainbow Maker
- 16 VIBRANT CRYSTAL PRISMS CREATE ENCHANTING RAINBOWS INDOORS & OUTDOORS.
- PERFECT FOR GIFTS: MOTHER'S DAY, VALENTINE'S, CHRISTMAS & SPECIAL OCCASIONS.
- EASY TO HANG WITH S HOOKS; ADDS INSTANT CHARM TO ANY SPACE!
LUMITI 6pcs Crystal Sunflower Suncatchers Hanging Ornaments, Rainbow Maker Sun Catchers Indoor Window Outdoor Patio Garden Decor Gifts (Multicolor)
-
CREATE VIBRANT SPACES WITH COLORFUL CRYSTAL FLOWERS AND RAINBOWS!
-
HANDCRAFTED GLASS BEADS ALLOW ENDLESS MIX-AND-MATCH DECOR OPTIONS.
-
PERFECT GIFT FOR LOVED ONES ON SPECIAL OCCASIONS AND HOLIDAYS!
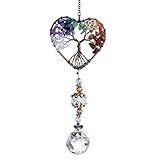
H&D HYALINE & DORA Suncatcher Window Hanging Tree of Life Heart Shaped Crystal Ball Prism Drop Pendant
- HANDMADE SPARKLE: UNIQUE TUMBLED STONE TREE & K9 CRYSTAL DESIGN.
- GIFT-READY PACKAGING: THOUGHTFULLY PACKED FOR IMMEDIATE GIFTING DELIGHT.
- VERSATILE DECOR: PERFECT FOR WALLS, WEDDINGS, CARS, AND SEASONAL DISPLAYS.
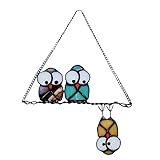
Multicolor Owls on a Wire High Stained Glass Suncatcher Panel, Bird Suncatcher for Windows Doors Room Home Decoration Hummingbird Ornamentand Gifts for Bird Lovers
-
ILLUMINATE YOUR SPACE: TRANSFORM ANY ROOM WITH COLORFUL CHARM!
-
PERFECT GIFT FOR ANY OCCASION: DELIGHT LOVED ONES WITH THIS UNIQUE ORNAMENT!
-
RISK-FREE PURCHASE: ENJOY OUR SATISFACTION GUARANTEE FOR WORRY-FREE BUYING!
Suncatchers are decorative objects designed to capture and diffuse sunlight, creating visual effects such as reflections and colorful dispersions. On cloudy days, the effectiveness of suncatchers is somewhat reduced because there is less direct sunlight for them to interact with. However, they may still exhibit some effects if there is enough ambient light filtering through the clouds. The colors and patterns produced will be less vibrant compared to a sunny day but can still provide some visual interest. Essentially, while suncatchers are at their most striking in direct sunlight, they can still offer subtle beauty and charm even when the sky is overcast.
How to repair a broken suncatcher?
Repairing a broken suncatcher can vary depending on the material and extent of the damage. Here’s a general guide to help you fix common issues:
Tools and Materials Needed
- Glass cleaner or mild soap solution
- Soft cloth
- Clear epoxy glue or glass adhesive
- Replacement beads or glass pieces (if needed)
- Small paintbrush or toothpick (to apply glue)
- Tweezers or needle-nose pliers
- Masking tape or painter's tape
- Safety goggles and gloves
Steps to Repair
- Assess the Damage: Determine the extent of the breakage. Identify if parts of the suncatcher can be repaired or if pieces need replacing.
- Clean the Area: Gently clean the broken pieces with a glass cleaner or mild soap solution and a soft cloth. Ensure that the surfaces are dry and free of any dust or debris.
- Arrange the Pieces: Lay the suncatcher on a flat, stable surface. If it’s collected sun figurines or glass pieces, try to arrange them in their original positions for a visual reference.
- Prepare the Adhesive: Use a clear epoxy or glass adhesive. Follow the product instructions to mix if necessary.
- Apply the Adhesive: Use a small paintbrush or toothpick to apply the glue to the edges of the broken pieces. Be cautious not to use too much, as excess glue can seep out and mar the surface.
- Join Pieces Together: Carefully press the broken pieces together. Align them as precisely as possible to maintain the original pattern.
- Secure the Pieces: Use masking tape or painter’s tape to hold the pieces in place as the adhesive cures. Follow the drying time recommended by the adhesive’s instructions.
- Replace Missing Parts: If any pieces are missing or too damaged, consider replacing them with parts of similar size, shape, and color.
- Reattach to Frame or Hanging Structure: Once all pieces are secure and the adhesive is fully cured, reattach the suncatcher to its frame or hanging apparatus. Use tweezers or pliers if you need to handle small loops or hooks.
- Final Inspection: Remove any excess adhesive gently, if necessary, with a razor blade or a small knife after it is completely dry. Ensure the repaired suncatcher is stable and hanging correctly.
Additional Tips:
- Always wear safety goggles and gloves when handling broken glass to protect from sharp edges.
- Take your time aligning the pieces together to avoid any misalignment.
- If the repair is beyond the scope of a DIY project, consider taking the suncatcher to a professional for repair.
By following these steps, you should be able to effectively repair your broken suncatcher, restoring it to its original beauty.
What materials are used to make suncatchers?
Suncatchers are typically made from materials that allow light to pass through and create colorful effects. Common materials used include:
- Glass: Colored glass is a traditional choice for suncatchers. Stained glass pieces are often soldered together using copper foil and lead or zinc came to create intricate designs.
- Acrylic or Plastic: These materials are often more affordable and lightweight than glass. Acrylic suncatchers can be found in a variety of colors and transparencies and are popular for DIY projects.
- Crystal: Cut crystal or glass beads are sometimes used in suncatchers to create sparkling reflections and rainbows when sunlight passes through them.
- Resin: Resin can be used to encapsulate items like dried flowers or glitter, creating a unique suncatcher with a personal touch.
- Metal Foil or Wire: These are used to create the framework or outlines of a design, particularly in combination with stained glass.
- Crystal Prisms: Often hung as part of suncatchers to refract light and create a spectrum of colors.
These materials are selected based on the effect and durability desired for the suncatcher. The choice of material also depends on whether the suncatcher is intended for indoor or outdoor use, as some materials may fade or degrade in direct sunlight over time.
What is the origin of suncatchers?
Suncatchers, used to capture and refract sunlight to create colorful patterns, have a history that is not tied to a single origin but rather a blend of cultural influences over time. The modern concept of suncatchers is believed to have been popularized in the United States in the 20th century, drawing inspiration from various glass art traditions.
One notable influence is Native American art, particularly the glass art of the Southwestern Zuni and Navajo tribes. These tribes have long created intricate glass beadwork and crafts that capture and reflect light. The use of colorful glass or transparent materials to interact with sunlight has parallels in other cultures as well, such as the stained glass windows in European cathedrals that have been used for centuries to create vibrant displays of light and color.
Additionally, the practice of glassmaking and the use of colored glass in decorative items can be traced back to ancient times in different parts of the world, including ancient Egypt and Rome.
Overall, while there is no single origin for suncatchers, they reflect a synthesis of various artistic traditions that appreciate the interplay of light and color.