
Best Storage Sheds with Windows to Buy in July 2026
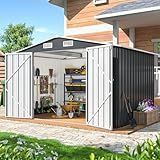
YADSUNY 10x8 FT Outdoor Storage Shed, Metal Garden Tool Shed with Updated Frame Structure and Lockable Doors, Ideal for Backyard Garden Patio Lawn, Grey
- DURABLE GALVANIZED STEEL: ALL-WEATHER PROTECTION AGAINST RUST & UV.
- EASY ASSEMBLY: 35% FASTER ASSEMBLY FOR A STABLE, HASSLE-FREE SETUP.
- SPACIOUS & ORGANIZED: LARGE DIMENSIONS TO NEATLY STORE ALL ESSENTIALS.


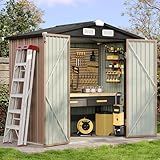
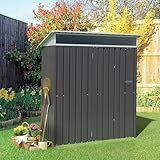
Aoxun 6.2x4 FT Shed Outdoor Storage Shed with Lockable Doors & Slooping Roof Metal Garden Tool Shed for Backyard, Patio, Poolside (Brown)
-
WEATHER-RESISTANT WITH STEEL FRAME FOR DURABLE, LONG-LASTING USE.
-
VERSATILE DESIGN PERFECT FOR STORAGE, PETS, OR OUTDOOR ORGANIZATION.
-
SPACIOUS 6X4FT CAPACITY, IDEAL FOR ALL YOUR OUTDOOR ESSENTIALS.
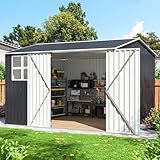
DAUSOLA 10x10 FT Outdoor Storage Shed, Metal Garden Tool Shed with Updated Frame Structure, Lockable Doors and Windows, Ideal for Backyard Garden Patio Lawn, Grey
- DURABLE GALVANIZED STEEL ENSURES ALL-WEATHER PROTECTION YEAR-ROUND.
- REINFORCED STRUCTURE ENABLES 35% EASIER, STABLE ASSEMBLY.
- SPACIOUS DESIGN WITH ORGANIZED STORAGE FOR ALL YOUR OUTDOOR GEAR.
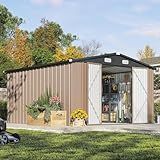
Aoxun 10 x 12FT Outdoor Storage Shed with Double Hinged Large Door Utility Garden Shed with Lockable Door & Sloped Roof Metal Sheds Outdoor Storage for Garden, Backyard, Patio and Backyard, Brown
-
SPACIOUS STORAGE: GENEROUSLY SIZED FOR ALL OUTDOOR ESSENTIALS, KEEPING YOU ORGANIZED.
-
WEATHERPROOF DESIGN: SLOPED ROOF AND VENTILATION PROTECT ITEMS FROM DAMAGE.
-
DURABLE BUILD: THICK-GAUGE GALVANIZED STEEL RESISTS RUST AND HARSH ELEMENTS.
Vongrasig 5 x 3 x 6 FT Outdoor Storage Shed Clearance, Metal Garden Shed with Large Window and Lockable Door, Anti-Corrosion Waterproof Tool Shed for Backyard Patio, Lawn (Dark Gray)
- WEATHER-RESISTANT DESIGN WITH THICK STEEL PLATES ENSURES DURABILITY.
- BRIGHT ACRYLIC WINDOW AND VENTS KEEP YOUR SHED WELL-LIT AND DRY.
- VERSATILE USE: PERFECT FOR TOOLS, PETS, OR GARDEN STORAGE NEEDS.
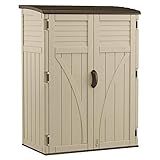
Suncast Outdoor Storage Cabinet Waterproof Resin Vertical Outdoor Storage Shed (54 cu. ft.) for Patio, Garden Tools, Cushions, & Equipment. Weatherproof Plastic Multi-Wall Design, Capacity Made in USA
- SECURE DESIGN: LOCKABLE SHED PROTECTS TOOLS & GEAR FROM THEFT.
- YEAR-ROUND DURABILITY: ALL-WEATHER CONSTRUCTION NEEDS NO MAINTENANCE.
- CUSTOMIZABLE STORAGE: ADD SHELVES FOR ORGANIZED AND FLEXIBLE USE.
Outdoor storage sheds with windows can provide some level of ventilation, as windows can be opened to allow fresh air to enter and circulate within the shed. This can help in reducing humidity, minimizing mold and mildew growth, and maintaining a more stable temperature inside. However, the effectiveness of the ventilation will depend on factors such as the size and number of windows, their placement, and the local climate conditions. Additional ventilation features, like vents or louvers, may be needed to ensure adequate airflow for specific storage needs.
How does proper ventilation prevent mold in storage sheds?
Proper ventilation is crucial in preventing mold growth in storage sheds for several reasons:
- Moisture Control: Mold thrives in damp environments. Proper ventilation helps to regulate and reduce the humidity levels within the shed by allowing moist air to escape and promoting the circulation of dry air. This decreases the overall moisture content in the air, making it less conducive for mold growth.
- Air Circulation: Good airflow prevents stagnant conditions where mold can easily take hold. By keeping the air moving, ventilation disperses pockets of humid air and helps in drying out any dampness on surfaces, which might have resulted from leaks, condensation, or rain.
- Temperature Regulation: Ventilation helps in maintaining a consistent indoor temperature by allowing hot air to escape during warmer months and moderating temperature fluctuations. Rapid temperature changes can lead to condensation, which can increase the risk of mold.
- Odor Reduction: Mold and mildew can produce musty odors. Effective ventilation reduces these odors by dispersing the microorganisms and spores that cause them, alongside freshening the air inside the shed.
- Protection of Stored Items: With adequate ventilation preventing mold, the items stored within the shed-be it furniture, tools, or other goods-are less likely to experience mold-related damage, preserving their condition and extending their lifespan.
To ensure proper ventilation, you might incorporate things like vents, fans, or strategically placed windows in the shed design, all of which can greatly aid in keeping the interior dry and mold-free.
How to install additional vents in a storage shed?
Installing additional vents in a storage shed can help improve airflow, reduce humidity, and prevent mold and mildew. Here’s a step-by-step guide to installing vents in your shed:
Tools and Materials Needed:
- Vent kits (gable vents, ridge vents, or soffit vents, depending on your style preference)
- Measuring tape
- Pencil
- Level
- Saw (hand saw, circular saw, or jigsaw depending on the material and cut)
- Drill
- Screwdriver
- Screws or nails
- Caulk or sealant
- Safety glasses
- Dust mask
- Ladder
Steps to Install Vents:
1. Select Vent Type and Position:
- Choose the type of vent that suits your needs (gable vents for higher airflow, ridge vents for roofline ventilation, or soffit vents for under-eaves).
- Decide on the position for the vents to ensure optimal air circulation (e.g., opposite ends for gable vents, or along the roofline for ridge vents).
2. Prepare the Shed:
- Clear the area inside and outside the shed where you’ll be working.
- Make sure you have safe ladder access if working at a height.
3. Mark the Vent Location:
- Use a measuring tape and pencil to mark the location for your vents on the shed wall, roof, or soffit. Ensure that the marks are level for even installation.
- Use these marks to draw the outline of the vent opening.
4. Cut the Opening:
- Wear safety glasses and a dust mask.
- Use the appropriate saw to cut along the outline marked for your vent on the shed's surface.
- Be cautious to avoid damaging the structural integrity of the shed.
5. Install the Vent:
- Fit the vent into the cut opening. Adjust as necessary to ensure a snug fit.
- Secure the vent with screws or nails at the provided mounting points.
- Ensure the vent is level and aligned properly before fastening completely.
6. Seal the Edges:
- Apply a bead of caulk or sealant around the edge of the vent from the inside and outside to prevent water ingress and to seal against drafts.
- Ensure the caulking is applied neatly for aesthetic purposes.
7. Check and Finish:
- Inspect the installation to ensure the vent is securely fastened and sealed.
- Clean any debris from cutting and installation.
- If painting is desired, allow the caulk to dry completely before applying paint.
8. Test Ventilation:
- Once installed, check the airflow by opening the shed door and windows (if any) to ensure the vents are enhancing air circulation.
By following these steps, you can effectively and safely install additional vents in your storage shed, leading to a well-ventilated storage space. If you are unsure or uncomfortable with the process, consider hiring a professional to assist with the installation.
How to retrofit an existing shed for better ventilation?
Retrofitting an existing shed for better ventilation is a great way to improve airflow, reduce humidity, and prevent mold or unpleasant odors. Here are some steps to help you enhance ventilation in your shed:
- Assess Current Ventilation: Identify any existing vents or airflow issues and determine areas where ventilation is most needed.
- Add Roof Vents: Ridge Vents: Install these along the peak of the roof to allow hot air to escape. Gable Vents: Place vents at the gable ends of the shed. These can be static or powered to improve airflow.
- Install Windows: If your shed doesn't already have windows, consider adding one or two. Windows can provide cross-ventilation and can be opened and closed as needed.
- Include Louvered Vents: Position these vents low on the walls to allow cooler air to enter, effectively creating a flow of air from low to high (exiting through roof vents).
- Solar-Powered Vent Fans: These are an excellent option for sheds without power. A solar panel powers the fan, helping to expel hot air out of the shed.
- Wall Vents: Install wall vents to increase airflow, especially in areas of the shed that seem stagnant. Automatic vents are also available that open and close based on temperature.
- Use Ventilated Soffits: If possible, install ventilated soffit panels which can draw in cooler air from outside and improve air circulation.
- Incorporate Fan Systems: Use battery-operated or electric fans to help circulate air within the shed during particularly hot or cold spells.
- Install a Skylight with Ventilation: Consider a skylight with a venting feature to enhance natural light and provide an additional escape route for hot air.
- Regular Maintenance: Keep vents and fans clean and free of obstructions such as leaves, debris, or dust to ensure effective operation.
- Strategic Placement of Shelving and Items: Arrange shelves and storage to not block vents. Ensuring a clear path for air to move will enhance effectiveness.
Before starting, ensure that any modifications comply with local building codes and regulations. If you're unsure about how to proceed, consider consulting with a professional.
What is the difference between passive and active ventilation in sheds?
Passive and active ventilation are two different approaches to ensuring adequate air circulation in sheds, and each has its own characteristics and benefits.
Passive Ventilation:
- Nature: Relies on natural air movement without the use of mechanical devices.
- Mechanism: Utilizes openings such as vents, louvers, or windows to allow air to flow in and out.
- Air Movement: Driven by natural forces like wind and temperature differences between the inside and outside of the shed.
- Energy Use: Does not require any electricity or energy because it functions solely based on natural forces.
- Cost: Typically lower initial costs as it involves less equipment and maintenance.
- Effectiveness: Can be less controllable and effective, especially in areas with little wind or in sheds that are tightly sealed.
Active Ventilation:
- Nature: Utilizes mechanical devices to move air.
- Mechanism: Involves fans, blowers, or ventilators to force air movement.
- Air Movement: Controlled by mechanical means, providing consistent airflow regardless of natural conditions.
- Energy Use: Requires electrical power to run the mechanical systems.
- Cost: Usually higher due to the cost of equipment and ongoing power consumption.
- Effectiveness: Offers better control over air exchange and can be more effective in tightly sealed or larger sheds.
Considerations:
- Climate & Environment: In areas with consistent wind, passive systems might be sufficient; however, in hot, humid, or still climates, active systems can provide more reliable ventilation.
- Usage: If the shed is used frequently or houses animals, machinery, or materials sensitive to heat and moisture, active ventilation might be necessary.
- Installation Costs and Maintenance: Passive systems generally have lower installation costs and require less maintenance, while active systems may require more investment and upkeep.
Choosing between passive and active ventilation depends largely on specific needs, climate conditions, energy considerations, and budget.
What is the impact of window size on shed ventilation?
The impact of window size on shed ventilation is significant and can influence temperature control, air quality, and overall comfort within the shed. Here are some key points on how window size affects ventilation:
- Airflow: Larger windows generally allow for greater airflow, facilitating better ventilation. This can help dissipate heat, moisture, and odors, creating a more comfortable environment inside the shed.
- Temperature Regulation: Proper ventilation helps maintain a stable temperature by allowing hot air to escape and cooler air to enter. Larger windows improve this exchange, particularly in warmer months, reducing the need for additional cooling systems.
- Humidity and Moisture Control: Adequate ventilation helps control humidity levels, preventing condensation and the growth of mold and mildew. Larger windows can enhance this effect by allowing moisture-laden air to exit efficiently.
- Air Quality: With better airflow through larger windows, fresh air can circulate more effectively, which improves air quality by removing pollutants and replenishing oxygen levels.
- Light and Insulation: While larger windows improve ventilation, they also affect lighting and insulation. They can provide natural light, reducing the need for artificial lighting during the day. However, large windows may also allow more heat to enter in summer and escape in winter, so they should be strategically placed and perhaps combined with shades or curtains for thermal management.
- Design and Placement: The effectiveness of ventilation is not only dependent on window size but also on the design and placement of windows. Cross-ventilation, achieved by positioning windows on opposite walls, can enhance airflow and ensure more uniform temperature distribution.
- Security and Privacy: Larger windows may raise security concerns, so it's important to consider durable materials, locks, or other security measures. Privacy can also be affected by larger windows, necessitating curtains or frosted glass.
In summary, the size of the windows plays a crucial role in shed ventilation by influencing airflow, temperature regulation, humidity control, air quality, and light. Balancing these aspects with security, privacy, and energy efficiency considerations is important when deciding on the appropriate window size for a shed.