Best Ceiling Fan LED Lights to Buy in July 2026
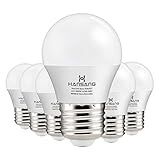
MAXvolador E12 LED 60W Equivalent Daylight White 5000K Ceiling Fan Bulbs, 600LM CRI 85+ Small Base Candelabra Bulbs, 6W Non-Dimmable, Pack of 6
- SAVE ON BILLS: REPLACE 60W BULBS WITH 6W ENERGY-EFFICIENT LEDS!
- LASTS OVER 25,000 HOURS: SPEND LESS ON REPLACEMENTS AND ENJOY MORE LIGHT.
- INSTANT FULL BRIGHTNESS: ILLUMINATE YOUR SPACE PERFECTLY WITHOUT DELAY!


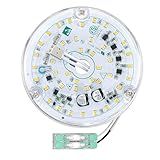
Ledytech 4 inch LED Retrofit Light Kit for Ceiling Fan Light Replacement Panel PCB 18W 6000K 2200LM 120V CRI90 Dimmable ETL (White 6000K)
- PLUG-AND-PLAY: EASILY CONNECTS TO 120V WITHOUT EXTRA DRIVERS.
- BRIGHT & EFFICIENT: OVER 2200 LUMENS; 80% ENERGY SAVINGS!
- VERSATILE & LONG-LASTING: PERFECT FOR VARIOUS SPACES WITH 3-YEAR LIFE.
PARTPHONER E12 Base LED Light Bulbs B11 Candelabra Bulbs 60W Equivalent, Non-Dimmable 6W LED Bright Candle Small Base Chandelier Bulb 600 Lumen, 5000K Cold White for Ceiling Fan, Pack of 6
- BRIGHT, ENERGY-EFFICIENT E12 BULBS: 60W LIGHT FOR JUST 6W POWER.
- LASTS 25,000 HOURS FOR RELIABLE, LOW-MAINTENANCE LIGHTING.
- HIGH CRI OF 85 ENSURES VIBRANT, TRUE-TO-COLOR ILLUMINATION.
Caisens 4 Inch Ceiling Fan LED Light Replacement, 18W 6000K 2200LM LED Ceiling Fan Light Kit, Round Ceiling Fan Light Kit Replacement, 120V, CRI90, Dimmable (Natural Daylight)
- TRANSFORM LIGHTING EASILY WITH OUR USER-FRIENDLY RETROFIT KIT.
- ENJOY ADJUSTABLE BRIGHTNESS FOR ANY OCCASION WITH DIMMABLE FEATURE.
- EXPERIENCE VIBRANT NATURAL DAYLIGHT WITH OUR 6000K LED MODULE.
hansang A15 LED E26 Small Light Bulb, Daylight 5000K, 60Watt Equivalent Ceiling Fan Light Bulbs, E26 Standard Base Appliance Light Bulb, 600 Lumen, CRI85+, Eye Protection, 120V, Non-Dimmable 6 Pack
- BRIGHT 5000K DAYLIGHT: ENERGIZING, CLEAN LIGHT ENHANCES ANY SPACE.
- FLICKER-FREE TECHNOLOGY: REDUCES FATIGUE AND PROTECTS YOUR EYESIGHT.
- HIGH CRI 85+: SUPERIOR COLOR RENDERING REVEALS TRUE SHADES BRILLIANTLY.
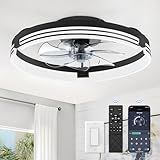
ZMISHIBO Low Profile Ceiling Fans with Lights and Remote, 20 Inch Flush Mount Ceiling Fan with Light, 3000K-6000K Dimmable Fandelier LED Fan Light, 6 Wind Speeds Black Ceiling Fans for Bedroom
- EFFORTLESS CONTROL WITH REMOTE & APP FOR CUSTOMIZED COMFORT.
- ENERGY-EFFICIENT REVERSIBLE MOTOR OFFERS YEAR-ROUND AIRFLOW.
- SMOOTH DIMMING AND COLOR TEMP SELECTION ENHANCE AMBIANCE.
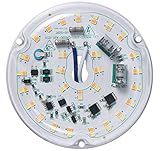
Ledytech 4 inch LED Retrofit Light Kit for Ceiling Fan Light Replacement Panel PCB 18W Color Temperature Adjustable 3000K 4500K 6000K 2200LM 120V CRI90 Dimmable
- SAVE 80% ENERGY WITH 2200+ LUMENS, ECO-FRIENDLY LED LIGHTING!
- QUICK INSTALLATION & COMPATIBLE WITH MOST DIMMER SWITCHES.
- CUSTOMIZE LIGHTING WITH SMART TEMPERATURE CONTROL FOR ANY MOOD.

4 Inch Ceiling Fan LED Light Replacement, 18W 2200LM 3000K 4000K 5000K LED Ceiling Fan Light Kit, Ceiling Fan Light Kit Replacement, 120V, CRI90, Dimmable
-
EFFORTLESS LIGHTING WITH ADJUSTABLE COLOR TEMPERATURES FOR ANY MOOD.
-
EASY INSTALLATION: NO SPECIAL SKILLS NEEDED FOR A QUICK UPGRADE.
-
HIGH CRI90 FOR VIBRANT COLORS THAT ENHANCE YOUR SPACE'S AESTHETICS.
Yes, you can replace the LED light in a ceiling fan, although the process may vary depending on the design of the fan and the type of LED module or bulb it uses. First, ensure that the power to the fan is turned off at the circuit breaker to prevent any electrical hazards. If the fan uses standard LED bulbs, you can simply remove the glass covering or light fixture on the fan to access the bulb, then unscrew or unclip it and replace it with a new one of the same type and wattage. However, if the fan uses an integrated LED module, replacing it might be more complex, and you may need to refer to the fan's manual or contact the manufacturer for specific instructions. In some cases, the integrated LED may not be replaceable, and you might need to replace the entire light kit or consult a professional for assistance.
What is the difference between regular and dimmable LED bulbs?
The primary difference between regular and dimmable LED bulbs lies in their compatibility with dimmer switches and the technology used to achieve adjustable brightness levels. Here are the main distinctions:
- Design and Electronics: Regular LED Bulbs: These are designed to provide a consistent level of brightness and are typically not compatible with traditional dimmer switches. They use simple circuitry optimized for full power operation. Dimmable LED Bulbs: These bulbs are equipped with advanced electronic components that allow them to adjust the light output in response to changes in the input current, without flickering or humming. They are specifically designed to be used with compatible dimmer switches.
- Dimmer Compatibility: Regular LED Bulbs: When used with a dimmer switch, these bulbs may not function properly. They can flicker, buzz, or not dim at all. Dimmable LED Bulbs: These are compatible with dimmer switches, allowing the user to adjust the brightness smoothly. However, it’s essential to ensure that both the bulb and the dimmer switch are compatible with each other, as not all dimmers are suitable for LED technology.
- Cost: Regular LED Bulbs: Generally, these bulbs are less expensive than dimmable versions because they have simpler circuitry. Dimmable LED Bulbs: These tend to be more expensive due to the added technology required for dimming functionality.
- Applications: Regular LED Bulbs: Ideal for areas where constant lighting levels are desired, such as wardrobes, or utility rooms. Dimmable LED Bulbs: Suitable for settings where variable lighting is beneficial, like living rooms, dining areas, or bedrooms where ambiance matters.
- Energy Efficiency: Both regular and dimmable LED bulbs are energy-efficient compared to traditional incandescent or halogen bulbs. However, dimmable LEDs provide the added benefit of energy savings when operated at lower brightness levels.
Overall, the choice between regular and dimmable LED bulbs depends on the specific needs of your lighting setup and whether you require adjustable lighting control.
How to remove a stuck LED bulb from a ceiling fixture?
Removing a stuck LED bulb from a ceiling fixture can be tricky, but with some patience and the right approach, you can do it safely. Here are some steps you can follow:
- Safety First: Ensure the power is off. Turn off the light switch and, if possible, the circuit breaker to prevent any electrical accidents.
- Allow to Cool: If the bulb was recently on, give it some time to cool down completely before attempting removal, as it could be hot and may burn your hands.
- Use a Sturdy Ladder: If the fixture is on the ceiling, use a stable and secure ladder to reach it comfortably.
- Grip Material: Sometimes a bulb is stuck because it's too smooth to grip easily. Use a piece of rubber, like a jar opener, or wear rubber gloves to get a better grip on the bulb.
- Firm but Gentle Pressure: Carefully hold the bulb and try to turn it counterclockwise. Use firm but controlled pressure. Avoid using excessive force, which might break the bulb.
- Lubricate the Base: If the bulb doesn't budge, you can try a small amount of lubricant, like WD-40, applied around the base where the bulb meets the socket. Make sure to clean any residue thoroughly afterward to prevent potential hazards.
- Alternative Methods: Duct Tape: Wrap a length of duct tape around the bulb, leaving two “handles” you can pull on for better grip. This can give more leverage and grip. Sock or Cloth: Put a sock or piece of cloth over the bulb to increase friction while trying to unscrew it.
- Last Resort: If none of the above methods work and the bulb breaks, wear protective gloves and use pliers to carefully remove the remaining base of the bulb. Be cautious of sharp edges.
- Inspect for Damage: After removing the bulb, check the socket for any damage or debris that might have caused the bulb to stick.
- Replace Safely: When replacing the bulb, ensure it is compatible with the fixture, and avoid over-tightening to prevent it from getting stuck again.
If you feel uncomfortable at any point, consider contacting a professional electrician to assist with the removal.
How to check for compatibility of LED bulbs in ceiling fans?
When it comes to checking the compatibility of LED bulbs for ceiling fans, there are several key factors to consider. Here's a comprehensive guide to help you ensure a good fit and optimal performance:
- Socket Type: Verify the bulb socket type in your ceiling fan. Common types include E26 (medium base) and E12 (candelabra base). Make sure the LED bulb you choose matches the socket type.
- Wattage Equivalence: Check the wattage rating of the fan's light fixture. LED bulbs typically consume less wattage for the same brightness (lumens) compared to incandescent bulbs. Ensure the LED bulb's wattage does not exceed the fixture's maximum wattage limit.
- Lumens and Brightness: When replacing bulbs, consider the lumens (brightness) rather than wattage. Choose a bulb that provides adequate lighting for the space. Use a lumens-to-wattage conversion chart if necessary to find an LED equivalent.
- Dimmability: If the ceiling fan has a dimming feature, make sure the LED bulb is dimmable. Also, verify compatibility with the specific dimmer switch, as some LEDs may flicker or not dim smoothly with certain dimmers.
- Size and Shape: Ensure the LED bulb fits within the fixture. Ceiling fan light kits may have limited space, so consider the bulb's physical size (height, width) and shape.
- Weight: LEDs are generally lighter than incandescent bulbs, but extremely heavy bulbs could affect the fan's balance. This is usually not a problem with LED bulbs, but it's good to be mindful.
- Color Temperature: Decide on the color temperature that suits your preference: warm white (around 2700K-3000K) for a cozy feel, cool white (around 3500K-4100K) for a neutral look, or daylight (5000K-6500K) for a bright, invigorating light.
- Compatibility with Enclosed Fixtures: Check whether the LED bulb is rated for use in enclosed fixtures if your fan's light kit is fully enclosed, to avoid overheating the bulb.
- Brand Reliability and Warranty: Opt for reputable brands known for quality. Consider the warranty offered, as it can give you peace of mind regarding the bulb's longevity and performance.
- Smart Features (if applicable): If you have a smart ceiling fan, or are using a smart home system, make sure the LEDs are compatible with your setup, especially if you plan on controlling them via an app or voice assistant.
By taking these factors into account, you can ensure that the LED bulbs you choose for your ceiling fan will be efficient, compatible, and meet your needs.
How to handle fragile LED bulbs during replacement?
Handling fragile LED bulbs with care is important to prevent breakage or damage. Here are some steps to ensure safe replacement:
- Turn Off Power: Always make sure the power is turned off at the switch and, if possible, at the circuit breaker. This minimizes the risk of electric shock.
- Let the Bulb Cool: If the LED bulb has been on, give it some time to cool down to avoid burns, as some bulbs can generate heat.
- Use a Ladder Safely: If the bulb is at a height, use a stable ladder and ensure it is placed on a flat, even surface to prevent accidents.
- Wear Gloves: Use gloves, preferably made of soft fabric, to prevent oils from your skin from getting on the bulb, which can cause damage and improve grip.
- Gently Remove the Old Bulb: Carefully unscrew the old bulb by holding it gently yet firmly. Use light pressure as you turn it counterclockwise. Do not squeeze too tightly, as this can break the bulb.
- Handle the New Bulb Carefully: Take the new LED bulb out of its packaging gently. Avoid touching the glass part of the bulb; handle it by the base instead.
- Install the New Bulb: Insert the new bulb into the socket and turn it clockwise until snug. Avoid over-tightening, as this can damage both the bulb and the socket.
- Check for Proper Fit: Make sure the bulb is seated correctly in the socket to ensure it will function properly.
- Clean the Fixture: While the bulb is out, it might be a good idea to clean the fixture of dust and debris. This can help with the light output and longevity of the bulb.
- Recycle the Old Bulb Appropriately: Dispose of the old bulb according to local regulations, as LED bulbs contain electronic components that should not go to regular trash.
- Turn On the Power: Once the new bulb is securely in place, turn the power back on and test the bulb to ensure it functions.
By following these steps, you can safely and efficiently replace fragile LED bulbs without damaging them or injuring yourself.
How to replace a broken ceiling fan pull chain for the light?
Replacing a broken ceiling fan pull chain for the light involves a few straightforward steps. Here's a general guide to help you:
- Turn Off the Power: For safety, switch off the power to the fan at the circuit breaker. Confirm that the power is off by trying to operate the fan or light, ensuring it doesn't work.
- Access the Pull Chain Switch: Use a sturdy ladder to safely reach the fan. Remove the light bulb and the globe or light cover if necessary. These are typically held in place by screws or clips, which you should keep safe for reassembly. Locate the decorative cover or housing canopy on the bottom of the fan. This may also need to be unscrewed to expose the internal parts.
- Remove the Broken Pull Chain: Identify the pull chain switch, a cylindrical component from which the chain hangs. Unscrew the switch from its fitting after noting the wires attached to it. Most pull chain switches will have two wires. Detach the wires by either pulling them out or unscrewing the wire connectors, noting the connections for the new switch.
- Install the New Pull Chain Switch: Obtain a replacement switch that matches the existing one. Bring the old part to a hardware store to ensure compatibility. Connect the wires from the new switch to the fan. Typically, this involves connecting the wires using wire nuts. Ensure the connections are tight and secure. Screw the new pull chain switch back into place.
- Reassemble the Fan: Replace the decorative cover or housing canopy and secure it with screws. Reattach the light cover or globe; make sure it is fixed firmly but not overtightened. Reinstall the light bulb.
- Restore Power and Test: Turn the power back on at the circuit breaker. Test the new pull chain to ensure the light operates correctly. If it doesn’t work, double-check your electrical connections.
If you encounter any complications or are unsure at any point, it’s wise to consult with a professional electrician to avoid electrical hazards.