
Best Sheds with Windows for Tool Storage to Buy in July 2026
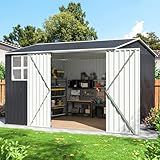
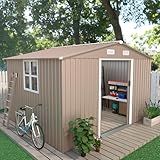
DAUSOLA 10x10 FT Outdoor Storage Shed, Metal Garden Tool Shed with Updated Frame Structure, Lockable Doors and Windows, Ideal for Backyard Garden Patio Lawn, Grey
-
DURABLE & WEATHERPROOF: CONSTRUCTED FROM RUST-RESISTANT GALVANIZED STEEL.
-
EASY ASSEMBLY: REINFORCED DESIGN ENABLES 35% SIMPLER SETUP!
-
SPACIOUS & SECURE: AMPLE STORAGE WITH LOCKABLE DOOR & VENTILATION.


8x6 FT Outdoor Storage Shed, Metal Garden Shed - Tool Storage Sheds with Lockable Doors & 1 Clear Window, Waterproof Outside Storage Building for Backyard, Patio (Black; Floor Not Included)
- SPACIOUS 8X6 SHED WITH 247 CU. FT. FOR VERSATILE OUTDOOR STORAGE.
- INCLUDES LIGHTS, A LEAF BAG, AND SECURE LOCK FOR CONVENIENCE.
- DURABLE DESIGN WITH VENTILATION ENSURES LONG-LASTING PERFORMANCE.
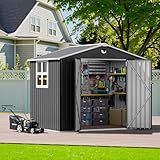
DWVO 12' x 8' Outdoor Storage Shed, Waterproof Metal Garden Shed with Windows, Lockable Doors, and Sloped Roof for Patio, Backyard, Lawn, Tool Storage, Bike Shed, Pet Shelter (Gray + White)
- AMPLE 568 CU. FT. CAPACITY: STORE TOOLS, BIKES, AND MORE EFFORTLESSLY!
- DURABLE & WEATHERPROOF: BUILT TO WITHSTAND CORROSION, WATER, AND WIND.
- SECURE LOCKABLE ACCESS: KEEP YOUR BELONGINGS SAFE WITH DOUBLE DOORS!
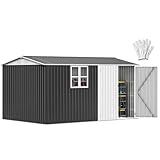
VanAcc 12x10.3x8.1 FT Galvanized Steel Outdoor Storage Shed with a Lockable Hinged Door and 2 Windows, Metal shed for Garden, Backyard, Dark Grey/White
- CHARMING NORDIC DESIGN ENHANCES AESTHETICS AND APPEALS TO BUYERS.
- ABUNDANT NATURAL LIGHT ALLOWS FOR VERSATILE INDOOR USE AND STORAGE.
- DURABLE GALVANIZED STEEL CONSTRUCTION ENSURES LONGEVITY IN ALL WEATHER.
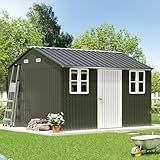
Halmuz 10×8FT Outdoor Storage Shed with Window,Large Metal Tool Shed with Lockable Door and Rainproof Sloped Roof, Garden Shed for Backyard, Patio, Brown
-
AMPLE 10FTX8FT SPACE FOR OUTDOOR FURNITURE AND TOOLS-SAY GOODBYE TO CLUTTER!
-
DURABLE GALVANIZED STEEL PROTECTS YOUR ITEMS FROM WIND AND RAIN DAMAGE.
-
QUICK ASSEMBLY SAVES TIME-ENJOY HASSLE-FREE STORAGE IN NO TIME!

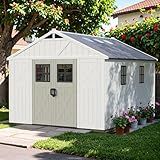
Handy Home Products Designer 12x10 Wooden Storage Shed with Dormer, Windows, and Floor Kit- Paint and Shingles not Included
- FULLY CUSTOMIZABLE: PERSONALIZE YOUR SHED WITH PAINT AND SHINGLES.
- DURABLE DESIGN: PRIMED WOOD RESISTS DECAY FOR LONG-LASTING USE.
- SECURE & SPACIOUS: DOUBLE DOORS WITH T-HANDLE LOCK FOR EASY ACCESS.
Greesum 10×12 FT Plastic Outdoor Storage Shed with Floor and Lockable Door, Resin Sheds with Windows and Skylights, Weather Resistant Organization for Garden, Lawn, Pool Supplies, Beige
-
HEAVY-DUTY DESIGN: EXCEPTIONAL STRENGTH WITH 75KG/M² ROOF LOAD CAPACITY.
-
QUICK ASSEMBLY: 30% FEWER SCREWS MAKE SETUP FASTER AND EASIER.
-
NATURAL LIGHT: BUILT-IN WINDOWS AND SKYLIGHTS REDUCE LIGHTING NEEDS.
Yes, you can store tools in a shed with windows. However, there are several considerations to keep in mind. The presence of windows can lead to increased light exposure, which might cause certain materials to fade or degrade over time. Moreover, windows can be vulnerable entry points for thieves, so ensuring they are secured with locks or reinforced glass can enhance security. Temperature and humidity control is another factor to consider, as windows might affect the internal climate of the shed, potentially leading to rust or damage if the tools are not properly stored or insulated. Additionally, regular maintenance and cleaning can help prevent any build-up of moisture or dust, which might affect the tools over time.
How to set up a workbench in a shed?
Setting up a workbench in a shed can significantly enhance your workspace for various projects. Here's a step-by-step guide to help you set up a functional workbench:
Materials and Tools Needed
- Workbench kit or lumber: If you prefer building from scratch, use 2x4s for the frame and a thick plywood or hardwood for the surface.
- Saw: For cutting wood to size if building from scratch.
- Drill and drill bits: To assemble the bench and attach any tools or vises.
- Wood screws or bolts: Depending on the design.
- Workbench vise: Optional, but useful for holding materials.
- Level and measuring tape: Ensure everything is straight and even.
- Miter saw or hand saw: To cut wood pieces accurately if building yourself.
- Safety goggles and work gloves: For protection.
Steps to Set Up Your Workbench
- Plan the Layout Determine the best location in your shed, ensuring adequate lighting and accessibility to power sources if needed. Decide on the dimensions that fit your space while considering the projects you’ll be working on.
- Choose the Workbench Type Pre-made workbenches are available if you prefer easy assembly. Custom-built options allow for specific size and storage preferences.
- Prepare the Surface and Area Clear the area and ensure the ground or floor is level. An uneven floor can affect your workbench stability.
- Building or Assembling the Frame Pre-made Kit: Follow assembly instructions provided by the manufacturer. Custom Build: Cut wood to desired lengths for the legs and frame structure. Assemble the frame on the ground using screws or bolts for sturdiness. Ensure all joints are tight and secure.
- Install the Work Surface Attach the plywood or hardwood surface to the frame using screws. Ensure it is secure to handle pressure from tools and materials.
- Stabilization Check if your workbench wobbles or needs support. Use shims or additional braces if necessary to stabilize.
- Add Additional Features Vises: Attach any vises securely with bolts or screws. Shelving or Pegboard: Consider adding storage underneath or a pegboard for tools above the workbench for easy access.
- Final Adjustments Use a level to ensure your workbench is even. Make any final adjustments to the height and positioning.
- Organize the Space Place frequently used tools and materials within arm's reach. Consider arranging the workspace to optimize the flow and efficiency.
- Safety Check Ensure all tools and the workbench itself are stable and safely installed. Confirm electrical outlets are accessible if power tools will be used frequently.
Having a well-organized and sturdy workbench will greatly improve the efficiency and enjoyment of your projects in the shed.
How to organize tools in a shed?
Organizing tools in a shed can improve efficiency and make your tasks easier to manage. Here's a step-by-step guide to help you get organized:
- Declutter: Start by emptying the shed and sorting through your tools. Donate, sell, or recycle any duplicates, broken tools, or items you no longer need.
- Categorize Tools: Group your tools into categories such as gardening, woodworking, mechanical, and electrical. This helps you see what you have and decide how to store them efficiently.
- Plan Your Layout: Think about how often you use each category of tools, and plan your shed layout accordingly. Frequently used tools should be more accessible.
- Install Shelving: Use wall-mounted shelves to store smaller items and keep your workspace clear. Adjustable shelves can accommodate different sizes of tools and supplies.
- Use Pegboards: Install pegboards on walls for hanging tools such as hammers, screwdrivers, and pliers. This keeps them visible and within reach.
- Utilize Vertical Space: Hang tools vertically to maximize space on walls. Hooks, brackets, and magnetic strips can hold various tools securely.
- Create Zones: Designate specific areas for different tasks, like a potting station for gardening or a workbench for repairs. This helps keep your shed organized and task-focused.
- Label Everything: Use labels on shelves, bins, and pegboards to ensure everything has a designated place. This makes it easy to maintain the organization over time.
- Use Bins and Containers: Store small items like screws, nails, and other hardware in labeled bins or jars. Clear containers make it easy to see contents at a glance.
- Install a Workbench: If space allows, have a sturdy workbench for projects. Include drawers or shelves underneath for storing commonly used tools.
- Store Seasonal Items Away: Keep seasonal items in the back or higher up, storing only the tools that are currently in use within easy reach.
- Regular Maintenance: Schedule regular clean-ups to keep the shed tidy. Reorganize as needed to accommodate new tools or changing needs.
By following these steps, you can create an organized and functional tool shed that makes your projects easier and more enjoyable.
What is the safest way to store sharp tools?
Storing sharp tools safely is important to prevent injuries and preserve the tools' condition. Here are some guidelines for safely storing sharp tools:
- Toolboxes and Tool Chests: Use toolboxes or chests with designated compartments for each tool. Make sure the tools are securely fastened and not loose.
- Magnetic Strips: Install magnetic strips on walls. This allows you to hang metal tools securely, keeping them visible and accessible without cluttering drawers.
- Blade Covers and Sheaths: Always cover blades with sheaths or covers when storing them. Many tools, like knives or saws, come with protective sheaths, or you can make or buy them separately.
- Tool Rolls or Pouches: Use rolls or pouches made of sturdy materials to store tools like chisels or carving tools. These keep each tool separated and protected from damage.
- Pegboards: Mount pegboards on walls and use hooks to hang tools. This keeps tools visible and can be coupled with outlines to indicate where each tool belongs.
- Drawers with Dividers: Use drawers with custom dividers to keep tools organized and prevent them from moving around and getting damaged.
- Vertical Racks: For larger tools like axes or shovels, use vertical racks. Make sure they are stable and have holders that prevent the tools from accidentally falling out.
- Secure Location: Always keep sharp tools in a locked cabinet or room, especially if there are children or unauthorized persons around.
- Regular Maintenance: Ensure tools are cleaned and dried before storing to prevent rust and degradation. This also includes regularly sharpening blades to maintain their condition.
- Clear Labeling: Label storage areas or containers clearly to ensure tools are returned to the correct location.
By following these guidelines, you can maintain a safe environment and ensure your tools remain in good working condition.
What is a tool shed made of?
A tool shed can be made from a variety of materials, each with its own benefits. Common materials include:
- Wood: Offers a traditional and aesthetically pleasing appearance. It can be customized and painted but requires maintenance to prevent rot and insect damage.
- Metal: Usually made from galvanized steel or aluminum, metal sheds are durable and relatively low-maintenance, although they can be prone to rust if not properly coated.
- Plastic/Resin: These sheds are lightweight, resistant to rot, rust, and insects, and require minimal maintenance. They can also be easily assembled and are available in a variety of designs.
- Vinyl: Similar to plastic sheds, vinyl sheds are durable and maintenance-free, often offering insulation benefits and resistance to environmental wear.
The choice of material often depends on factors like budget, climate, desired aesthetics, and the level of maintenance one is willing to perform.