
Best DIY Garden Suncatcher Kits to Buy in July 2026
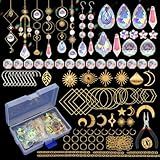
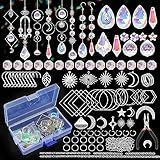
HYBEADS 200 pcs DIY Sun Catchers Making Kits Craft for Adults Crystal Suncatchers Supplies Stained Glass Window Hanging Prism Indoor Outdoor Garden Xmas Decor with Rainbow Maker Pendants Chains
-
CREATE 10+ UNIQUE SUNCATCHERS WITH 200+ PREMIUM ACCESSORIES!
-
TRANSFORM SUNLIGHT INTO RAINBOWS WITH CRYSTAL-CLEAR DESIGNS!
-
PERFECT GIFT FOR CRAFTY ENTHUSIASTS-IDEAL FOR ANY OCCASION!


Worgree DIY Suncatcher Kit 460pcs Sun Catchers Making Supplies Art and Crafts for Adults Hanging Prism Sun Catcher with Crystals Ball Indoor Window Home Wedding Garden Festival Decor Gifts
- CRAFT YOUR OWN STUNNING DECOR-400+ ACCESSORIES FOR ENDLESS CREATIVITY!
- PERFECT FOR ALL SKILL LEVELS-INCLUDES TOOLS AND EASY-TO-FOLLOW INSTRUCTIONS.
- IDEAL GIFTS FOR ANY OCCASION-DELIGHT LOVED ONES WITH CREATIVE SUNCATCHER KITS!

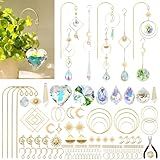
Sun Catchers, 10 Pcs Crystal Suncatcher Prism Hanging Kit with Chain Rainbow Maker Crystals Balls Pendants Ornaments for Indoor Window Outdoor Garden Backyard Patio Car Mirror Christmas Tree Decor
-
TEN UNIQUE DESIGNS: ENJOY VARIETY WITH 10 STUNNING PRISM SUNCATCHERS.
-
PREMIUM QUALITY: MADE WITH POLISHED CRYSTALS FOR BRILLIANT SUNLIGHT REFLECTION.
-
VERSATILE DECOR: PERFECT FOR WINDOWS, GARDENS, AND SPECIAL OCCASIONS ALIKE.
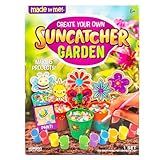
Made by Me Create Your Own Suncatcher Garden, Includes 6 Suncatchers to Paint, 7 Suncatcher Paints & Acrylic Paints, Fun Arts & Crafts for Kids, Suncatcher Kit, Unique Craft Kits, Cool Window Art
-
CREATE VIBRANT SUNCATCHERS WITH NATURE-INSPIRED THEMES FOR ALL AGES!
-
MIX & MATCH PAINTS FOR ENDLESS CREATIVITY IN YOUR MINI GARDEN CRAFT!
-
ENHANCE FINE MOTOR SKILLS & SENSORY PLAY WITH FUN, HANDS-ON ASSEMBLY!
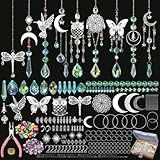
DIY Sun Catcher Kits for Adults, 260 pcs Crystal Suncatchers Making Suppliers for Garden Plant Windows Hanging Art and Crafts for Women Valentines Mother's Day Birthday Gifts Home Decor
-
CREATE STUNNING DECOR WITH OUR EYE-CATCHING CRYSTAL SUNCATCHERS!
-
260PCS CRAFTING SUPPLIES FOR ENDLESS DIY CREATIVITY AND FUN!
-
PERFECT HEARTFELT GIFTS FOR ANY OCCASION-CRAFTS LOVED BY ALL!

Motroce 200 Pcs DIY Suncatcher Making Kits, Crystal Sun Catchers Crafts with Hooks Chains Pendants, Rainbow Maker Prism for Windows Hanging Indoor Outdoor Garden Wedding Party Xmas Decor(Sliver)
-
OVER 200 PREMIUM ACCESSORIES FOR ENDLESS CREATIVE SUNCATCHER DESIGNS!
-
HIGH-QUALITY CRYSTALS REFRACT SUNLIGHT, CREATING STUNNING RAINBOWS!
-
PERFECT GIFT FOR CRAFT LOVERS; BEAUTIFULLY PACKAGED FOR SPECIAL OCCASIONS!
HYBEADS 200 Pcs DIY Suncatcher Making Kits for Adults Crystal Sun Catchers Crafts with Hooks Chains Pendants Rainbow Maker for Window Hanging Prism Indoor Outdoor Garden Xmas Wedding Party Decor
- CRAFT 10+ UNIQUE SUNCATCHERS WITH 200+ DIY ACCESSORIES INCLUDED!
- CREATE STUNNING RAINBOWS WITH POLISHED CRYSTALS REFRACTING SUNLIGHT.
- PERFECT GIFT FOR DIY ENTHUSIASTS; SHARE CREATIVITY AND JOY TOGETHER!

Beanewone DIY Suncatchers, 300pcs Sun Catchers Making Supplies Kit Art and Crafts for Indoor Window Home Wedding Garden Christmas Decor
- 300+ CRAFTING ACCESSORIES FOR ENDLESS DIY SUNCATCHER DESIGNS!
- PERFECT FOR BEGINNERS & PROS WITH EASY-TO-FOLLOW INSTRUCTIONS.
- IDEAL CREATIVE GIFT FOR MOTHER’S DAY, FAMILIES, AND FRIENDS!

HAPGFS DIY Suncatcher Kit, 402pcs Sun Catchers Making Supplies, Art and Crafts Rainbow Maker for Adults Hanging Prism Sun Catcher with Crystals Indoor Outdoor Garden Party Decor
-
402-PIECE KIT: ENDLESS CREATIVITY FOR UNIQUE SUN CATCHERS.
-
BRIGHT AB COATED CRYSTALS: TRANSFORM SUNLIGHT INTO RAINBOWS!
-
PERFECT GIFT IDEA: IDEAL FOR ANY OCCASION AND DIY ENTHUSIASTS!
kanpura DIY Suncatchers 164pcs Sun Catchers Making Kit for Adults Clear Hanging Prism Sun Catcher with Crystals Rainbow Maker for Window Wedding Garden Christmas Decor
-
CREATE STUNNING RAINBOWS: TRANSFORM ANY SPACE WITH DAZZLING LIGHT DISPLAYS.
-
ENDLESS DIY POSSIBILITIES: CRAFT UNIQUE SUNCATCHERS WITH FRIENDS AND FAMILY.
-
PREMIUM K9 CRYSTALS: DURABLE, SPARKLING MATERIAL FOR INDOOR AND OUTDOOR CHARM.
Creating a DIY garden suncatcher can be a fun and rewarding project that adds a personal touch to your garden space. A suncatcher can be crafted from a variety of materials, such as glass, plastic, or even recycled items, that reflect and refract sunlight. To make one, you could use old CDs, colorful beads, or glass gems. Start by deciding on the design and gathering your materials. If you opt for a simple project, you might string colored beads onto a strong fishing line or wire, alternating sizes and shapes for visual interest. For more intricate designs, you could use a clear plastic or glass disc as a base and attach elements such as glass gems using a strong adhesive. Hanging elements like ribbons or strings of beads below the main piece can add movement and catch the light beautifully. Once assembled, secure your suncatcher in a location where it can freely move and catch the sunlight, like a tree branch or a pergola. Remember that the materials you use should be weather-resistant to ensure your creation lasts outdoors. Apart from being a charming decorative feature, your DIY suncatcher can bring a sense of personal satisfaction and creativity to your garden.
What are the benefits of suncatchers in a garden?
Suncatchers can offer several benefits to a garden, enhancing both its aesthetic appeal and the growth environment. Here are some of the key benefits:
- Aesthetic Enhancement: Suncatchers add color and visual interest to a garden. They can be particularly striking when sunlight refracts through them, casting vibrant colors and patterns in their surroundings.
- Atmosphere and Ambiance: The playful light and color produced by suncatchers can create a cheerful and whimsical atmosphere in garden spaces, making them more inviting for relaxation and enjoyment.
- Wildlife Attraction: The dazzling colors and light effects can attract birds, butterflies, and other wildlife, enhancing the garden’s ecosystem. Certain designs may also act as bird deterrents by reflecting light and movement.
- Complement to Plant Life: Suncatchers can complement blooming plants and colorful foliage by adding another layer of visual interest. They can be particularly effective in gardens where blooms are sparse or out of season.
- Versatility: They come in various shapes, sizes, and designs, allowing for personalization to match the garden’s theme or the gardener’s personal aesthetic preferences.
- Low Maintenance: Once installed, suncatchers require little to no maintenance compared to plants, making them an easy way to add beauty without ongoing effort.
- Emotional and Psychological Benefits: The dynamic interplay of light and color can have uplifting effects on mood, which is beneficial for garden users seeking a peaceful and rejuvenating outdoor space.
- Educational: For those interested in the science of light and color, suncatchers can be a practical demonstration of refraction and dispersion.
By integrating suncatchers, gardeners can enhance their space with minimal effort, enjoying both visual beauty and the subtle alterations in their environment's dynamic.
What is a solar-powered suncatcher?
A solar-powered suncatcher is a decorative item that combines a traditional suncatcher with modern solar technology. Traditional suncatchers are often made of glass or other transparent materials and are hung in windows or outdoor spaces to catch and refract sunlight, creating beautiful visual effects and colorful displays as sunlight passes through them.
When solar technology is incorporated, the suncatcher typically includes small solar panels that collect solar energy. This energy can power LED lights or small motors within the suncatcher. For example, at night or in low-light conditions, the stored solar energy can be used to illuminate the suncatcher, often creating a striking contrast to its daytime appearance. Some solar-powered suncatchers might also feature moving parts or rotating elements powered by the solar energy collected during the day.
The combination of the aesthetic beauty of a traditional suncatcher and the functionality of solar power makes these items popular for adding charm and environmental consciousness to gardens, patios, or homes.
How to make a mosaic suncatcher?
Creating a mosaic suncatcher is a fun and creative project that can add a beautiful touch to any window. Here’s a step-by-step guide to help you make your own:
Materials Needed:
- Clear Glass or Plexiglas Panel: This will be your base. You can use picture frame glass or a small window pane.
- Colored Glass Pieces: These can be stained glass scraps, glass gems, or glass tiles. You can also use tumbled glass or sea glass.
- Glass Cutter: If you need to cut the glass pieces into specific shapes.
- Glass Adhesive: A clear-drying adhesive suitable for glass surfaces.
- Grout: Optional, if you want a more traditional mosaic look. Choose a grout color that will complement your design.
- Grout Sealer: Optional, if using grout.
- Suction Cup Hooks or Frame Hooks with Chain: To hang the suncatcher.
- Safety Gear: Safety glasses and gloves to protect yourself while cutting glass.
- Tweezers and/or Toothpicks: For precise placement of small glass pieces.
- Soft Cloth: For cleaning the glass surface.
Instructions:
- Design Your Pattern: Sketch your design on paper. If you’re new to mosaics, start with a simple pattern. Consider using geometric shapes, floral patterns, or abstract designs.
- Prepare the Base: Clean the glass or plexiglass thoroughly to ensure the adhesive adheres well. Lay out your design on the glass without gluing anything to see how it fits.
- Cut and Shape the Glass: If necessary, use a glass cutter to trim glass pieces to your desired shapes and sizes. Wear safety glasses and gloves during this process to protect your eyes and hands.
- Adhere the Glass Pieces: Starting from one section, apply a small amount of glass adhesive to the back of each glass piece. Press the glass pieces onto your base, following your design pattern. Use tweezers or toothpicks for small or intricate pieces. Allow the adhesive to dry completely as per the manufacturer’s instructions.
- Apply Grout (Optional): If you want a more traditional mosaic finish, mix the grout according to the package instructions. Use a squeegee or your fingers (with gloves) to apply grout over the entire surface, pressing it into the gaps between the glass pieces. Wipe away excess grout with a damp sponge, and let it set for the recommended time. Buff the tiles with a soft cloth to remove any grout haze.
- Seal the Grout (Optional): If you used grout, apply a grout sealer for added protection and durability.
- Attach Hanging Hardware: Install suction cup hooks if you plan to hang the suncatcher directly on a window. Alternatively, attach frame hooks and a chain to hang the suncatcher from a window frame or ceiling hook.
- Display Your Suncatcher: Hang your mosaic suncatcher in a sunny window where the light will shine through, enhancing the colors of the glass pieces.
Tips:
- Experiment with different textures and thicknesses of glass for unique effects.
- Use various colors to create depth and interest in your design.
- Be patient, as setting up a mosaic can take time, and precision will enhance the final result.
Enjoy creating a beautiful mosaic suncatcher to brighten up your space!
What is the best sealant for outdoor suncatchers?
For outdoor suncatchers, it's important to choose a sealant that is durable, UV-resistant, and waterproof to withstand the elements. Here are some good options:
- Clear Acrylic Sealant Spray: This type of sealant is easy to apply and provides a clear protective coating that's resistant to UV rays and moisture. It's great for preserving the color and clarity of the suncatcher.
- Polyurethane Sealant: Polyurethane sealants offer excellent durability and outdoor protection. They are also resistant to water and UV damage, making them suitable for outdoor use.
- Epoxy Resin: While more typically used as a coating rather than a spray, epoxy resin can provide a thick, high-gloss finish that is both water and UV-resistant. It's particularly good for suncatchers that might require a thicker protective layer.
- Marine Spar Varnish: This type of varnish is designed to protect surfaces exposed to marine environments and is very effective at withstanding UV exposure and moisture. It works well for wooden suncatchers or those that need a robust protective finish.
When applying any sealant, make sure to follow the manufacturer's instructions for the best results and ensure proper curing time before exposing the suncatcher to the outdoor environment.
How to make a garden suncatcher?
Making a garden suncatcher is a fun and creative project that can add color and charm to your outdoor space. Here's a simple guide to help you create one:
Materials Needed:
- Metal or Wooden Hoop/Ring - You can use an embroidery hoop, a metal hoop, or even a sturdy wire formed into a circle.
- Fishing Line or Thin Wire - This will be used to attach beads and crystals.
- Beads and Crystals - Choose glass beads, crystal prisms, or acrylic pieces in various colors and sizes to catch the sunlight.
- Scissors - For cutting the line or wire.
- Pliers - Handy for twisting wire and securing knots (optional, if using wire).
- Strong Glue - In case you want to secure certain beads or decorations.
- Decorative Items - Such as feathers, small mirrors, or charms (optional).
Instructions:
- Prepare the Base: If using an embroidery hoop, separate the inner and outer rings, and use the inner one. For a metal hoop or wire, ensure it is the desired size and shape.
- Attach the Fishing Line or Wire: Cut several lengths of fishing line or wire, varying in length. These will dangle from the hoop.
- String the Beads and Crystals: Start stringing the beads and crystals onto each piece of line. Mix colors and sizes for variety. Leave some space at the end of each line for tying.
- Secure the Lines to the Hoop: Tie or wrap the tops of each line to the hoop. You can distribute them evenly around the hoop or cluster them for a different look. Use strong knots to ensure they hold well; if using wire, twist it tightly.
- Add Decorative Elements: Attach any additional items like feathers or small mirrors to the lines if desired. Use glue for additional security if needed.
- Finish the Suncatcher: Ensure all elements are securely attached. Tie a longer piece of line or wire at the top of the hoop for hanging.
- Hang the Suncatcher: Choose a spot in your garden that catches the sunlight well. Hang your suncatcher from a tree branch, a hook, or a garden stake.
Tips:
- Experiment with different bead arrangements to see how they cast light.
- If in a windy area, consider weighting the suncatcher or using a more secure attachment method.
- Ensure the hanging spot allows the suncatcher to move gently in the breeze for the best effect.
Enjoy the beautiful play of colors and light your new garden suncatcher brings!
How to hang a garden suncatcher safely?
Hanging a garden suncatcher can add beauty and sparkle to your outdoor space. To do it safely, follow these steps:
- Choose the Right Location: Ensure you choose a spot where the suncatcher can catch direct sunlight for most of the day. Avoid areas with heavy foot traffic or where it could pose a hazard to people or pets.
- Select Appropriate Materials: Use weather-resistant materials such as stainless steel hooks or strong nylon string to hang your suncatcher. Ensure all materials can withstand outdoor conditions, including rain and wind.
- Secure the Hanging Hardware: If attaching to a tree branch, use a sturdy branch that can support the weight. Secure the string, wire, or chain tightly around the branch or hanging point to prevent it from falling.
- Consider Wind and Weather: Take into account local weather conditions. In windy areas, secure the suncatcher extra tightly or choose a heavier design. Check that all parts are securely fastened to avoid any pieces breaking off or becoming detached.
- Regular Maintenance: Periodically check the suncatcher and its hanging hardware to ensure it remains secure. Clean it occasionally to maintain its shine and visual appeal, using a gentle cleaner suitable for the materials.
- Height and Accessibility: Hang it at a height that is attractive but also ensures it can’t be easily bumped or tampered with. Ensure it is safely out of reach of children or pets if it’s fragile or made of small pieces.
By following these steps, you can safely and effectively hang a garden suncatcher to beautify your outdoor space.