
Best Zero-Gravity Chairs to Buy in July 2026
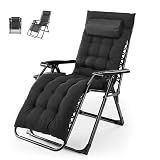
NEWBULIG Zero Gravity Chair, Folding Patio Recliner with Removable Cushion & Cup Holder Trays, Portable Lounge Chair for Beach & Camping, Classic Black
- SUPPORTS 440 LBS: PREMIUM METAL FRAME ENSURES LONG-LASTING DURABILITY.
- ERGONOMIC ZERO GRAVITY: RELIEVES PRESSURE FOR MAXIMUM RELAXATION.
- PORTABLE & FOLDABLE: EASY TO CARRY FOR ANY OUTDOOR ADVENTURE!


NEWBULIG Zero Gravity Chairs Set of 2, Lounge Chair Folding Portable Adjustable Camping Reclining Chairs with Adjustable Pollow, Mesh Back, Cup Holder Trays Lawn Patio Chair for Pool Beach
-
DURABLE ALLOY STEEL FRAME: SUPPORTS 330 LBS FOR LASTING OUTDOOR USE.
-
LIGHTWEIGHT & PORTABLE: EFFORTLESSLY FOLDS FOR EASY TRANSPORT ANYWHERE.
-
CUSTOMIZABLE COMFORT: ADJUSTABLE HEADREST AND ANGLE FOR PERFECT RELAXATION.
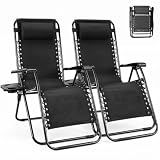
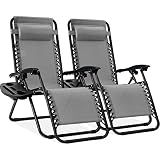
Best Choice Products Set of 2 Adjustable Steel Mesh Zero Gravity Lounge Chair Recliners w/Pillows and Cup Holder Trays - Gray
- ERGONOMIC ZERO-GRAVITY RECLINE ADJUSTS TO YOUR BODY’S WEIGHT.
- LIGHTWEIGHT, FOLDABLE FOR EASY TRANSPORT TO ANY EVENT.
- CONVENIENT TRAY WITH CUP AND DEVICE HOLDERS FOR ULTIMATE COMFORT.
NEWBULIG Zero Gravity Chairs Set of 2, Lounge Chair Folding Portable Adjustable Camping Recliner with Adjustable Pollow, Mesh Back, Cup Holder Trays Lawn Patio Chair for Pool Beach
-
DURABLE DESIGN: SUPPORTS UP TO 330 LBS WITH A ROBUST ALLOY STEEL FRAME.
-
PORTABLE & LIGHTWEIGHT: FOLDS EASILY FOR TRAVEL-PERFECT FOR ANY OUTDOOR ADVENTURE.
-
CUSTOM COMFORT: ADJUSTABLE ANGLES AND HEADRESTS FOR PERSONALIZED RELAXATION.

NEWBULIG Zero Gravity Chair, Folding Patio Recliner with Removable Cushion & Cup Holder Trays, Portable Lounge Chair for Beach & Camping, Classic Grey
-
SUPPORTS 440 LBS: HEAVY-DUTY FRAME ENSURES DURABILITY & LONG-LASTING USE.
-
ERGONOMIC ZERO GRAVITY DESIGN: RELIEVES PRESSURE FOR ULTIMATE RELAXATION.
-
PORTABLE & FOLDABLE: EASY TO CARRY FOR ALL YOUR OUTDOOR ADVENTURES.
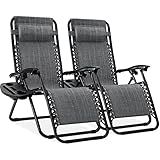
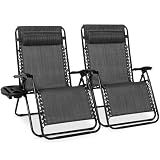
Best Choice Products Set of 2 Adjustable Steel Mesh Zero Gravity Lounge Chair Recliners w/Pillows and Cup Holder Trays - Ice Gray
- EFFORTLESSLY ADJUSTS TO YOUR BODY FOR ULTIMATE COMFORT ANYWHERE.
- LIGHTWEIGHT, FOLDABLE DESIGN PERFECT FOR TRIPS TO THE PARK OR BEACH.
- CONVENIENT TRAY WITH HOLDERS FOR DRINKS AND DEVICES KEEPS YOU RELAXED.
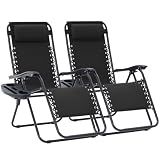
JEAREY Zero Gravity Lounge Chairs Set of 2, Adjustable Steel Mesh Recliners with Pillows and Cup Holder Trays for Patio, Garden, Beach, Black
- EFFORTLESS ADJUSTABILITY: CRADLES YOUR BODY FOR ULTIMATE RELAXATION.
- PORTABLE ENTERTAINMENT: DETACHABLE TRAY FOR DRINKS AND MEDIA ON-THE-GO.
- SPACE-SAVING DESIGN: STACKABLE AND LIGHTWEIGHT FOR EASY TRANSPORT.
Best Choice Products Set of 2 Extra Wide Adjustable Steel Mesh Zero Gravity Lounge Chair Recliners w/Pillows and Cup Holder Trays - Gray
-
SPACIOUS 30 SEAT FOR ULTIMATE RELAXATION ANYWHERE!
-
ADJUSTABLE RECLINE LOCKS FOR PERFECT COMFORT EVERY TIME!
-
DURABLE, WEATHER-RESISTANT DESIGN FOR YEAR-ROUND USE!
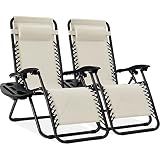
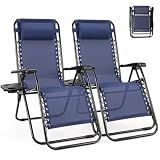
Best Choice Products Set of 2 Adjustable Steel Mesh Zero Gravity Lounge Chair Recliners w/Pillows and Cup Holder Trays - Ivory
- GLIDE INTO ZERO-GRAVITY COMFORT WITH OUR LOCKABLE RECLINING SYSTEM!
- LIGHTWEIGHT, FOLDABLE DESIGN-PERFECT FOR ALL YOUR OUTDOOR ADVENTURES!
- STAY CONNECTED WITH OUR CONVENIENT DETACHABLE TRAY AND CUP HOLDERS!
Zero-gravity chairs are often considered good for relaxing due to their unique design, which is intended to mimic the weightless experience astronauts feel in space. They allow users to recline in such a way that the legs are elevated above the heart, distributing weight more evenly across the body. This position can reduce pressure on the spine, improve circulation, and provide a sense of relaxation and comfort. Additionally, many people find that zero-gravity chairs help alleviate back pain, reduce muscle tension, and promote a feeling of well-being. These benefits make zero-gravity chairs popular for both outdoor and indoor use, offering a comfortable seating option for lounging and unwinding.
What is the weight capacity of a zero-gravity chair?
The weight capacity of zero-gravity chairs can vary depending on the design and materials used by the manufacturer. Typically, most standard zero-gravity chairs have a weight capacity ranging from 250 to 350 pounds (about 113 to 159 kilograms). However, there are heavy-duty models available that can support up to 400 to 500 pounds (approximately 181 to 227 kilograms) or more. Always check the specifications provided by the manufacturer for the specific chair you are considering to ensure it meets your needs.
How do you adjust a zero-gravity chair?
Adjusting a zero-gravity chair typically involves a few simple steps, but the exact process might vary slightly depending on the model and brand. Here’s a general guide:
- Position the Chair: Place the chair on a stable, flat surface. Make sure there is enough space behind and in front of the chair to allow for movement.
- Sit in the Chair: Gently sit down and position yourself comfortably on the chair.
- Adjust the Recline: Most zero-gravity chairs have a reclining mechanism that is controlled either by armrests, a lever, or a shift in your weight: Weight Shift: For some models, gently lean back, using your feet to push and your back to shift your weight until you achieve the desired incline. Armrests/Lever: On other models, you may need to engage a lock or lever mechanism while simultaneously leaning back or pressing the armrests to recline.
- Lock the Position: Once you have reached your preferred position, lock the chair in place if it has a locking mechanism. This is often done using knobs, levers, or clamps usually located under the armrests or on the sides of the chair. Make sure it is securely locked before relaxing.
- Return to Upright Position: When you’re ready to sit upright, unlock the chair (if it was locked) and slowly return to an upright position. You may use similar controls or simply shift your weight forward to assist in returning to a seated position.
Additional Tips:
- Always follow the manufacturer's instructions for your specific chair model.
- Perform adjustments slowly to avoid sudden movements that could be uncomfortable or cause tipping.
- Ensure all components are in good working condition before use.
- If your chair is new, spend some time getting familiar with how it operates and feels as you adjust it.
By following these steps, you should be able to adjust your zero-gravity chair comfortably and safely.
How to troubleshoot common issues with zero-gravity chairs?
Troubleshooting common issues with zero-gravity chairs involves a few basic steps that you can often manage on your own. Here are some common issues and potential solutions:
- Chair Won't Recline or Adjust Properly: Check Locks and Levers: Ensure the locking mechanisms are fully released before trying to adjust the chair. Sometimes the levers or locks can become stiff due to dirt or rust. Lubricate Moving Parts: Use a suitable lubricant on the moving parts to ensure smooth operation. Be sure not to overapply, as this can attract more dirt. Inspect for Obstructions: Check if there are any obstructions in the chair frame or tracks that might be hindering movement.
- Squeaky or Noisy Chair: Tighten Loose Bolts or Screws: Loose components can cause squeaking. Use a screwdriver or wrench to ensure all parts are tightly fastened. Apply Lubricant: Use a lubricant spray on joints and hinges, being careful to wipe away any excess.
- Fabric Issues (Tearing, Sagging, or Stains): Repair Tears: For small tears, consider using a fabric adhesive or patch. Larger issues might require professional repair or replacement of the fabric. Tighten or Adjust Fabric: If the fabric is sagging, inspect the attachment points to see if it can be tightened. Clean Stains: Use a mild soap and water solution or a fabric cleaner appropriate for the chair's material. Spot test in an inconspicuous area first.
- Chair Feels Unstable or Wobbly: Check Ground Surface: Ensure the chair is on a level surface. Unstable surfaces can make the chair feel wobbly. Inspect Frame and Joints: Look for any bent or damaged parts. Tighten all joints, and replace any that are compromised. Examine Connections: Make sure all the connecting pins or hardware are properly inserted and locked in place.
- Difficulty Folding/Unfolding: Review Instructions: Revisit the manufacturer’s instructions to ensure you are folding/unfolding the chair correctly. Clear Obstructions: Ensure no objects or debris are caught in the folding mechanisms. Lubricate Movable Parts: Applying a light lubricant can help in easing the folding/unfolding process.
- Broken Parts: Contact Manufacturer: If a crucial part is broken, reach out to the manufacturer for replacement parts or advice on repair. Consider Professional Repair Services: For significant damage or if unable to source replacement parts, consider professional repair.
- Wear and Tear: Regular Maintenance: Routine maintenance, including cleaning and lubrication, can extend the lifespan of the chair. Replace Worn-Out Parts: Regularly inspect and replace parts such as plastic feet or armrest padding when they show signs of wear.
For any persistent issues or if the chair is still under warranty, contacting the manufacturer or the place of purchase might be the best course of action. They may offer repair services, replacements, or further troubleshooting advice.
How to assemble a zero-gravity chair?
Assembling a zero-gravity chair can vary slightly depending on the brand and model, but the general process is similar across most designs. Here’s a step-by-step guide to help you assemble a typical zero-gravity chair:
- Unpack the Box: Carefully open the box and remove all the parts and pieces. Lay them out on a flat surface and check that you have all the components as per the manual or instructions that came with the chair.
- Identify the Parts: Typically, you’ll have the main frame, the fabric or seating material, armrests, and any additional accessories like a pillow or cup holder. Refer to the instruction manual to familiarize yourself with each component.
- Assemble the Frame: If your chair comes with the frame in multiple sections, like the base and the backrest, connect these parts according to the manufacturer’s instructions. This usually involves sliding, clicking, or snapping parts into place. Ensure that any locking mechanisms are engaged for stability.
- Attach the Fabric: If the fabric is not pre-attached, begin by securing it to the frame. This may involve threading screws through pre-drilled holes, using bolts, or attaching it via clips. Ensure that the fabric is taut but not overly tight, which could cause tearing.
- Install Armrests: If the chair includes detachable armrests, align them with the corresponding slots or anchor points on the frame. Secure them using the provided screws or fasteners, and tighten as needed.
- Add Accessories: Attach any additional accessories such as a headrest or cup holder. These often slide onto the frame or are secured with velcro or straps.
- Test the Mechanism: Before sitting in the chair, test the reclining mechanism. Most zero-gravity chairs feature a locking mechanism that should click into place when adjusted. Ensure all bolts and screws are adequately tightened to avoid instability.
- Final Adjustments: Make any necessary adjustments to ensure comfort and stability. If the chair has a removable pillow, adjust it to your preferred height.
- Safety Check: Double-check all components to ensure they are secure. Verify that the locking mechanism works properly when adjusting the recline angle.
- Enjoy Your Chair: Once everything is set up and checked, you’re ready to use your zero-gravity chair. Enjoy the weightless comfort!
If you encounter any difficulties, refer back to the product manual or contact the manufacturer's customer support for assistance.