
Best Ceiling Fans with LED Lights to Buy in July 2026
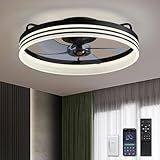
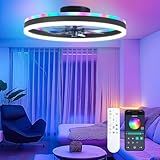
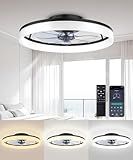
LUDOMIDE Ceiling Fans with Lights, Flush Mount Ceiling Fan with Lights and Remote, 6 Wind Speeds Smart Low Profile Ceiling Fan for Bedroom, Kids Room and Living Room 20" (Black)
- VERSATILE 2-IN-1 DESIGN: SLEEK CEILING FAN WITH DIMMABLE LED LIGHT.
- WHISPER-QUIET OPERATION: ENJOY COOL COMFORT WITHOUT THE NOISE DISRUPTION.
- SMART FEATURES: REMOTE/APP CONTROL, TIMING, AND MEMORY FUNCTIONS!


Amico Ceiling Fans with Lights, 42 inch Low Profile Ceiling fan with Light and Remote Control, Flush Mount, Reversible, 3CCT, Dimmable, Noiseless, Black Ceiling Fan for Bedroom, Indoor/Outdoor Use
-
EFFORTLESS CONTROL: REMOTE WITH 6 SPEEDS & DIMMABLE LIGHT FOR COMFORT.
-
WHISPER-QUIET: DESIGNED FOR PEACEFUL NIGHTS, PERFECT FOR FAMILIES.
-
STYLISH & VERSATILE: AESTHETIC FLUSH MOUNT SUITS ANY INDOOR/OUTDOOR SPACE.
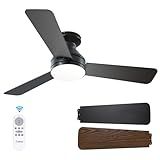
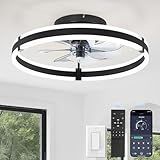
CubiCubi Modern Ceiling Fans, 20 Inch Black Ceiling Fan with Lights and Remote Control, APP, Fandelier with 6 Wind Speeds, Low Profile Ceiling Fans with Lights for Bedroom, Office
- QUICK SETUP IN 15 MINUTES WITH INCLUDED INSTALLATION GUIDE VIDEO.
- CONTROL FAN SPEED AND LIGHT EASILY VIA REMOTE OR MOBILE APP.
- ULTRA-QUIET MOTOR DELIVERS 3400 CFM AIRFLOW FOR YEAR-ROUND COMFORT.
Passky Ceiling Fans with Lights, 52 inch Sleek Ceiling Fan with Light and Remote Control, 3CCT, Dimmable, Reversible, Noiseless, Black Ceiling Fan for Bedroom, Living Room
-
ENERGY-EFFICIENT DESIGN SAVES UP TO 80% ELECTRICITY COMPARED TO PEERS.
-
REMOTE CONTROL OFFERS PERSONALIZED SETTINGS FOR LIGHT AND FAN SPEED.
-
NOISE-FREE OPERATION ENSURES PEACEFUL SLEEP FOR FAMILIES AND LIGHT SLEEPERS.
ORITHAM RGB Ceiling Fans with Lights, 20" Fandelier Low Profile Ceiling Fan with Light, Modern Flush Mount Ceiling Fan Light with Remote/APP Control, Bedroom Chandelier Fan Fixture for Indoor(Black)
-
SLEEK DESIGN & RGB LIGHTING: ELEVATES DECOR WITH CUSTOMIZABLE AMBIANCE.
-
YEAR-ROUND COMFORT: REVERSIBLE MOTOR FOR COOL SUMMERS AND WARM WINTERS.
-
SMART CONTROL CONVENIENCE: EASILY ADJUST SETTINGS VIA REMOTE OR APP.
ZMISHIBO Ceiling Fans with Lights and Remote, 19.7'' Low Profile Ceiling Fan, 3000-6000K Dimmable Modern Flush Mount LED Fan Light, 6 Wind Speeds, Black Fandelier Ceiling Fans for Bedroom
- SAVE ENERGY WITH LED LIGHTS & MEMORY FUNCTION FOR OPTIMAL BRIGHTNESS.
- CONTROL VIA APP OR REMOTE-CUSTOMIZE SETTINGS TO YOUR LIKING!
- QUIET, REVERSIBLE DESIGN ENSURES COMFORT ALL YEAR ROUND.
TCL Ceiling Fans with Lights, 52 Inch Low Profile Ceiling Fan with Light and Remote Control, Flush Mount, DC Reversible Motor, Noiseless, 6 Speeds Ceiling Fan for Bedroom (White)
- CONTROL EVERYTHING WITH EASE USING REMOTE, SPEED, AND COLOR SETTINGS.
- ENJOY CUSTOMIZABLE AMBIANCE WITH DIMMABLE LED LIGHT AND COLOR OPTIONS.
- QUIET, REVERSIBLE MOTOR ENSURES COMFORT YEAR-ROUND IN ANY ROOM.
ZMISHIBO 52 Inch Ceiling Fan with Light, App&Remote Control, Flush Mount Low Profile, Dimmable 20W LED Light, Quiet Reversible Motor for Bedroom, Living Room, Apartment, Black
-
PERFECT FOR ANY ROOM: 52 FAN WITH BRIGHT 20W LIGHT & STRONG AIRFLOW.
-
SMART CONTROL: REMOTE, APP, DIMMABLE LIGHT & COLOR SETTINGS INCLUDED!
-
WHISPER-QUIET: ENJOY POWERFUL AIRFLOW WITHOUT NOISY DISRUPTIONS!
AQUBT Ceiling Fans with Lights and Remote, 20" Modern Low Profile Ceiling Fan with Light, Stepless Color Temperature Change and 6 Speeds for Bedroom, Kids Room and Living Room (Black)
- CONTROL FANS & LIGHTS VIA 2.4G REMOTE OR CONVENIENT MOBILE APP.
- STEPLESS DIMMING WITH 3 LIGHT MODES FROM WARM TO BRIGHT WHITE.
- SILENT OPERATION WITH 6 SPEED SETTINGS FOR ULTIMATE COMFORT.
Ceiling fans with LED lights can be dimmable, but it often depends on the specific model and the type of LED lights used. Many modern ceiling fans come equipped with LED lights that are designed to be dimmable, allowing users to adjust the brightness to their preference. However, to dim these lights effectively, the fan typically needs to be paired with a compatible dimmer switch or a remote control that supports dimming functions. It's important to ensure that both the LED bulbs and the dimmer switch are designed to work together, as not all LED lights are inherently dimmable, and not all dimmer switches are designed for use with LED lights. When purchasing a ceiling fan with LED lights, it's a good idea to check the manufacturer's specifications or product description to confirm whether the lights are dimmable and to find out what additional equipment, such as specific switches or controllers, might be needed to use the dimming feature.
What is the role of a capacitor in a ceiling fan with LED lights?
In a ceiling fan with LED lights, the capacitor primarily serves the following roles:
- Motor Starting and Running: The primary function of the capacitor in a ceiling fan is to help start and run the motor efficiently. Typically, ceiling fans use single-phase induction motors, which require a phase shift to create a rotating magnetic field. The capacitor provides this phase shift, allowing the motor to start and run smoothly. Without the capacitor, the fan's motor might struggle to start or operate inefficiently.
- Speed Regulation: The capacitor also plays a role in regulating the speeds of the fan. By altering the capacitance, it's possible to change the motor's torque and, consequently, the fan's speed. This is particularly useful in multi-speed fans where different capacitance values correspond to different speed settings.
- Power Factor Correction: In some cases, the capacitor can help with power factor correction. This means it helps reduce the reactive power, improving the overall power efficiency of the fan’s motor.
For the LED lights in the ceiling fan, the capacitor doesn't play a direct role. The LED lights have separate circuits and components (such as drivers) that manage their operation, which include functions like rectification, voltage regulation, and ensuring consistent light output.
Overall, the capacitor is crucial for the optimal functioning of the fan motor, ensuring efficient performance and longevity of the ceiling fan.
How to program a remote control for a ceiling fan with LED lights?
Programming a remote control for a ceiling fan with LED lights can differ slightly depending on the brand and model of the fan and the remote. However, here's a general guide to help you with the process:
Initial Setup
- Turn off Power: Ensure the power is turned off at the circuit breaker to avoid any electrical issues during the setup process.
- Installation: Make sure the ceiling fan and the LED lights are installed correctly if you haven't done that already. Ensure all connections are secure.
- Check Battery: Install or check the batteries in your remote control. Most remotes use AAA or AA batteries.
Programming the Remote
- Power On: Restore power by turning the circuit breaker back on.
- Identify Controls: Familiarize yourself with the remote control buttons, typically including power, light, fan speed settings, and a reverse direction button if applicable.
- Pairing Mode: Find the Pairing Button: Some remotes have a specific button or a combination of buttons to initiate pairing. Check your fan’s manual if you aren't sure. Press to Pair: Generally, you will need to press and hold the pairing button (or a combination such as "Fan Off" for a few seconds) until the fan's light blinks or you hear a beep indicating it's in pairing mode.
- Synchronize Frequency (If Needed): Some fans use DIP switches to set a frequency on the receiver and remote. If this is the case, make sure the settings on the remote match those on the fan’s receiver.
- Test the Remote: Fan Operation: Test the fan speeds, turning it on and off, and reversing the direction if applicable. Light Operation: Toggle the LED lights on and off and, if possible, adjust brightness.
Troubleshooting
- No Response: Ensure the remote has fresh batteries and is within range.
- Re-pairing Issues: Try resetting by turning off the power to the fan for a few minutes before attempting to pair again.
- Consult the Manual: If issues persist, refer to the specific user manual for troubleshooting tips or additional instructions tailored to your fan model.
Optional Features
- Dimming LED Lights: Some remotes allow you to control the brightness of the LED lights. Check the manual for instructions if this is available.
- Smart Features: If your fan supports smart connectivity, you may need to connect it to a smart home system for app-based controls.
If you encounter specific issues with your model, the manufacturer’s customer support or your product manual can often provide detailed support.
What is the cost difference between dimmable and non-dimmable LED ceiling fans?
The cost difference between dimmable and non-dimmable LED ceiling fans can vary based on several factors, including the brand, model, features, and retailer. Generally, dimmable LED ceiling fans may be slightly more expensive than non-dimmable ones due to the additional technology and components required for dimming functionality. On average, you might expect the price difference to be in the range of $20 to $50, although this can vary more widely.
Several factors can influence the price difference:
- Brand and Quality: High-end brands or models with superior build quality and additional features might have a larger cost difference.
- Size and Design: The overall size and design of the fan can affect the price. Larger or more decorative fans might carry a higher premium for the dimmable feature.
- Retailer and Location: Prices can vary depending on where you purchase the fan. Online retailers often offer competitive prices compared to physical stores.
- Sales and Discounts: Special promotions or sales events can reduce the cost difference, making dimmable options more accessible.
To get an accurate idea of current prices, it's best to compare specific models from a few retailers, keeping in mind the features and attributes that are most important to you.
How to troubleshoot a ceiling fan LED light that won't dim?
Troubleshooting a ceiling fan LED light that won't dim can involve several steps. Here's a structured approach to help you identify and resolve the issue:
- Verify Compatibility: Ensure the LED bulbs you are using are dimmable. Not all LED bulbs are designed to be dimmed. Check the packaging or specifications of the bulb. Confirm that the dimmer switch is compatible with LED bulbs. Some older dimmers are designed for incandescent bulbs and may not work properly with LEDs.
- Inspect the Dimmer Switch: Check if the dimmer switch is functioning by replacing it temporarily with a standard switch to see if the problem persists. Ensure that the dimmer switch is properly installed and that there are no loose connections or wiring issues.
- Examine the Ceiling Fan Wiring: Turn off the power at the circuit breaker before examining any wiring. Look for loose connections or damaged wires in the housing of the ceiling fan.
- Reset the Ceiling Fan: Sometimes resetting the ceiling fan can help. Turn off the power for a few minutes and then turn it back on.
- Check for Interference: Ensure there is no interference from other remote-controlled devices in the vicinity. If the fan light is controlled by a remote, try changing the frequency/channel if possible.
- Replace the LED Bulb: Try replacing the LED bulb with another dimmable bulb to see if the issue is with the bulb itself.
- Check for Firmware Updates: If your ceiling fan is a smart device, check if there are any firmware updates available that could resolve the dimming issue.
- Consult the User Manual: Refer to the ceiling fan and dimmer switch user manuals for any specific troubleshooting steps or customer support contact information.
- Seek Professional Help: If you are not comfortable working with electrical fixtures, it's best to call a licensed electrician to diagnose and fix the issue safely.
By following these steps, you should be able to identify and possibly resolve the issue with your ceiling fan LED light not dimming correctly.
How to replace LED lights in a ceiling fan?
Replacing LED lights in a ceiling fan is generally a straightforward process, but it can vary slightly depending on your fan model. Here are the general steps to guide you through the process:
- Turn Off the Power: Before you start, ensure the fan and light are turned off at the wall switch. For added safety, you can also turn off the power at the circuit breaker.
- Remove the Light Cover/Fixture: Depending on your fan model, the light cover might twist off, pop off, or be held in place by screws. Twist or unscrew the cover gently to avoid breaking it.
- Remove the Old LED Bulbs: Once the cover is off, you'll see the LED bulbs. They may be screwed in like traditional bulbs or have a pin connection. If screwed in, twist them out counterclockwise. If they have pins, gently pull them straight out.
- Select the Appropriate Replacement Bulbs: Make sure your replacement LEDs are compatible with your ceiling fan. Check the bulb type, size, wattage, and base type (like E26, GU10, etc.).
- Install the New LED Bulbs: Insert the new LED bulbs by screwing or plugging them in, depending on the connection type. Be gentle to avoid damaging the bulb or socket.
- Replace the Light Cover/Fixture: Once the new bulbs are secure, reattach the light cover by twisting or screwing it back into place. Ensure it is firmly in place to prevent it from falling.
- Restore Power: Turn the power back on at the circuit breaker and wall switch. Test the new bulbs to ensure they're working properly.
- Safety Precautions: Ensure your hands are dry when handling electrical components. Avoid touching the surface of the new bulbs with your bare hands, as oils can reduce their lifespan.
If you encounter any issues, consult the ceiling fan’s user manual or consider contacting a professional electrician, especially if you're uncomfortable working with electrical components.
How to wire a dimmer switch for a ceiling fan with LED lights?
Wiring a dimmer switch for a ceiling fan with LED lights can enhance the ambiance and functionality of your room, but it's essential to ensure compatibility and safety in the process. Here’s a step-by-step guide on how to do it:
Important Considerations
- Compatibility: Before starting, ensure that the dimmer switch is compatible with both LED lights and ceiling fans. Not all dimmer switches can handle the variable load of a fan motor and may cause buzzing or fan malfunctioning.
- Safety: Turn off the power at the circuit breaker before working with electrical wiring to prevent electric shock.
- Tools and Materials Needed: Compatible dimmer switch (designed for LED lights and ceiling fans) Voltage tester Screwdrivers (flathead and Phillips) Wire strippers Wire connectors (wire nuts) Electrical tape
Steps to Wire the Dimmer Switch
- Turn Off Power: Locate the circuit breaker that controls the ceiling fan and switch and turn it off. Use a voltage tester to confirm that the power is off.
- Remove the Existing Switch: Unscrew the wall plate and remove it. Gently pull the existing switch out of the wall box. Use the voltage tester again to ensure no voltage is present. Disconnect the wires from the old switch. Typically, there are two wires plus a ground.
- Prepare the Wires: Depending on the type of dimmer switch, you may need to trim the wires to an appropriate length or strip them slightly to expose enough copper for a secure connection.
- Connect the Dimmer Switch: Ground Wire: Connect the green or bare copper ground wire from the dimmer switch to the ground wire in the wall box. Secure with a wire nut. Load Wire: Typically black, connect the load wire from the dimmer switch to the wire leading to the ceiling fan/light. Secure with a wire nut. Line/Hot Wire: Connect the hot wire (usually black or red from the wall) to the other black wire on the dimmer switch. Secure with a wire nut.
- Install the Dimmer Switch: Carefully fold the wires back into the wall box. Fix the dimmer switch into the wall box using the screws provided. Attach the wall plate.
- Final Checks and Testing: Turn the power back on at the circuit breaker. Test the dimmer switch to ensure it controls both the fan speed and the brightness as expected. Adjust settings if necessary.
- Troubleshooting: If the switch doesn’t work, double-check wire connections and ensure the dimmer is properly installed. If there's buzzing, the dimmer might not be fully compatible with the fan motor. Consider using separate switches for the fan and light for optimal performance.
Additional Tips
- Separate Controls: Ideally, have separate dimmer controls for the fan and the lights, which may require additional wiring or using a dual dimmer switch.
- Professional Help: If you are not comfortable with electrical work, it's always a good idea to hire a licensed electrician.
By being cautious and following the steps above, you can safely install a dimmer switch for your ceiling fan with LED lights. Always prioritize safety and compatibility to ensure the best results.